Service Electrical
Remember While Reading
While reading this Operator's Manual, remember that:

|
Indicates a potential hazard that, if not avoided, could result in serious injury or death.
|
Battery Statement
WARNING: Battery posts, terminals and related accessories contain lead and lead components, chemicals known to the State of California to cause cancer and reproductive harm. Wash hands after handling.
Service the Battery Safely
|
Battery electrolyte contains sulfuric acid. It is poisonous and can cause serious burns:
· Wear eye protection and gloves.
· If electrolyte is swallowed, get medical attention immediately.
· If electrolyte is splashed into eyes, flush immediately with water for 15-30 minutes and get medical attention.
· If electrolyte is splashed onto skin, flush immediately with water and get medical attention if necessary.
The battery produces a flammable and explosive gas. The battery may explode:
· Do not smoke near battery.
· Wear eye protection and gloves.
· Do not allow direct metal contact across battery posts.
· Remove negative cable first when disconnecting.
· Install negative cable last when connecting.
|
Cleaning Battery and Terminals
1. Park machine safely. (See Parking Safely in the SAFETY section.)
2. Remove battery.
3. Wash battery with solution of four tablespoons of baking soda to one gallon of water. Be careful not to get the soda solution into the cells.
4. Rinse the battery with plain water and dry.
5. Clean terminals and battery cable ends with wire brush until bright.
6. Apply petroleum jelly or silicone spray to terminal to prevent corrosion.
7. Install battery.
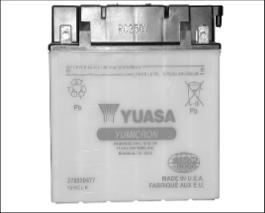
Battery Removal
|
Always respect this order for disassembly; disconnect BLACK (-) cable first. Electrolyte or fuel vapors can be present in engine compartment and a spark may ignite them and possibly cause personal injuries
|
1. Disconnect BLACK (-) cable first then RED (+) cable.
2. Remove the holding straps.
3. Pull out vent tube from frame.
|
Battery electrolyte is a caustic substance that burns or destroys organic tissues by chemical action. Avoid contact with eyes, skin and clothing. Wear protective eyeglasses and a suitable pair of non-absorbent gloves when removing the battery by hand. Should any electrolyte spillage occur, immediately wash off with a solution of baking soda and water.
|
4. Remove battery from vehicle being careful not to tilt it so that electrolyte flows out of vent tube.
Refilling
1. Place battery on a level surface.
V00G02Y2
2. Unscrew caps and add distilled water up to upper mark as required. Do not overfill.
3. Properly retighten caps.
Installation
|
Connect RED (+) cable first then BLACK (-) cable. Always connect RED (+) cable first.
|
NOTE: Place the RED (+) cable between holding straps and battery.
Reinstall battery in vehicle. Fasten battery and make sure to reinstall the vent tube.
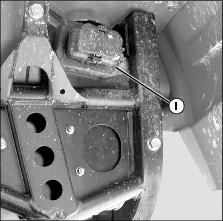
Fuses
IMPORTANT: Avoid damage! Do not use a higher rated fuse as this can cause severe damage.
|
NOTE: If a fuse is damaged, replace it by one of the same rating.
V04G1KY2
1. The fuse holder (I) is located at the rear of the vehicle, on left side, under rear fender.
V00G01Y2
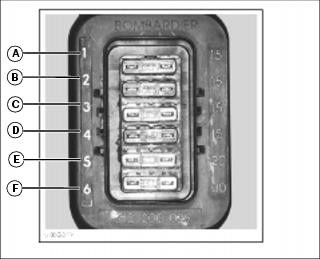
Picture Note: Trail Buck Series
A - Spare
B - Spare
C - Accessories (power outlet and auxiliary supply)
D - Fan
E - Main
F - Charging System
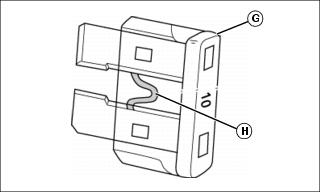
2. Fuses are identified by a number located beside the fuse.
A15E0KY3
3. To remove fuse (G) from holder, remove the fuse holder cover then pull fuse out. Check if filament (H) is melted.
Bulb Replacement
|
Halogen light bulb contains gas under pressure. The bulb may shatter if the glass is scratched or dropped. Wear eye protection and handle bulb with care when replacing.
|
NOTE: Always check light operation after replacement.
Head lamps
IMPORTANT: Avoid damage! Never touch glass portion of an halogen bulb with bare fingers, it shortens its operating life. If glass is touched, clean it with isopropyl alcohol which will not leave a film on the bulb.
|
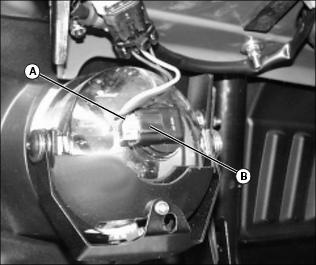
MX30905
1. Unplug connector (A) from head lamp.
2. Rotate the bulb socket (B) counterclockwise then remove head lamp bulb.
3. Properly reinstall removed parts in the reverse order of their removal.
4. Adjust beam aiming as follows:
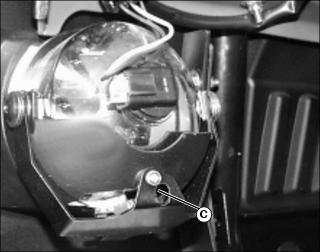
MX30905
5. Insert screwdriver into hole (C) and turn adjustment screw.
· Turn clockwise to raise beam
· Turn counterclockwise to lower beam
Taillight
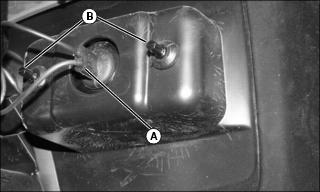
MX30906
1. Turn socket (A) counterclockwise to expose bulb.
2. Push bulb in and hold while turning counterclockwise to release.
3. Install the new bulb by first pushing in while turning clockwise.
4. Remove the taillight casing by pushing outward on the two studs (B). The taillight casing can be removed.
Indicator Light (If so equipped)
If one LED is burnt in the indicator light cluster, see an authorized John Deere UATV dealer for replacement of the light cluster.
Speedometer
The speedometer is lighted with LEDs. If one LED burns out, replace the speedometer. The LEDs are not available separately.
While reading this Operator's Manual, remember that:
|
Indicates a potential hazard that, if not avoided, could result in serious injury or death.
|
|