
Service Miscellaneous
Remember While Reading
While reading this Operator's Manual, remember that:
Drive Shaft Boot/Protector
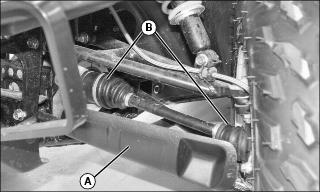
Visually inspect drive shaft protectors (A) and boot (B) conditions. Check protectors for damage or rubbing against shafts. Check boots for cracks, tears, leaking grease etc. Repair or replace damaged parts as necessary.
Wheel
Occasionally, wheel nuts should be removed to apply anti-seize lubricant on studs to ease further removal. This is particularly important when vehicle is used in salt-water environment or in mud. Remove one nut at a time, lubricate then torque.
Wheel Bearing Condition
Push and pull the wheels from the upper edge to feel the play. See an authorized John Deere UATV dealer if there is any play.
Tires and Wheels
Tire Pressure
Check pressure when tires are "cold" before using the vehicle. Tire pressure changes with temperature and altitude. Recheck pressure if one of these conditions has changed.
For your convenience, a pressure gauge is supplied in tool kit.
Although the tires are specifically designed for off-road use, a flat may still occur. Therefore, it is recommended to carry a tire pump and a repair kit.
Tire/Wheel Condition
Check tire for damage and wear. Replace if necessary.
Do not rotate tires. The front and rear tires are a different size. The tires are directional and their rotation must be kept in a specific direction for proper operation.
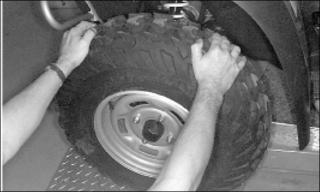
Wheel Removal
Loosen nuts then lift vehicle. Place a support under vehicle. Remove nuts then remove wheel.
IMPORTANT: Avoid damage! Always use the recommended wheel nuts. Using a different nut could cause damages to the rim. |

At installation, it is recommended to apply anti-seize lubricant on threads. Gently tighten nuts (A) in a criss-cross sequence then apply a final torque of 75 N·m (55 lb-ft).
Rear Shock Adjustment
Preload Adjustment
Adjust spring preload by turning adjusting cam accordingly with the adjusting wrench in vehicle tool box.

Turn the adjusting cams (A) clockwise for a firmer ride (B) and rough terrain or when carrying cargo or pulling a trailer.
Turn the adjusting cams counterclockwise for a light load and a smooth (C) terrain.
Skid Plate Condition
Check tightness of fasteners and condition of plate for cracks or other damage. Properly retighten fasteners as necessary and have skid plate replaced if damaged.
Hitch/Trailer Ball Condition
Check tightness of fasteners and tightness/condition of trailer ball. Properly retighten as necessary and replace ball if worn.
Fasteners
Check fastener condition and tightness on the vehicle. Retighten as required.
Seat Latch
Remove seat and check the locking mechanism and its pin for wear. See an authorized John Deere UATV dealer for parts replacement if damaged.
Front Storage Compartment Latch
Check latch condition. See an authorized John Deere UATV dealer for parts replacement if damaged.
Vehicle Cleaning and Protection
Never use a high pressure washer to clean the vehicle use low pressure only (like a garden hose). High pressure can cause electrical or mechanical damages.
Painted parts which are damaged should be properly repainted to prevent rust.
When required, wash the body with hot water and soap (only use mild detergent). Apply non-abrasive wax.
Winch (If Equipped)
No lubrication is required for the life of the winch.
Check battery cables at 90 day intervals to be certain that they are clean and tight at all connections.
Inspect the wire rope before and after each winching operation. Replace winch rope when damage.
NOTE: This manual should be kept in the tool box and remain with the vehicle at all time.
Replacing the Wire Rope
1. Park machine safely. (See Parking Safely in the SAFETY section.)
2. Spool off entire length of wire rope. Turn vehicle key switch to stop position.

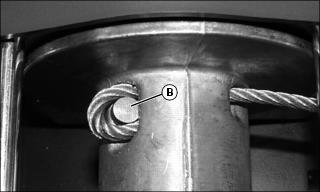
3. Manually rotate drum until cable opening appears at top side. Remove end of wire rope (A) from drum. Discard the wire rope and cable stop (B).

4. Route end of new wire rope through fairlead opening and between carrier plate and bottom side of drum (C). Insert end of rope into small opening (D) and through the drum.
5. Insert end of rope as far as possible into large opening (E) to form a loop.
6. Install new cable stop (B) in loop and pull cable tight. Tap end of cable lightly with wood dowel to seat wire rope and cable stop in drum.
7. Maintain tension on cable and manually rotate drum toward rear of winch to obtain five complete wraps.
8. Stretch wire rope properly before operating.
Stretching the Wire Rope
IMPORTANT: Avoid damage! New wire rope will bind and become damaged if not properly stretched before use. Stretch the wire rope under a minimum 227 kg (500 lb) load. |
1. Center vehicle approximately 15 m (50 ft) from a minimum 227 kg (500 lb) load. Do not exceed winch load capacity.
2. Park machine safely. (See Parking Safely in the SAFETY section.)
3. Spool out entire length of wire rope, leaving five wraps on the drum. Move vehicle closer to load if necessary.
4. Prepare the rigging for a single line pull.
6. Place transmission in park.
7. Make sure park brake is locked.
8. Leave engine run to avoid draining battery.
9. Spool in the load to stretch the wire rope and create a tight wrap on the drum. Stop winching when hook is 1.2 m (4 ft) from roller fairlead.
10. Spool out enough slack to disconnect hook.
11. Install hook strap to hook and spool in all wire rope.
12. Turn key switch to stop position.
13. Store hook strap in a secure location.
Rear Cargo Box
Buck EXT
Check release lever and its mechanism for bend, cracks or other damages.
Lift up rear cargo box and check latches mechanism and pins for wear.
Check gate latches condition. See an authorized John Deere UATV dealer for parts replacement if damaged.