
Service Engine
Remember While Reading
While reading this Operator's Manual, remember that:
Engine Warranty Maintenance Statement
Maintenance, repair, or replacement of the emission control devices and systems on this engine, which are being done at the customers expense, may be performed by any non -road engine repair establishment or individual. Warranty repairs must be performed by an authorized John Deere dealer.
Avoid Fumes
Fuel
Recommended Fuel:
NOTE: In most service stations, pump octane number corresponds to (R + M)/2 octane number. Usually a sticker can be found on the pump.
Use regular unleaded gasoline or gasohol containing less than 10% of ethanol or methanol, available from most service stations. The gasoline used must have an octane number of 87 ((R + M)/2) or higher.
Body/Frame
Engine Compartment
Check engine compartment for any damage and leaks. Ensure all hose clamps are properly secured and no hose is cracked, kinked or otherwise damaged.
Inspect muffler, battery and reservoir fastening devices. Check electrical connections for corrosion and tightness.
Replace or have damaged parts repaired.
Engine/ Transmission Oil
Use 4-stroke mineral-based engine oil that meets or exceeds the requirements for API service classification SG, SH or SJ. Always check the API service label on the oil container to be sure it includes the letters SG, SH or SJ. Only use high-quality high-detergent oil.
Oil Viscosity
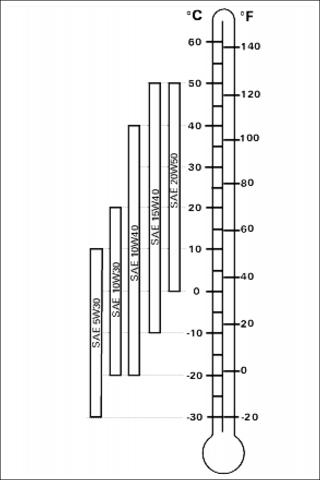
SAE 10W40 is recommended for summer time while SAE 5W30 is recommended for winter time.
Other viscosity should be used if the average temperature is outside the range of the recommended oil. See chart below.
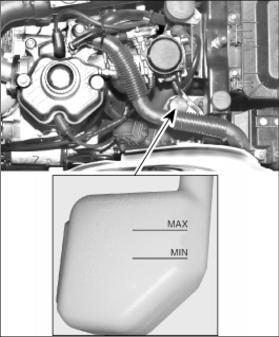
Oil Level
With vehicle on a level surface and engine cold, not running, check the oil level as follows:

Picture Note: Buck Series - LH Side of Engine
1. Remove the dipstick (A) and wipe clean.
2. Reinstall dipstick. The dipstick must be inserted properly and completely.
3. Remove the dipstick again and check oil level. It should be near or equal with the upper mark (B).
NOTE: Use a funnel to avoid spillage.
4. To add oil unscrew filler cap (C). Add a small amount of oil and recheck oil level. Repeat until oil level reaches the dipstick's upper mark. Do not overfill.
5. Properly install the dipstick and/or tighten filler cap then reinstall seat.
Oil Change and Oil Filter Replacement
NOTE: Oil and filter are to be changed at the same time. Oil change should be done with a warm engine.
1. Ensure vehicle is on a level surface.
4. Place a drain pan under the engine drain plug area.
6. Allow enough time for oil to flow out of oil filter.
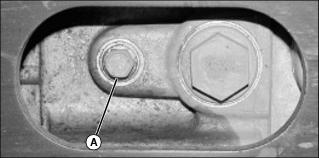
Oil Filter Removal
1. Carefully unscrew oil filter and as soon as it can be removed from the engine, turn it upright. Discard filter.
NOTE: Be sure that the old filter O-ring is removed.
2. Lubricate the O-ring on the filter with engine oil. Install the new filter then screw one full turn after O-ring contact.
3. Wipe out any oil spillage on engine.
NOTE: Do not clean oil strainer every time you change the oil and filter. It is only necessary to clean the oil strainer every 200 hours.
5. Remove oil strainer cover (A) and oil collector, located near oil drain plug (B), then clean oil strainer.
6. Clean oil strainer, using a solvent then dry with compressed air. Install strainer.
7. Change gasket on drain plug. Clean gasket area on engine and drain plug then reinstall plug. Refill engine at the proper level with the recommended oil. Refer to SPECIFICATIONS for capacity.
8. Start engine and let idle for a few minutes. Ensure oil filter area and drain plug areas are not leaking.
9. Stop engine. Wait a while to allow oil to flow down to crankcase then check oil level. Refill as necessary.
10. Dispose of oil as per your local environmental regulations.
Engine Coolant
Always use ethylene-glycol antifreeze containing corrosion inhibitors specifically for internal combustion aluminum engines.
Cooling system must be filled with John Deere premixed coolant or with distilled water and antifreeze solution (50% water, 50% antifreeze).
Coolant Level
IMPORTANT: Avoid damage! Check coolant level with engine cold. Never add coolant in cooling system when engine is hot. |
NOTE: When checking level at temperature lower than 20°C (68°F), it may be slightly lower than MIN. mark.
With vehicle on a level surface, liquid should be between MIN. and MAX. level marks of coolant reservoir.
Add coolant up to MAX. mark if required. Use a funnel to avoid spillage. Do not overfill.
Properly reinstall and tighten filler cap and reinstall seat.
If the coolant is added in the coolant reservoir, check the level in the radiator too. Add coolant if necessary.
NOTE: A cooling system that frequently requires coolant is the indication of leaks or engine problems. See an authorized John Deere UATV dealer.
Coolant Replacement
To avoid burning yourself, do not remove the radiator cap or loosen the engine drain plug if the engine is hot. |
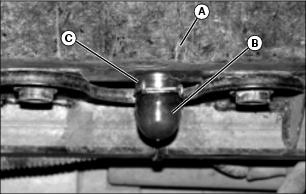
1. Turn the radiator cap counterclockwise and remove it.
2. Unscrew the bleed screw on the top of thermostat housing.
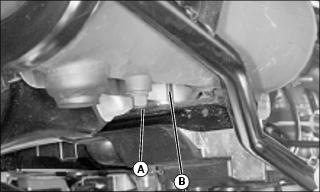
3. Remove drain plug under engine and drain the system completely. Reinstall the drain plug (A).
NOTE: Lift the rear of vehicle, about 75 mm (3 in.).
4. Pinch hose between radiator and thermostat housing with a large hose pincher (B).
5. Fill the radiator until the coolant comes out by the thermostat housing hole. Install the bleed screw then remove the hose pincher.
6. Complete the radiator filling.
7. Check the level in the coolant reservoir and refill if necessary.
8. Run engine at idle with the radiator cap off. Slowly add additional coolant if necessary.
9. At this point, wait until engine reaches normal operating temperature. Depress the throttle lever two or three times; then add coolant if required.
10. Install radiator cap. Inspect all connections for leaks and check coolant level in the reservoir.
Valve Adjustment
Valve adjustment isn't required on this engine.
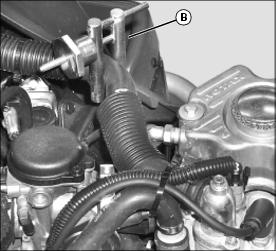
Spark Arrester
NOTE: The muffler must be periodically purged of accumulated carbon.
1. Select a well-ventilated area and make sure the muffler is cool.
2. Place transmission on PARK position.
3. Remove the clean-out plug (A) from muffler (B).
4. Block the end of muffler with a shop rag and start engine.
5. Momentarily increase engine RPM several times to purge accumulated carbon out of the muffler.
6. Stop engine and allow muffler to cool.
7. Reinstall the clean-out plug.
Radiator
NOTE: On Buck EXT, there are no air ducts.
Periodically check the radiator area and the air ducts for cleanliness. Ensure air ducts are unobstructed to allow air flow going to the radiator.
Buck Series Except Buck EXT
NOTE: An access hole is available to inspect the radiator condition and to give access for cleaning.
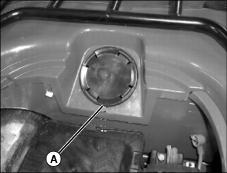
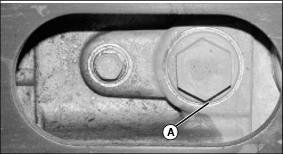
2. Pull on the circumference of the access plug (A) and remove plug.
Buck EXT
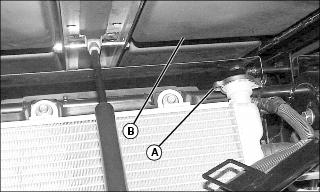
To reach the radiator (A), lift the rear cargo box (B).
Buck Series
1. Inspect radiator fins. They must be clean, free of mud, dirt, leaves and any other deposit that would prevent the radiator from cooling properly.
2. Remove as much deposits as you can with your hands. If water is available in proximity, try rinsing the radiator fins.
3. If available, use a garden hose to rinse the radiator fins.
4. Properly reinstall access plug and seat.
Carburetor
See an authorized John Deere UATV dealer each year to verify and clean the fuel system.
Air Intake System
Air Filter Cleaning/Draining
NOTE: If vehicle is used in dusty area, inspect more frequently than specified in maintenance chart.
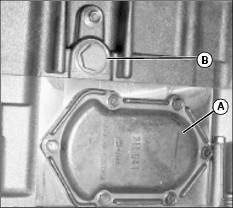
1. Periodically inspect air filter box drain (A) tube for liquid or deposits.
2. If liquid/deposits are found, squeeze (B) and remove the clamp (C). Pull drain tube out and empty it.
3. When liquid/deposits are found, the air filter must be inspected/dried/replaced depending on its condition.
4. Remove air filter as explained below.
Air Filter Removal
NOTE: On EXT, lift the rear cargo box to have access to the air filter box.
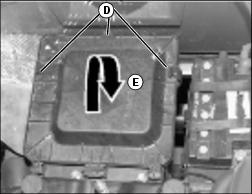
2. Release clamps (D) and remove air filter box cover (E).
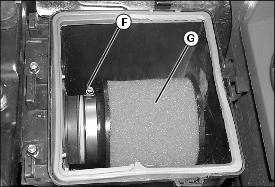
3. Loosen clamp (F) and remove air filter (G).
4. Clean air filter with a solution of dish soap and warm water.
5. Rinse the filter with warm water until all cleaning solution disappears.
NOTE: If the air filter foam is still dirty, replace it with a new one.
7. Allow the filter dry completely.
8. When the filter is dried, apply a few drops of air filter oil. Use a clean rag to squeeze the foam filter and evenly distribute the oil throughout the filter.
Air Filter Installation
Properly reinstall removed parts in the reverse order of their removal.
Throttle Lever Adjustment
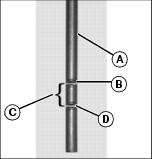
1. Slide rubber protector back to expose throttle cable adjuster.
NOTE: Measure throttle free play at the tip of throttle lever.
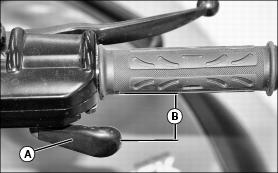
B - 3 to 6 mm (1/8 to 7/32 in.)
2. Loosen lock nut then turn the adjuster to obtain correct throttle lever free play.
3. Tighten lock nut and reinstall protector.
4. With the transmission lever on PARK position, start the engine. Check if the throttle cable is adjusted correctly by turning handlebar fully right then fully left. If the engine RPM increases, readjust the throttle lever free play.