
Operating
Daily Operating Checklist
o Check snow blade for loose fasteners.
Controls

Operating
IMPORTANT: Avoid damage! This blade is designed to move new loose snow in depths up to 6 inches. Blade is not intended to move gravel or dirt. |
Operate blade at slow travel speed.
Operate engine at full throttle for best performance, control ground speed using foot controls.
Put Blade On An Angle:
· When clearing material to side.
· To decrease amount of power required to move material.
· To decrease rear wheel slippage.
Use Blade In Straight-Across Position:
· To move material straight ahead.
After You Are Finished Using Blade:
· Park machine on hard, level surface.
· Put blocks of wood under blade.
· Remove snow from snow blade and push channel assembly.
Raising and Lowering Snow Blade

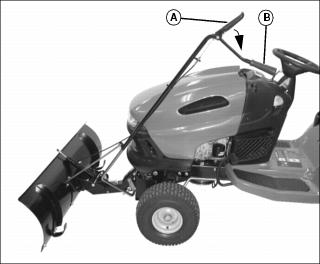
To raise snow blade: Pull lift handle tube (A) back and push down.
To lower snow blade: Pull lift handle tube (A) back and pull up.
Adjusting Blade Angle
2. Push release grip (A) against lift handle tube (B) and hold.
3. Push forward on lift handle tube to angle blade to right, or pull back to angle blade to left.
4. Release release grip to lock in position.
Adjusting Skid Shoes
When clearing snow on smooth surfaces, skid shoes should be approximately 1/4 in. (6 mm) above ground.
When clearing snow on uneven surfaces, height above ground should be based on unevenness of surface.
1. Park machine on a level surface.
3. Place a block of wood under each end of blade.
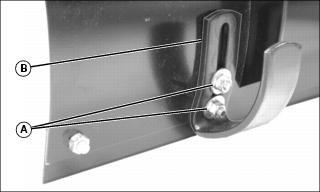
5. Loosen nuts (A) and adjust skid shoes (B) as required. Tighten nuts.
Adjusting Trip Spring
Trip spring tension may be adjusted to allow snow blade to tilt forward and bypass small obstructions.
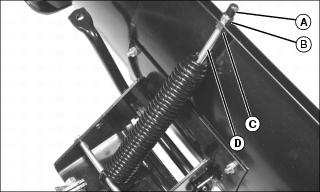
1. Remove plastic cap (A) and loosen 3/8 in. nut (B).
2. Turn 3/8 in. nut (C) to adjust tension.
· Decrease length of threads (D) between trip spring and snow blade to increase tension.
· Increase length of threads (D) between trip spring and snow blade to decrease tension.
3. Tighten 3/8 in. nut (B) and replace plastic cap (A).
Adjusting Control Cable
If angle lock bars do not engage or disengage slots in pivot plate, control cable adjustment may be required.
NOTE: Control cable can be adjusted at cable mount bracket on lift handle tube or on angle lock bars using same procedure.
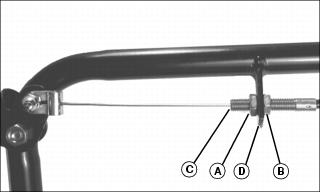
1. Loosen 5/16 in. jam nut (A).
2. Turn 5/16 in. jam nut (B) to adjust control cable.
· Decrease length of threads (C) protruding from cable mount bracket (D) to increase travel of lock release bars.
· Increase length of threads (C) protruding from cable mount bracket (D) to decrease travel of lock release bars.