
Service
Adjusting Carburetor
NOTE: Carburetor is calibrated by the engine manufacturer and should not require any adjustments.
If engine is operated at altitudes above 1829 m (6,000 ft), some carburetors may require a special high altitude main jet. See your John Deere dealer.
If engine is hard to start or runs rough, check the Troubleshooting section of this manual.
After performing the checks in the troubleshooting section and your engine is still not performing correctly, contact your John Deere dealer.
Avoid Fumes
Engine Oil
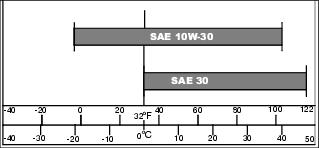
Use oil viscosity based on the expected air temperature range during the period between oil changes.
The following John Deere oils are preferred:
The following John Deere oils are also recommended, based on their specified temperature range:
Other oils may be used if above John Deere oils are not available, provided they meet the following specification:
• API Service Classification SJ or higher
Checking Engine Oil
1. Park machine safely. (See Parking Safely in the Safety Section.)

2. Clean area around dipstick (A).
3. Remove dipstick and wipe clean.
4. Install and tighten dipstick.
6. Check oil level on dipstick. Oil must be between ADD and FULL marks.
7. If oil level is low, add oil to bring oil level no higher than FULL mark on dipstick. Do not overfill.
8. Install and tighten dipstick.
Changing Engine Oil
NOTE: Be sure the fuel tank is at least half empty before changing the oil. Change oil after mowing or run the engine briefly to lower the fuel in the tank to the appropriate level.
1. Run engine for at least five minutes to warm up oil.
2. Stop engine and disconnect spark plug wire.
4. Place a drain pan on the left side of the mower.
5. Turn mower onto its left side so the fuel tank opening is at the highest point.
6. Drain engine oil from the dipstick filler tube location into the drain pan.
7. After oil has drained, return mower to an upright position and clean around dipstick filler tube.
IMPORTANT: Avoid damage! Do not overfill. Overfilling can cause smoking, hard starting, fouling of spark plug, and oil saturation of air filter. |
8. Add oil through dipstick filler tube. Check oil level and continue to add oil to FULL mark on dipstick.
9. Install dipstick and connect spark plug wire.
Servicing Air Cleaner Element
1. Park machine safely. (See Parking Safely in the Safety Section.)

3. Clean dirt and debris from the air cleaner cover (A).
4. Loosen screw (B) and tilt cover down against side discharge cover.

5. Inspect the foam precleaner (C) at the inside of the cover (A). If the foam precleaner is dirty:
IMPORTANT: Avoid damage! The foam precleaner consists of a thin foam layer with a wire mesh backing. Care must be taken to not distort the wire mesh backing when cleaning or drying the precleaner. |
b. Carefully wash precleaner in a solution of warm water and liquid detergent.
c. Rinse precleaner thoroughly. Gently blot up excess water with a dry cloth until precleaner is completely dry.
d. Replace the precleaner at the inside of the cover with the foam side toward the paper filter and the printed arrows pointing up.
6. Inspect the paper element (D) without removing it. If the paper element is damaged or dirty, tilt it outward to remove and replace it with a new element.
7. Clean air cleaner base carefully, preventing any dirt from falling into carburetor.
8. Install new paper element into air cleaner base.
9. Close cover and tighten screw.
Cleaning and Gapping Spark Plug
1. Disconnect spark plug wire. Remove spark plug.
2. Clean spark plug carefully with a wire brush.
3. Inspect spark plug and replace if damaged.
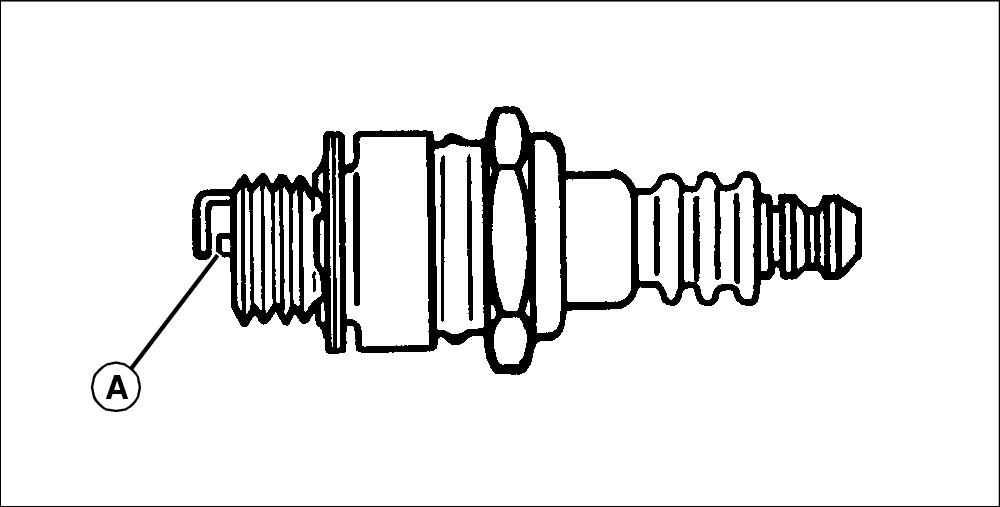
4. Adjust gap to 0.76 mm (0.030 in.).
5. Install and tighten plug to 20 N•m (15 lb-ft).
Cleaning Debris from Engine
IMPORTANT: Avoid damage! The engine can overheat or catch fire if not kept clean of debris. Clean engine of debris after every use. |
1. Park machine safely. (See Parking Safely in the Safety Section.)
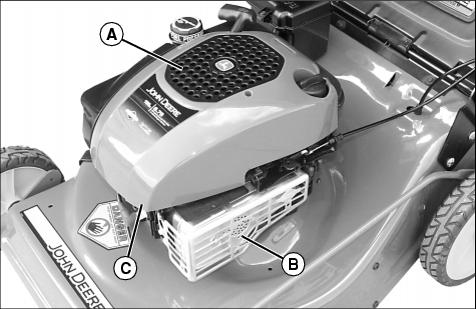
3. Clean recoil cover (A) with brush or clean rag.
4. Clean area around muffler (B) and under shroud (C).
Adjusting Ground Speed Control
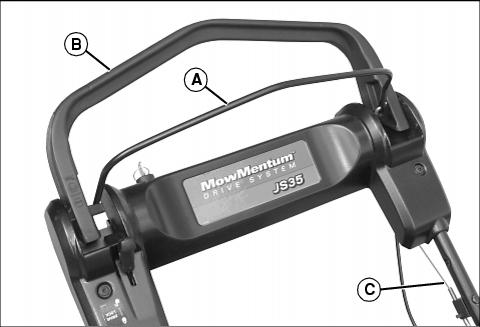
Picture Note: Operator Presence Control shown in released position.
When the operator presence control (A) is held back against the drive handle (B), and the drive handle is moved forward, the drive system is engaged. Pushing the drive handle further forward increases the ground speed. Pulling the drive handle back decreases ground speed and will ultimately disengage the drive system.
This occurs because the drive handle is connected to the traction drive belt tensioning mechanism by a cable (C) that runs under the left side of the handle assembly. As the drive belt wears, belt tension decreases, and ground speed at a given drive handle position changes.
If top ground speed of the mower has decreased due to belt stretch or wear, the drive cable (C) must be adjusted to increase belt tension.
To adjust drive cable:

• Locate the drive cable (C) and thumbwheel adjuster (D) under the left side of the handle assembly.
NOTE: Descriptions are based on the operator facing forward in cutting position.
• Rotate the thumbwheel upward (counter-clockwise) to increase belt tension.
• Start engine and check that drive system operates properly and pulls the mower in cutting conditions when drive handle is engaged.
NOTE: Drive system should disengage when drive handle is pulled all the way back.
• If drive system does not disengage when drive handle is pulled all the way back, adjust thumbwheel downward (clockwise) to decrease belt tension. Start engine and check for proper disengagement.
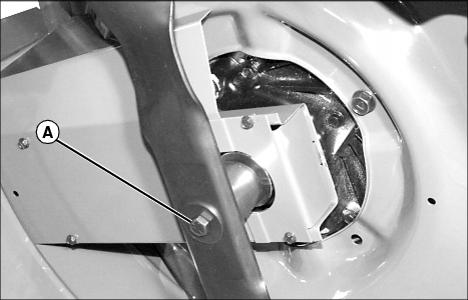
Replacing Drive Belt
Removing Drive Belt
1. Remove the grass bag, if attached.
2. Lift the spring-loaded rear cover and temporarily secure in the raised position.
3. Remove the mulch plug, if installed.

4. Remove the three hex head screws with washers (A) and rubber flap (B) from the mower housing.
5. Tip mower over to rest on its left side. Blocks can be placed under the left handle bracket to keep the left side slightly elevated.
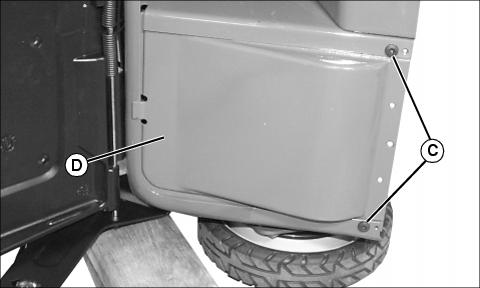
6. Remove two torx head screws (C). Metal drive cover (D) can be pulled toward the bottom of the mower and removed.
NOTE: It is not necessary to remove the blade when removing the belt covers or replacing the drive belt.
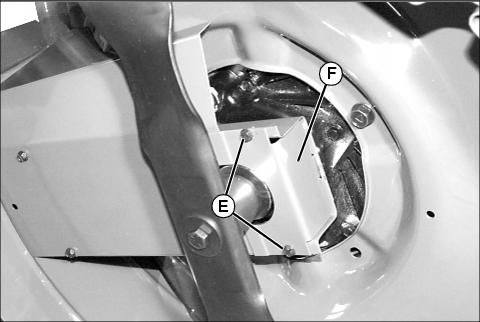
7. Remove two hex head screws (E) and front belt cover (F).

8. Remove four hex head screws (E) and rear belt cover (G). The rear belt cover also includes two belt guides for the blade sheave.

Picture Note: Drive unit shown from back of machine.
9. Remove two torx-head screws (H) and belt guide (I) from drive unit (J). Remove belt from drive unit pulley.
10. Pull belt through opening into underside of mower deck housing. Pull belt around mower blade and out from mower deck.
Installing Drive Belt
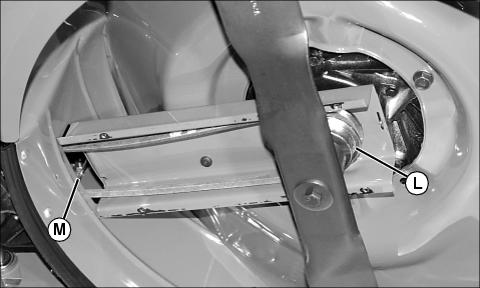
1. Place belt around blade and up onto blade sheave (L).
2. Route other end of belt back through opening (M) to drive unit.
3. Install belt on drive unit pulley.
4. Install belt guide over belt on drive unit and secure with hardware removed earlier. Do not overtighten belt guide screws.
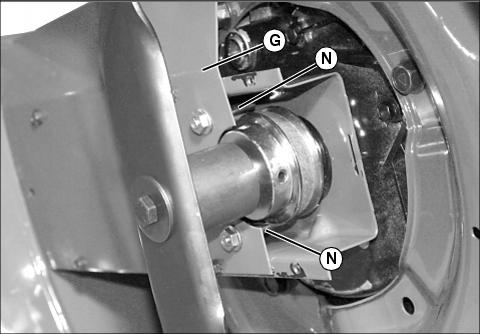
5. Install rear belt cover (G) and secure with hardware removed earlier. Make sure that belt guide pins (N) are at the outside of the belt
6. Install front belt cover and secure with hardware removed earlier.
7. Install metal drive cover and secure with hardware removed earlier.
8. Tip mower over to an upright position and install rubber flat. Secure with hardware removed earlier.
9. Adjust thumbwheel tensioner on drive belt cable as desired.
Grease
Use a general all-purpose grease with an NLGI grade No.2 rating.
Wet or high speed conditions may require use of a special-use grease. Contact your Servicing dealer for information.
Servicing Mower Blade
Removing Mower Blade
NOTE: Be sure the fuel tank is at least half empty before tipping mower on its side.
1. Turn mower onto its left side.
2. Remove bolt (A), washer and blade.
3. Inspect blade; sharpen, balance or replace blade as necessary.
Installing Mower Blade
NOTE: Sharpened edges on blade tips must face upward when installing blade.
1. Lubricate bolt threads lightly with a general purpose grease or oil to prevent rusting and seizing.

2. Install blade so that blade hub (A) fits between blade flanges (B).
3. Install washer (C) and bolt (D). Make sure washer is installed with cup side to the blade.
4. Tighten bolt to 54 N•m (40 lb-ft).
Sharpening Blades
• Sharpen blades with grinder, hand file, or electric blade sharpener.
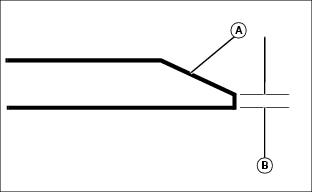
• Keep original bevel (A) when grinding.
• Blade should have 0.40 mm (1/64 in.) cutting edge (B) or less.
• Balance blades before installing.
Balancing Blades
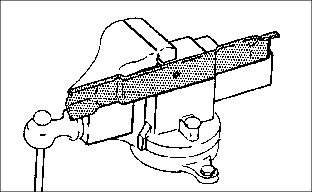
2. Put blade on nail in a vise. Turn blade to horizontal position.
3. Check balance. If blade is not balanced, heavy end of blade will drop.
4. Grind bevel of heavy end. Do not change blade bevel.
Inserting Fuel Stabilizer Cartridge in Fresh Start™ Fuel Cap
NOTE: Your machine may be equipped with a Fresh Start fuel cap that requires a fuel stabilizer cartridge. If equipped, check periodically and replace cartridge when empty.

1. Remove Fresh Start fuel cap (A) from fuel tank.
2. Place silver foil seal end of cartridge (B) into opening (C) on bottom side of fuel cap.
3. Press to snap cartridge into place.
4. Remove the white tab to expose membrane (D).
5. Install the fuel cap on fuel tank.
Using Proper Fuel
Use regular grade unleaded fuel with an octane rating of 87 octane or higher. Fuel blends containing up to 10% ethanol or up to 15% MTBE reformulated fuel are acceptable. Do not use fuel or additives containing methanol as engine damage can occur.
Always use fresh, clean fuel that is purchased in a quantity that can be used within approximately 30 days, or add fuel stabilizer.
Fuel is blended to give best seasonal performance. To avoid engine performance problems such as hard starting or vapor lock, use in-season fuel. Use fuel during warm weather that was purchased during that season, and use fuel during cold weather that was purchased during that season.
Fuel can become stale in machines with engines that are used seasonally or infrequently during a season. Stale fuel can produce varnish and plug carburetor components which can affect engine performance.
Keep fuel storage container tightly covered and in a cool area out of direct sunlight. Fuel can break down and degrade if not sealed properly or exposed to sun and heat.
Condensation may collect in the fuel tank because of a variety of operating or environmental conditions and, over time, may affect your machine’s operation. Fill fuel tank at the end of daily use and store fuel in plastic containers to reduce condensation.
For best year-round performance and fuel-handling, add stabilizer to fuel immediately after fuel purchase. Such practice helps prevent engine performance problems and allows fuel storage in the machine all year without draining.
Filling Fuel Tank
Fill fuel tank at the end of each day’s operation to prevent condensation and freezing during cold weather.
1. Park machine safely. (See Parking Safely in the SAFETY section.)
3. Remove any trash from area around fuel tank cap.
4. Remove fuel tank cap slowly to allow any pressure built up in tank to escape.
5. Fill fuel tank only to bottom of filler neck.
Servicing Battery (JS35 only)
Service the Battery Safely

Removing and Installing Battery
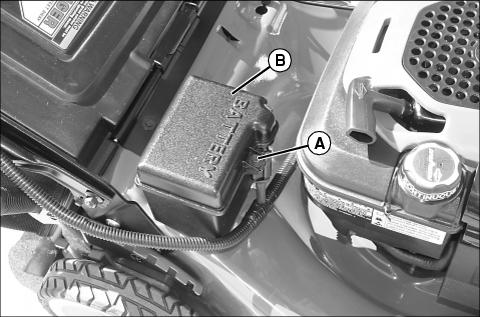
a. Remove screw (A) and battery box cover (B).
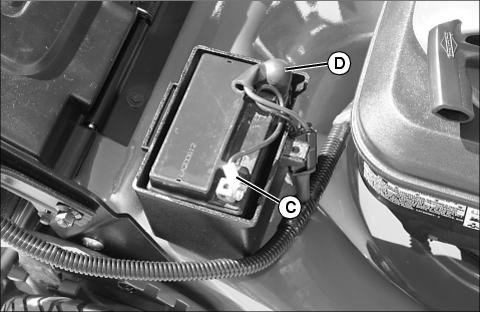
b. Disconnect black negative battery cable (C).
c. Pull back terminal cover (D) and remove red positive battery cable.
d. Lift battery out of battery box.
a. Set battery in battery box with terminals to the front.
b. Install red positive battery cable, secure with hardware removed earlier, and pull the cover over the terminal.
c. Install black negative battery cable and secure with hardware removed earlier.
d. Install battery cover and secure with cover screw.
Charging Battery with Supplied DC Charger
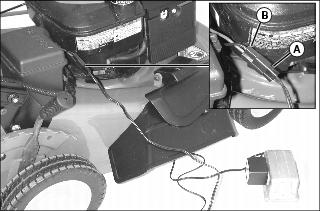
1. Plug charger wiring connector (A) into battery harness connector (B).
2. Plug charger into 110V house wall outlet and charge battery for 48 hours. Charging battery for longer periods of time will not damage battery.
Charging Battery Using Automotive-Type Charger
1. Follow instructions on battery charger to connect charger to battery.