
Assembly
Prepare Handle Assembly
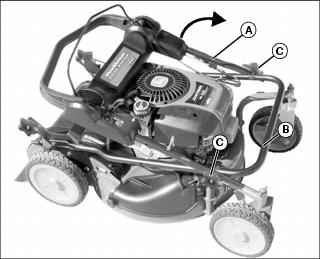
1. Remove mower from shipping carton. Mower shown as removed from shipping carton.
2. Unfold upper handle (A) toward front of machine until upper handle aligns with and fits into lower handle (B). Securely tighten upper handle knobs (C) on both sides.
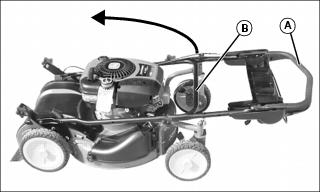
3. Lift handle assembly (A)(B) up and toward back of machine.
NOTE: Carriage bolts, lock washers and knobs may already be installed in brackets. Simply remove and install.
4. Align holes in lower handle with one of three height adjustment holes in mounting brackets. Insert one carriage bolt into desired hole in each bracket, out through lower handle, and secure with lock washer and knob, tightening securely.
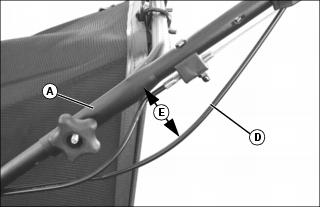
5. When unfolding handle, be certain that the loop in the traction drive cable (D) is not removed by pulling on cable. Be certain that there is a minimum distance of 10 cm (4 in.) (E) of center of loop between cable (D) and upper handle (A).
6. Tip mower back against the upper handle to gain access to cutting blade. Remove foam shipping block from cutting blade.
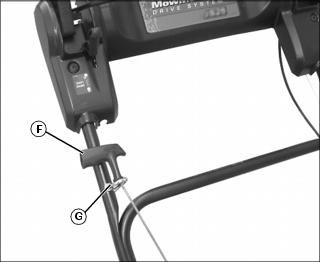
7. While squeezing the operator presence control down against the drive handle, slowly pull starter handle (F) up to rope guide (G) located on right side of upper handle as shown, and hook rope through guide.
Install Discharge Assembly
Your mower comes with a side discharge cover installed on the mower deck, and is ready to be operated as a mulching mower. The side discharge cover is raised to install the discharge deflector or the grass bag. See the Operating section for information to install the discharge deflector or the grass bag.
Check and Add Engine Oil
1. Remove dipstick and check engine oil level. (See Checking Engine Oil Level in the SERVICE section.)
2. Add the supplied oil as needed up to the FULL mark on the dipstick. Do not overfill.
Insert Fuel Stabilizer Cartridge in Fresh Start™ Fuel Cap (If Equipped)
Insert the fuel stabilizer cartridge if your machine is equipped with a Fresh Start fuel cap. (See Inserting Fuel Stabilizer Cartridge in Fresh Start Fuel Cap in the SERVICE section.)
Fill Fuel Tank
Fill the fuel tank. (See Filling Fuel Tank in the SERVICE section.)
Check Machine Safety System
Perform safety system check to make sure the operator presence control is functioning properly. (See Testing Safety System in the OPERATING section.)