
Service Transmission
Gear Case Oil
Use the following oil viscosity based on the air temperature range. Operating outside of the recommended oil air temperature range may cause premature gear case failure.
IMPORTANT: Avoid damage! ONLY use a quality oil in this gear case. DO NOT mix any other oils in this gear case. DO NOT use BIO-HY-GARD® in this gear case. |
The following John Deere gear case oil is preferred:

GL-5 GEAR LUBRICANT®-SAE 80W-90
Other gear case oils may be used if recommended John Deere gear case oil is not available, provided they meet the following specification:
API Service Classification GL-5.
Checking Front Axle Oil Level
IMPORTANT: Avoid damage! Allow oil one hour to settle before checking level to ensure accurate dipstick reading. Repeat oil level check after several hours of operation. |
1. Park machine safely. (See Parking Safely in the SAFETY section.) Allow machine to cool down for at least one hour.
IMPORTANT: Avoid damage! Dirt and debris in oil may cause damage to the transaxle. Clean area around opening before removing dipstick. |
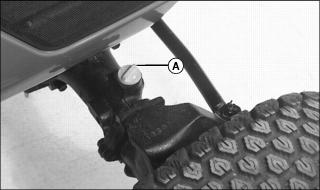
2. Loosen and remove dipstick (A) located on right side of front axle.
3. Wipe dipstick clean with a rag. Install and tighten dipstick.
4. Remove dipstick. Oil level should be at fill mark on dipstick. If oil level is low:
a. Add GL-5 Gear Lubricant®-SAE 80W-90 or equivalent through dipstick fill opening until oil level is correct.
b. Install and tighten dipstick.
5. Check front axle oil level again after the first several hours of operation.
Changing Front Axle Oil
1. Operate machine to warm front axle oil.
2. Park machine safely. (See Parking Safely in the SAFETY section.)

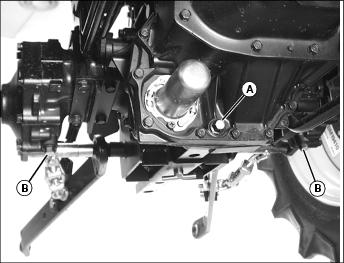
3. Position drain pan under differential drain plug (A).
NOTE: For draining purposes, front axle contains approximately 3.4 L (3.6 qt) of oil.
4. Remove differential drain plug and allow oil to drain.
5. Position drain pan under axle drain plug (B) on both sides of front axle.
6. Remove axle drain plugs and allow oil drain.
7. Install and tighten drain plugs (A) and (B) after all oil has drained.
8. Remove dipstick located on right side of front axle.
9. Add approximately 3.4 L (3.6 qt) GL-5 Gear Lubricant®-SAE 80W-90 or equivalent through dipstick fill opening until oil level is correct.
10. Install and tighten dipstick.
IMPORTANT: Avoid damage! Allow oil one hour to settle before checking level to ensure accurate dipstick reading. Repeat oil level check after several hours of operation. |
11. Check front axle oil level.
Transmission and Hydraulic Oil
IMPORTANT: Avoid damage! Use recommended oil only. Do not use engine oil or "Type F" automatic transmission fluid. |
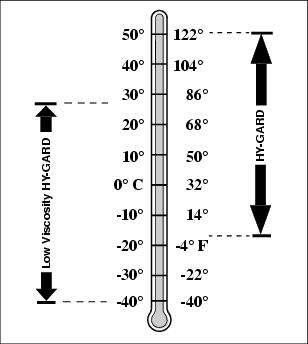
Use oil viscosity based on the expected air temperature range during the period between oil changes.
John Deere Low Viscosity HY-GARD® Transmission/Hydraulic Oil is recommended. Standard John Deere HY-GARD® Transmission/Hydraulic Oil may also be used.
Other oils may be used if they meet John Deere standard JDM J20D or J20C.
Checking Transmission Oil Level (Gear Models)
NOTE: To obtain an accurate dipstick reading allow oil to settle for one hour before checking level. Check oil level after several hours of operation.
1. Park machine safely. (See Parking Safely in the SAFETY section.) Allow machine to cool down for at least one hour.

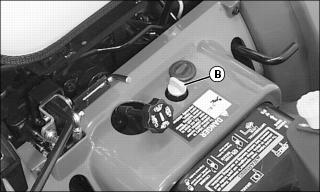
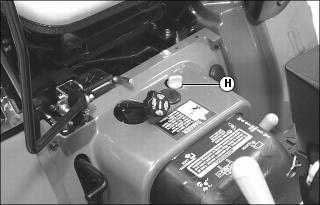
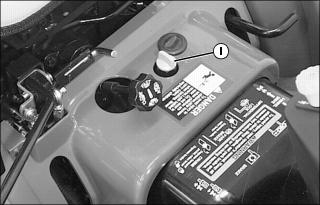
2. Locate sight glass (A) at rear of transmission next to the rear PTO stub shaft. Oil should be maintained to a mid-level range on the sight glass.

Add John Deere Low Viscosity HY-GARD® (JDM J20D) or equivalent through fill cap opening until oil level reaches mid-level range on the sight glass.
4. Install and tighten fill cap.
Checking Transmission Oil Level (Hydrostatic Models)
Two methods of checking transmission oil level are available for machines equipped with a hydrostatic transmission.
Sight Glass Check
NOTE: To obtain an accurate dipstick reading allow oil to settle for one hour before checking level. Check oil level after several hours of operation.
1. Park machine safely. (See Parking Safely in the SAFETY section.) Allow machine to cool down for at least one hour.
2. Locate sight glass (A) at rear of transmission next to the rear PTO stub shaft. Oil should be maintained to a mid-level range on the sight glass.
Add John Deere Low Viscosity HY-GARD® (JDM J20D) or equivalent through fill cap opening until oil level reaches mid-level range on the sight glass.
Dipstick Check

3. Check oil level on dipstick; oil level should be between high and low levels on dipstick.

Add John Deere Low Viscosity HY-GARD® (JDM J20D) or equivalent through fill opening until oil level is correct.
Changing Transmission Oil and Suction Screen (Gear Models)
Use caution when filling and draining hydraulic oil. During periods of machine operation the hydraulic oil can get hot. Allow engine and oil to cool before servicing. |
1. Run engine a few minutes to warm the transmission oil.
2. Park machine safely. (See Parking Safely in the SAFETY section.)
NOTE: For draining purposes, the model 4110 gear transmission contains approximately 13.5 L (3.6 gal) of oil.
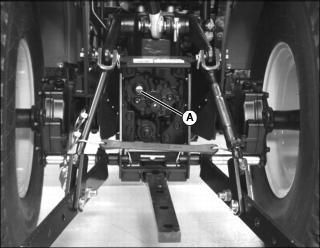
3. Position drain pan(s) under transmission drain plug (A) and final drive drain plugs (B). Remove plugs and allow oil to drain.

4. After oil is drained, remove two cap screws (C), two lock washers (D) and suction screen cover (E).
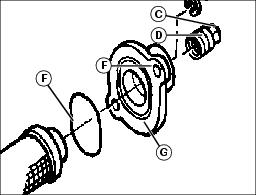
5. Remove suction screen (F) from transmission housing.
6. Clean suction screen and suction screen cover and O-ring (G) with a mild solvent. Allow to dry.
7. Inspect O-ring for damage or cracking. Replace if necessary.
8. Install suction screen into transmission housing.
9. Install suction screen cover (E) with O-ring (G) onto transmission housing with hardware (C) and (D).
10. Install and tighten all drain plugs.
12. Add approximately 13.5 L (3.6 gal) of preferred transmission oil or equivalent into fill opening until oil level reaches mid-level range on the sight glass.
14. Start engine. Check for oil leaks.
16. Check transmission oil level.
Changing Transmission Oil, Oil Filter and Suction Screen (Hydrostatic Models)
Use caution when filling and draining hydraulic oil. During periods of machine operation the hydraulic oil can get hot. Allow engine and oil to cool before servicing. |
1. Run engine a few minutes to warm the transmission oil.
2. Park machine safely. (See Parking Safely in the SAFETY section.)
NOTE: For draining purposes, the model 4110 hydrostatic transmission contains approximately 13.3 L (3.5 gal) of oil and the model 4115 hydrostatic transmission contains approximately 14.6 L (3.9 gal) of oil.

3. Position drain pan(s) under transmission drain plug (A) and final drive drain plugs (B). Remove plugs and allow oil to drain.
4. Position a drain pan under the transmission oil filter (C). Remove and discard filter. Allow oil to drain completely.
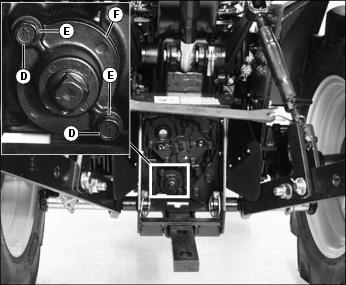
5. After oil is drained, remove two cap screws (D), two lock washers (E) and suction screen cover (F).
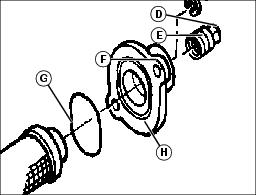
6. Remove suction screen (G) from transmission housing.
7. Clean suction screen and suction screen cover and O-ring (H) with a mild solvent. Allow to dry.
8. Inspect O-ring for damage or cracking. Replace if necessary.
9. Install suction screen into transmission housing.
10. Install suction screen cover (F) with O-ring (H) onto transmission housing with hardware (D) and (E).
11. Install and tighten all drain plugs.
12. Put a film of clean transmission oil on seal of new oil filter.
13. Fill the filter 1/3 to 1/2 full with specified transmission oil.
14. Install filter. Turn filter clockwise until gasket makes contact with the mounting surface. Tighten 1/2-3/4 turn after gasket contact.
16. Add preferred transmission oil or equivalent into fill opening until oil level reaches the mid-level range on the sight glass or oil level is between the high and low levels on the dipstick.
Model 4110: Oil capacity is 13.3 L (3.5 gal).
Model 4115: Oil capacity is 14.6 L (3.9 gal).