
Installing
Preparing Tractor
Required Equipment
Installing Ballast
Ballast is required when using the snowblower. See your tractor operator’s manual or your John Deere dealer.
Installing Implements on Front Hitch with A-frame

1. Loosen wing nut (A) and remove quick-lock pin (B).
2. Remove retainer rod (C) with wing nut and retainer plate (D) from A-frame.
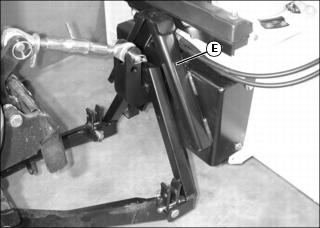
3. Drive tractor forward slowly, and align A-frame with mount (E) on implement.
4. Raise hitch to install A-frame on mount.

5. Install retainer rod with wing nut and retainer plate through mount and A-frame. Position wing nut (F) as needed to install quick-lock pin in retainer rod.
6. Tighten wing nut to secure implement to A-frame.
7. Install cotter pin in small hole at end of retainer rod.
Connecting Driveshaft to Tractor
1. Part tractor safely. (See Parking Safely in SAFETY Section of tractor operator’s manual.)
2. Pull back coupler on driveshaft to lock collar open.
3. Push driveshaft onto tractor PTO shaft until coupler locks.
Connecting Hydraulic Hoses
1. Park tractor safely. (See Parking Safely in SAFETY Section of tractor operator’s manual.)
2. Review Using Hydraulic Dual Selective Control Valve (SCV) and Using Dual Selective Control Valve instructions in your tractor operator’s manual.
3. Move the tractor dual SCV lever rearward-to-forward and side-to-side several times to relieve hydraulic pressure.
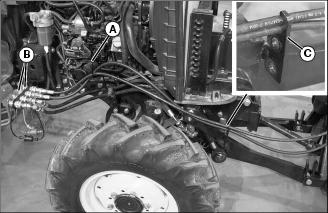
4. Route snowblower hydraulic hoses through front hitch hose support (A) and install hoses in SCV couplers (B) with matching yellow and red coupler dust plugs.
5. Install coupler dust plugs in hose dust covers for storage.
6. Secure hydraulic hoses on front hitch support bracket (C).