
Assembly
Parts
Snowblower
Drive Assembly (Models 4100, 4010, 4110, 4115, 2320, 2520)
*Parts used for installation on 2320, 2520 only.
Drive Assembly (Models 2210, 2305)
NOTE: See your Front Hitch Kit Installation Instructions for assembling large spring locking pin and tether assembly used with the Front Hitch Kit to restrict the hitch from angling with the attachment.
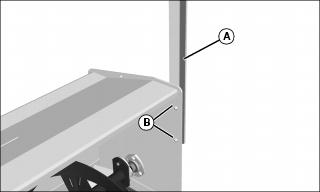
Install End Plates (4100, 4010, 4110, 4115, 2320, 2520 only)
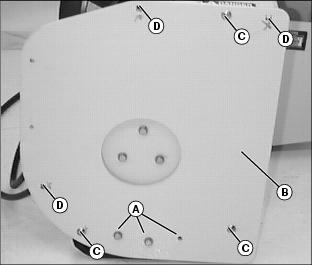
1. Remove two capscrews (A) and nuts from skid shoe. Retain nuts.
2. Install end plate (B) to plate on snowblower with three M8x20 carriage bolts (C) and M8 nuts.
3. Install three M8x35 capscrews (A) with one nut and the two nuts removed earlier.
4. Drill three 5/16 in. holes (D), and install M8x20 carriage bolt and M8 nuts.
5. Repeat installation on other side.
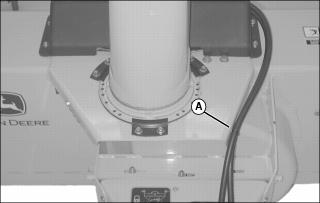
Install Discharge Chute and Cables
1. Apply grease on the bottom and inside flange of discharge chute.
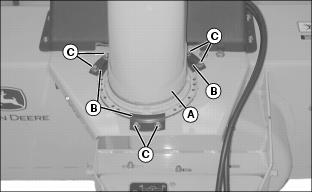
2. Place discharge chute (A) over auger opening on housing.
3. Install three clips (B) with six self tapping bolts (C).
4. Tighten bolts. Chute should rotate freely after tightening.
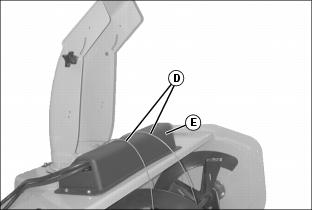
5. Lay cables (D) over housing.
6. Remove cable shield (E) and verify that chute cables are still on pulleys.
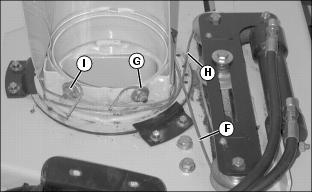
8. Stand behind snowblower. Take right cable (F) and wrap counterclockwise around chute.
9. Use locking pliers to pull cable tight around threaded stud, and behind nut and washer (G).
11. Wrap left cable (H) clockwise around chute.
12. Use locking pliers to pull cable tight around threaded stud, and behind nut and washer (I).
14. Tuck excess ends of cables under cable.
IMPORTANT: Avoid damage! When installing cable shield, install the longer bolts through the shield and bracket. |
Install Driveshaft
2. Install key (A) in gearbox shaft groove.
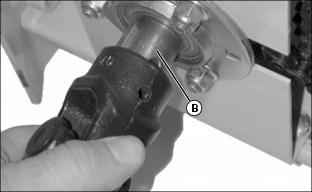
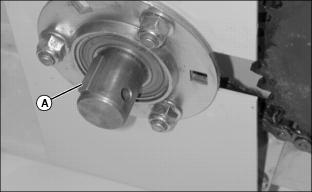
3. Apply recommended grease to sprocket shaft (B).
4. Align groove in driveshaft with key on sprocket shaft and push driveshaft on sprocket shaft.
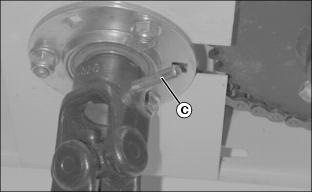
5. Align holes on sprocket shaft with holes in driveshaft, and install rolled pin (C) through both shafts.
6. Install wire through rolled pin and twist both ends of wire together a minimum of three turns.
Lubricate Auger Shaft
Install PTO Shield
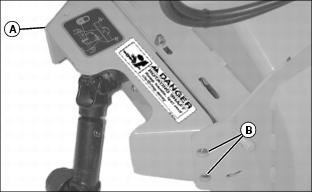
1. Install shield (A) with four M8x25 carriage bolts (B) and M8 nuts.
Install Tie Strap
1. Insert tie strap (A) through hole on right side of snowblower and secure the hydraulic hoses.
Install Hose Fittings (2210, 2305, 2320, 2520)
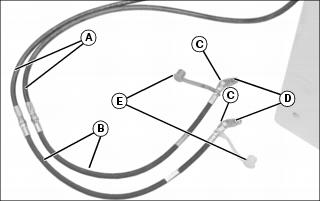
1. Remove and retain existing nipple fittings from 90-degree fittings on attachment hoses (A).
2. Remove and retain existing dust caps from attachment hoses.
3. Remove and discard 90-degree fittings from attachment hoses.
NOTE: When tightening hydraulic hose extensions (B), hold attachment hoses (A) horizontally, side-by-side, and orient 45° fittings (C) so that they point toward the ground. This will prevent unwanted twisting of hoses when installing attachment on machine.
4. Install hydraulic hose extensions (B) on attachment hoses.
5. Install original nipple fittings (C) on 45-degree fittings (D).
6. Install original dust caps (E) on attachment hoses.
Install Hose Fittings (4100, 4010, 4110, 4115)
1. Remove the 90-degree fittings from snowblower chute hoses.
2. Install hose extension to the rod-end cylinder hose.
3. Install straight hydraulic adapter to head-end hydraulic cylinder hose.
4. Install nipple-fitting onto the end of each snowblower chute hydraulic hose.
Install Driveshaft Support Rod
NOTE: Support rod must move freely to the stored position and lock in place over the bolt (A) when the driveshaft is installed on the PTO drive.
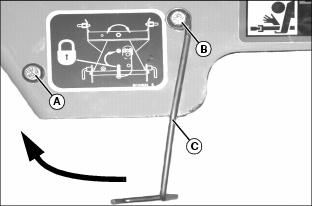
1. Install M8x25 bolt (A) in hole on left side of PTO shield and secure with M8 nut.
2. Install M8x25 bolt (B), support rod (C) and washer in other shield hole as shown with M8 locknut.
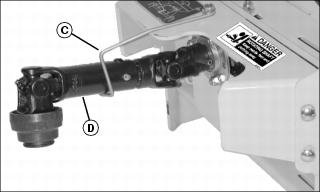
3. Install driveshaft (D) on end of support rod (C) and move support rod to the stored position.
Install Drift Blades
Picture Note: Left side of auger housing shown.
Fasten drift blade (A) to auger housing with two M6x30 bolts and M6 locknuts (B).
• 2210, 2305 tractor installation: Install one drift blade on right side of housing only.
• All other tractors: Install drift blade on both sides of housing.