
Service Transmission
Transmission and Hydraulic Oil
IMPORTANT: Avoid damage! Use recommended oil only. Do not use engine oil or “Type F” automatic transmission fluid. |
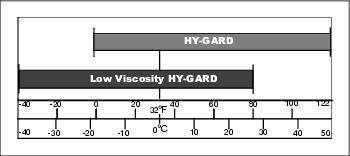
Use oil viscosity based on the expected air temperature range during the period between oil changes.
Standard John Deere J20C HY-GARD™ Transmission/Hydraulic Oil is recommended. John Deere J20D Low Viscosity HY-GARD™ Transmission/Hydraulic Oil may also be used.
Other oils may be used if they meet John Deere standard JDM J20C or J20D.
Checking Front Axle Oil Level
IMPORTANT: Avoid damage! Allow oil one hour to settle before checking level to ensure accurate dipstick reading. Repeat oil level check after several hours of operation. |
1. Park machine safely. (See Parking Safely in the SAFETY section.) Allow machine to cool down for at least one hour.
IMPORTANT: Avoid damage! Dirt and debris in oil may cause damage. Help prevent contaminants from entering the oil dipstick location. Clean area around dipstick before removing. |
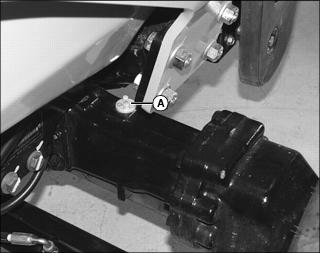
2. Loosen and remove dipstick (A) located on right side of front axle.
3. Wipe dipstick clean with a rag. Install and tighten dipstick.
4. Remove dipstick. Oil level should be at fill mark on dipstick. If oil level is low:
a. Add recommended oil through dipstick fill opening until oil level is correct.
b. Install and tighten dipstick.
5. Check front axle oil level again after the first several hours of operation.
Changing Front Axle Oil
1. Operate machine to warm front axle oil.
2. Park machine safely. (See Parking Safely in the SAFETY section.)
3. Raise front of machine with a safe lifting device. Support machine in the raised position with wood blocks or jackstands.
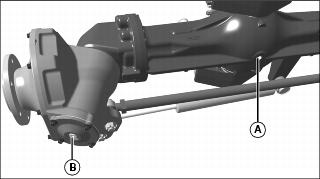
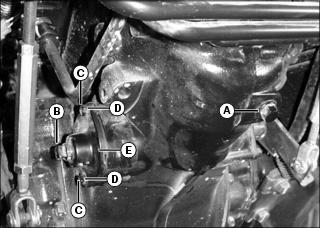
5. Position a drain pan under differential drain plug (A) and axle drain plugs (B) on both sides of the front axle.

6. Remove dipstick (C) located on right side of front axle.
7. Remove vent plug (D) on both sides of front axle.
8. Remove differential drain plug and allow oil to drain.
9. Remove axle drain plugs and allow oil to drain.
10. Install and tighten drain plugs (A) and (B) after all oil has drained.
11. Add recommended oil into dipstick filler opening.
13. Install and tighten dipstick.
IMPORTANT: Avoid damage! Allow oil one hour to settle before checking level to ensure accurate dipstick reading. Repeat oil level check after several hours of operation. |
16. Check front axle oil level.
Checking Transmission Oil Level
IMPORTANT: Avoid damage! Allow oil one hour to settle before checking level to ensure accurate dipstick reading. Repeat oil level check after several hours of operation. |
1. Park machine safely. (See Parking Safely in the SAFETY section.) Allow machine to cool down for at least one hour.
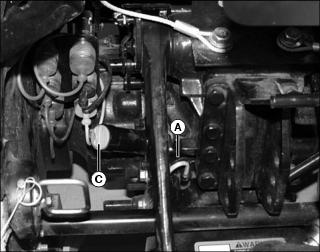
2. Remove dipstick (A) located behind operator’s seat. Wipe dipstick with a clean rag.
4. Remove dipstick and check oil level. Oil level should be between the high and low levels on the dipstick.
• Remove oil fill cap (C) and add recommended oil.
6. Install and tighten fill cap.
Changing Transmission Oil, Oil Filter, Suction Screen and Suction Side Filter
1. Run engine a few minutes to warm the transmission oil.
2. Park machine safely. (See Parking Safely in the SAFETY section.)
3. Position drain pan under transmission drain plug (A). Remove plug and allow oil to drain.
4. Position drain pan under suction screen cover drain plug (B) on right side of transmission. Remove plug and allow oil to drain.
5. After oil is drained, remove two capscrews (C), lock washers (D) and suction screen cover (E).
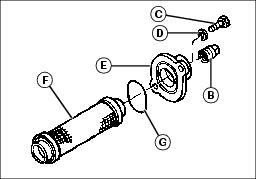
6. Remove suction screen (F) from transmission housing.
7. Clean suction screen, suction screen cover, and O-ring (G) with a mild solvent. Allow to dry.
8. Inspect O-ring for damage or cracking. Replace if necessary.
9. Inspect suction screen for damage or holes. Replace if necessary.
10. Install suction screen cover (E) with O-ring (G) onto transmission housing with hardware (C) and (D).
11. Install drain plugs (A) and (B).
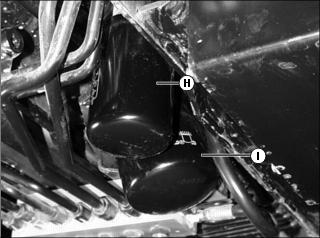
12. Locate hydraulic oil filter (H) under left side of machine.
13. Position a drain pan under the hydraulic oil filter. Remove and discard filter. Allow oil to drain completely.
14. Put a film of clean transmission oil on seal of new filter.
15. Install filter. Turn filter clockwise until gasket makes contact with the mounting surface. Tighten 1/2–3/4 turn after gasket contact.
16. Locate suction side filter (I) under left side of machine.
17. Position a drain pan under the suction side filter. Remove and discard filter. Allow oil to drain completely.
18. Put a film of clean transmission oil on seal of new filter.
19. Install filter. Turn filter clockwise until gasket makes contact with the mounting surface. Tighten 1/2–3/4 turn after gasket contact.
21. Add recommended oil into fill opening.
22. Start engine. Adjust hand throttle lever to slow idle speed.
23. Cycle all machine hydraulic controls several times and check for oil leaks.
25. Check transmission oil level. Add oil if necessary.
Adjust Mechanical Front Wheel Drive (MFWD) Axle Trunnion Torque
NOTE: Adjust axle trunnion torque at the required service interval to prevent excessive forward and rearward movement of the front axle.
1. Park machine safely. (See Parking Safely in the SAFETY section.)
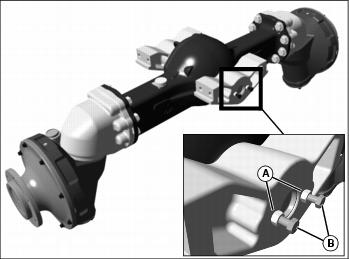
3. Tighten bolts (B) to 15 N•m (11 lb-ft). Do not overtighten hardware.