Service Transmission
Transmission and Hydraulic Oil
IMPORTANT: Avoid damage! Use recommended oil only. Do not use engine oil or “Type F” automatic transmission fluid. |
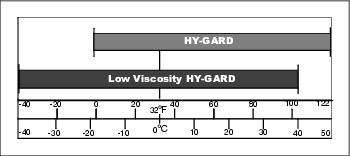
Choose oil viscosity based on the expected air temperature range during the period between oil changes.
John Deere Low Viscosity HY-GARD™ transmission/hydraulic fluid is recommended. John Deere HY-GARD transmission/hydraulic fluid may also be used for temperatures above -18? C (0? F).
Other oils may be used if they meet John Deere standard JDM J20C or J20D.
Checking Front Axle Oil Level
IMPORTANT: Avoid damage! Allow oil one hour to settle before checking level to ensure accurate dipstick reading. Repeat oil level check after several hours of operation. |
1. Park machine safely. (See Parking Safely in the SAFETY section.) Allow machine to cool down for at least one hour.
IMPORTANT: Avoid damage! Dirt and debris in oil may cause damage to the transaxle. Clean area around opening before removing dipstick. |
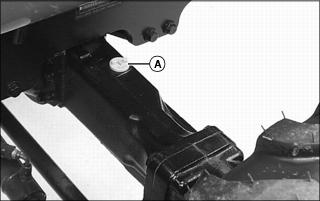
2. Loosen and remove dipstick (A) located on right side of front axle.
3. Wipe dipstick clean with a rag. Install and tighten dipstick.
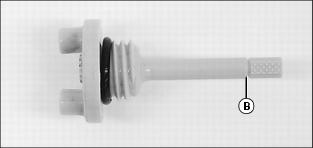
4. Remove dipstick again. Oil level should be indicated on the dipstick, but not above the full line (B). If oil level is low:
a. Add recommended oil through dipstick fill opening until oil level is correct.
b. Install and tighten dipstick.
5. Check front axle oil level again after the first several hours of operation.
Changing Front Axle Oil
1. Operate machine to warm front axle oil.
2. Park machine safely. (See Parking Safely in the SAFETY section.)
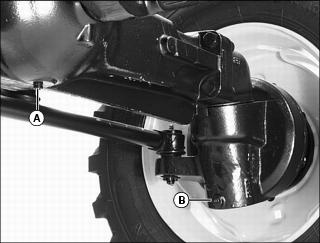
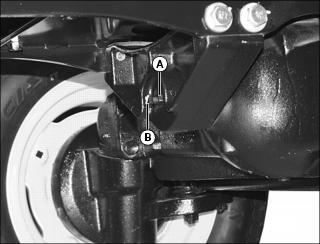
3. Position drain pan under differential drain plug (A).
NOTE: The front axle contains approximately 5.0 L (1.3 gal) of oil.
4. Remove differential drain plug and allow oil to drain.
5. Position drain pan under axle drain plug (B) on both sides of front axle.
6. Remove axle drain plugs and allow oil to drain.
7. Install and tighten all three drain plugs after all oil has drained.
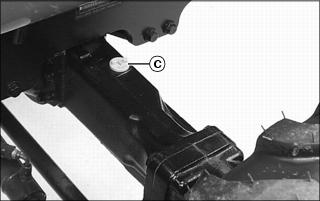
8. Remove dipstick (C) located on right side of front axle.
9. Add approximately 5.0 L (1.3 gal) of recommended oil into dipstick filler opening.
10. Install and tighten dipstick.
IMPORTANT: Avoid damage! Allow oil one hour to settle before checking level to ensure accurate dipstick reading. Repeat oil level check after several hours of operation. |
11. Check front axle oil level.
Adjusting Front Axle Thrust Bolt Torque
NOTE: Adjust bolt torque at the required service interval to prevent excessive forward and rearward movement of the front axle.
1. Park machine safely. (See Parking Safely in the Safety section.)
2. Raise front axle off ground to take machine weight off the front axle.
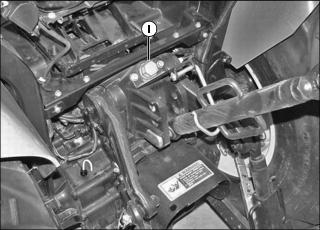
4. Tighten bolt (B) to 32 N•m (24 lb-ft). Do not overtighten.
6. Lower front axle back to ground.
Checking Transmission Oil Level
IMPORTANT: Avoid damage! Allow oil one hour to settle before checking level to ensure accurate dipstick reading. Repeat oil level check after several hours of operation. |
1. Park machine safely. (See Parking Safely in the SAFETY section.) Allow machine to cool down for at least one hour.
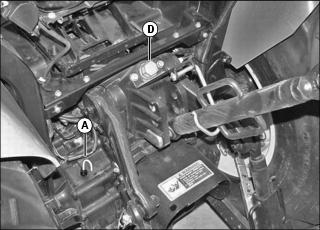
2. Remove dipstick (A) located behind operator’s seat. Wipe dipstick with a clean rag.
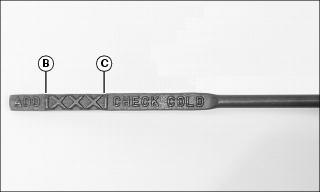
4. Remove dipstick and check oil level. Oil level should be between the minimum (B) and maximum (C) lines.
• Remove oil fill cap (D). Add recommended oil at fill cap location.
6. Install and tighten fill cap.
Changing Transmission Oil and Hydraulic Suction Oil Filter
1. Run engine a few minutes to warm the transmission oil.
2. Park machine safely. (See Parking Safely in the SAFETY section.)
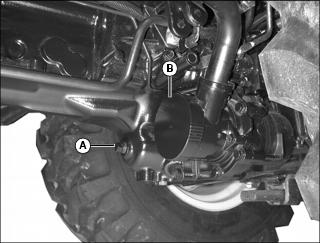
3. Position drain pan under transmission drain plug (A) and suction filter assembly on left side of transmission. Remove plug and allow oil to drain.
4. Remove cover (B) and allow oil to drain.
5. Remove filter assembly and replace with new filter assembly.
7. Install transmission drain plug.
NOTE: The inline hydraulic filter should be cleaned at the same time the transmission oil is changed, but not every time. See SERVICE INTERVALS.
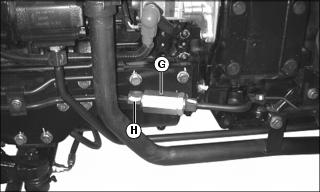
8. Clean inline hydraulic filter:
a. Position drain pan under filter (G).
c. Remove nut (H) with internal element from case.
d. Clean case and internal element with a mild solvent. Allow to dry.
NOTE: Direction-of-flow arrow on filter points toward transmission fitting.
e. Assemble and install hydraulic filter assembly.
10. Add recommended oil into filler opening.
11. Start engine. Check for oil leaks around filter base and drain plugs.
