Operating
Daily Operating Checklist
o Test safety systems. Perform safety interlock system checkout procedure.
o Check transmission oil level.
o Check radiator coolant level.
Avoid Damage to Plastic and Painted Surfaces
• Do not wipe plastic parts unless rinsed first.
• Insect repellent spray may damage plastic and painted surfaces. Do not spray insect repellent near machine.
• Be careful not to spill fuel on machine. Fuel may damage surface. Wipe up spilled fuel immediately.
Entering and Exiting Machine
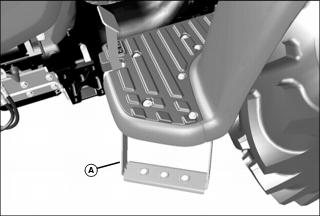
Using Step
Step (A) is located on the left side of machine. Use step for entering and exiting the operator station.
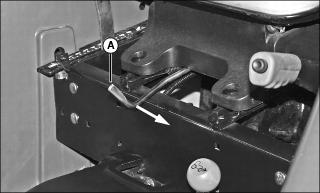
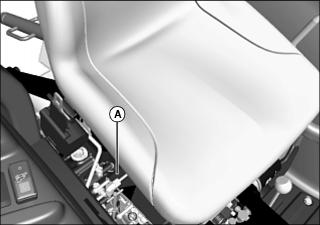
Adjusting Seat Position
2. Pull seat lever (A) to the left.
3. Slide seat forward or rearward to desired position.
4. Release lever to lock seat in position. Make sure all controls can be easily accessed.
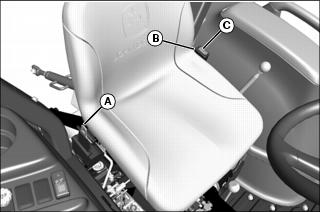
Using Seat Belt
Fasten Belt
1. Pull belt end (A) across operator lap.
2. Install tab into buckle (B).
• A click will be heard when the tab locks into the buckle.
Release Belt
1. Press red button (C) to release seat belt allowing the belt to retract.
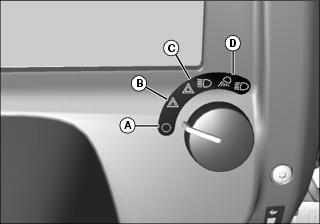
Using Light Switch
B - Warning flasher lights on.
C - Road Position: headlights, taillights, and warning flasher lights on.
D - Field Position: headlights, taillights, and optional working lights on.
With the key switch in the off position, you can view the hour meter in the instrument panel by turning the light switch to (B) or (C) position.
Using Key Switch
A-Start Position - Turn the key to the start position to start the engine. Release the key after the engine has started and it will automatically return to the run position. The engine will continue to run.
B-Run Position - With the key in the run position, and the engine not running, the engine oil pressure light and the battery discharging light should illuminate. Both lights should turn off when the engine is running. You will also hear a clicking noise when the engine fuel shut-off solenoid engages.
C-Off Position - With the key in the off position, all switched power is off, and the engine should not run.
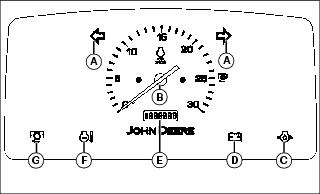
Using the Instrument Panel
A-Warning Flasher/Turn Signal Indicator Light: These indicator lights will turn on and flash when the light switch is turned to one of the two warning flasher positions, or the turn signal switch is in the right or left hand turn position.
B-Tachometer: Shows engine speed in increments of 100 rpm. Example: If indicator is pointing at 20, then 20x100 = 2000 rpm. Note the special PTO marker. At this engine speed, the PTO rotates at the industry standard 540 rpm.
C-Engine Oil Pressure Light: This light should illuminate when the ignition key switch is in the run position and the engine is not running, and also when engine oil pressure is too low with the engine running. If this light illuminates while the engine is running, stop engine immediately.
D-Alternator/Battery Discharging Light: This light should illuminate when the ignition key switch is in the run position and the engine is not running. If this light does illuminate with the engine running, see your John Deere dealer.
E-Hour Meter: This display shows Total number of accumulated running hours. Use the hour meter as a guide when servicing various components of this machine.
F-Engine Coolant Temperature Light: This light should not illuminate when the ignition key switch is in the run position or when the engine is running. It will light if the engine is running and the engine coolant temperature raises too high. If this light illuminates while the engine is running, stop engine immediately.
Using Turn Signal Switch
• Push the left side of the turn signal switch down to signal a left turn.
• Push the right side of the turn signal switch down to signal a right turn.
Testing Safety Systems
The safety systems installed on your machine should be checked before each machine use. Be sure you have read the machine operator manual and are completely familiar with the operation of the machine before performing these safety system checks.
Use the following checkout procedures to check for normal operation of machine.
If there is a malfunction during one of these procedures, do not operate machine. See your authorized dealer for service.
Perform these tests in a clear open area. Keep bystanders away.
Testing Rear PTO Knob
3. Move the transmission range lever to neutral.
4. Pull the PTO engagement knob to the engaged/on position.
5. Turn key switch to start position.
6. Push the PTO engagement knob to the disengaged/off position.
7. Turn key switch to off position.
Testing Rear PTO/Seat Switch Interface
3. Push the PTO engagement knob to the disengaged/off position.
4. Start machine engine. Set engine speed at 1500 rpm.
5. Pull the PTO engagement knob to the engaged/on position.
6. Raise up from operator’s seat. Do not dismount machine.
8. Push the PTO engagement knob to the disengaged/off position.
9. Turn key switch to off position.
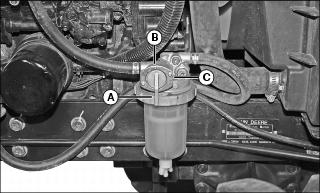
Using Fuel Shut-Off Valve
Close the valve when performing any type of engine fuel system service.
1. Locate the fuel shut-off valve on the right side of the machine on the fuel sediment filter.
2. Open or close fuel shut-off valve lever (A) as required:
Using Brake/Differential Lock Pedal
Depress pedal 20 - 25mm (3/4 - 1 in.) to operate differential lock.
Depress pedal beyond 25mm (1 in.) to operate brake.
Using Park Brake
Locking Park Brake:
1. Press down firmly on brake/differential lock pedal.
2. Pull park brake lever up to locked position.
3. Remove foot from brake/differential lock pedal.
Unlocking Park Brake:
1. Press down firmly on brake/differential lock pedal.
2. Pull up slightly on park brake lever while depressing release button. Push park brake lever down to unlocked position.
3. Remove foot from brake/differential lock pedal.
Using Throttle Controls
Use the throttle lever to change engine speeds. Use the throttle in conjunction with the tachometer to set engine speeds.
Starting the Engine
NOTE: It is recommended to install optional engine block heater and hydraulic oil heater if operating machine in temperatures below -18° C (0° F).
If temperature is below 0° C (32° F), follow the cold weather starting steps in this section.
2. Push the PTO knob to the disengaged/off position.
3. Remove foot from forward and reverse travel pedals.
4. Lower any rear mount implement to the ground by pushing the rockshaft control lever forward.
5. Lower any front mounted implement to the ground using the SCV lever.
6. Set hand throttle lever to the 1/3 fast position.
7. Turn key switch to the run position.
8. Check instrument panel indicator lights:
• Alternator/battery discharging light will illuminate.
• Engine oil pressure light will illuminate.
IMPORTANT: Avoid damage! Glow plugs and air heater are operational during cranking. Using ether or starter fluid during cranking will cause damage to engine. |
9. For cold weather starting, place range shift lever in low range, turn key to start position and hold for:
• 10 - 15 seconds for temperatures as low as -18°C (0°F).
• 15 - 30 seconds for temperatures below -18°C (0°F).
IMPORTANT: Avoid damage! Starter may be damaged if starter is operated for more than 20 seconds at a time: • Wait two minutes before trying again if engine does not start. |
10. Continue to hold key in start position and shift range lever to neutral position. Release key when engine starts.
11. Check instrument panel indicator lights:
• Engine oil pressure light should go out within 5 seconds.
• Alternator/battery discharging light should go out within 10 seconds.
12. Set engine speed at full throttle if indicator light does not go out after 10 seconds. If indicator light continues to stay on, stop the engine and check for cause.
IMPORTANT: Avoid damage! In cold weather, run engine several minutes to allow engine oil and transmission oil to warm. |
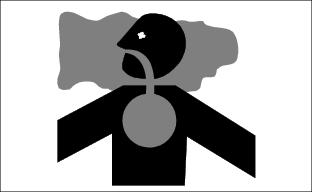
NOTE: It is normal for the engine to be louder and for blue-white exhaust smoke to be present during engine warm-up. The amount of exhaust smoke depends on air temperature.
• In warm weather, set hand throttle lever to the 1/2 fast position for 1 minute without load.
• In cold weather, set hand throttle lever to the 1/2 fast position for 5 minutes without load.
Idling the Engine
NOTE: Allowing engine to idle for long periods of time will waste fuel and cause carbon build-up.
1. Adjust hand throttle lever to set engine speed at slow idle.
Starting a Stalled Engine
IMPORTANT: Avoid damage! If engine stalls while operating under load, start engine immediately to prevent abnormal heat build-up in engine. |
2. Remove foot from forward travel and reverse travel pedals.
3. Shift transmission range lever to neutral.
4. Start engine. Continue with normal operation, or set engine at slow idle speed for 2 minutes before stopping the engine.
Stopping the Machine
Normal Stopping
1. Position the machine on a firm, level surface.
2. Remove foot smoothly from forward or reverse travel pedals to stop motion.
3. Push the PTO knob to the disengaged/off position.
4. Lower any rear mount implement to the ground by pushing the rockshaft control lever forward.
5. Lower any front mounted implement to the ground using the SCV lever.
IMPORTANT: Avoid damage! Do not stop engine immediately after hard or extended operation. Keep engine running at low idle for about 2 minutes to prevent heat build-up. |
6. Adjust hand throttle lever rearward to set engine speed to slow idle speed. Allow engine to idle for 2 minutes.
8. Turn key switch to the off position.
10. Wait for the engine and all moving parts to stop before leaving the operator’s station.
Emergency Stopping
1. Remove foot from forward or reverse travel pedals.
2. Depress brake/differential lock pedal.
3. Turn key switch to off position. Do not release brake/differential lock pedal until all moving parts have stopped.
4. If possible, lock the park brake.
Operating Transmission
The range shift lever provides two speed ranges.
The range shift lever is used in conjunction with the forward and reverse travel pedals.
1. Choose a speed range to match work application.
• L – Low speed/high power operations such as tilling hard soil, mowing high grass.
• L or H – Operations including hauling, and grass mowing.
• H – High speed operations such as transport and light mowing.
Driving Machine
IMPORTANT: Avoid damage! To prevent transmission damage, stop machine motion completely before shifting the range shift lever. |
3. Choose L or H speed range on transmission range shift lever to match work application.
4. Move hand throttle lever to desired operating speed.
5. Slowly depress forward pedal downward to travel forward. Slowly depress reverse pedal downward to travel in reverse.
• The farther either travel pedal is depressed, the faster the machine will travel.
6. Release travel pedal to stop machine and change speed range.
7. Fully stop machine motion before turning key switch to off.
Using Differential Lock (Traction Assist)
The differential lock is used to provide better traction when the rear wheels start to slip. Engaging the differential lock will lock the right and left side rear axles together and cause both rear wheels to turn at equal speeds for maximum traction.
NOTE: Turning radius is increased when the differential lock is engaged.
Engaging Differential Lock
1. Stop or slow machine movement.
2. Depress pedal 20 - 25mm (3/4 - 1 in.) to operate differential lock.
Disengaging Differential Lock
Rear wheel slippage will keep differential lock engaged. Lock will automatically disengage when traction equalizes.
Using Mechanical Front Wheel Drive (MFWD)
Mechanical front wheel drive (MFWD) enables the powertrain to drive both front and rear axles for improved traction on difficult ground conditions and provides 4-wheel braking. MFWD can be engaged and disengaged on-the-go with light loads and on low traction surfaces.
IMPORTANT: Avoid damage! Always disengage MFWD when driving on a paved surface. Put the transmission levers in neutral to move the machine when the engine is not running. |
1. Pull up on MFWD lever to engage MFWD.
NOTE: It may be necessary to reduce engine load to disengage front wheel drive.
2. Push down MFWD lever to disengage MFWD.
Tips for Operating MFWD:
• Maintain front tire pressure at maximum allowable level to ensure proper tire performance in all field conditions.
• Engage MFWD to provide four-wheel braking.
• Disengage MFWD when driving machine to or from work site to increase front tire life.
Using the Power-Take-Off (PTO) Safely
Using Rear PTO
NOTE: The Rear PTO is only operational with the operator on the seat.
Engaging Rear PTO
2. Stop machine motion, remove foot from forward and reverse travel pedals.
NOTE: The starter will not crank if the PTO knob is pulled to the engaged/on position. If the operator leaves the seat with the engine running and the PTO engaged, the safety interlock system will stop the engine.
3. Reduce throttle setting to 1500 rpm.
4. Pull the PTO knob to the engaged/on position to engage the rear PTO.
5. Adjust the hand throttle lever forward to the desired speed for implement used.
NOTE: The PTO icon on the tachometer indicates the correct engine rpm for a standard 540 PTO .
Disengaging Rear PTO
1. Adjust engine rpm to low idle speed.
2. Push the PTO knob to the disengaged/off position to disengage the rear PTO.
Using Drawbar Hitch (If equipped)
IMPORTANT: Avoid damage! Maximum static vertical load on drawbar should not exceed the maximum recommendations. Drive slowly with heavy loads. |
Maximum Drawbar Loads
Certain heavy equipment such as a loaded single-axle trailer can place excessive strain on the drawbar. Strain is greatly increased by speed and rough ground. Do not exceed the following maximum static vertical loads on drawbar:
• All Models............................................400 kg (882 lb)
Adjusting Drawbar Length
IMPORTANT: Avoid damage! For drawn PTO-driven implements, the drawbar must be in the operating position. |
The drawbar is equipped with two adjusting holes for changing drawbar length and one hole for storage.
1. Remove quick-lock pin (A) and drilled pin (B).
2. Adjust drawbar to one of two operating positions (C), or to storage position (D).
3. Install drilled pin (B) up from bottom of machine. Secure with quick-lock pin (A).
Towing Loads
NOTE: Weight requirement for towed equipment:
• If towed equipment does not have brakes, do not tow loads more than 1500 kg (3307 lb) maximum.
• If towed equipment has brakes, do not tow loads more than 2000 kg (4409 lb) maximum.
1. Hitch the towed load only to the drawbar. Lock the drawbar and pin in place.
2. Install a safety chain to the machine drawbar support and to the towed load. Provide only enough slack to permit turning.
3. Before descending a hill, shift to a gear low enough to control machine travel speed without having to use the brake pedal to brake the machine and installed implements.
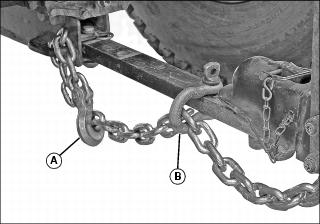
Using Safety Chain
1. Attach safety chain (A) to drawbar support and to towed load. Provide only enough slack to permit turning.
2. Install additional attaching points (B) for chain on drawbar to reduce slack in chain when necessary.
3. Remove safety chain and store when not in use.
Using 3 Point Hitch
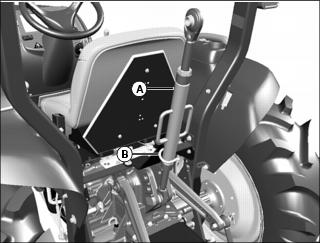
NOTE: The 3-point hitch on your machine is classified as a Category 1 hitch.
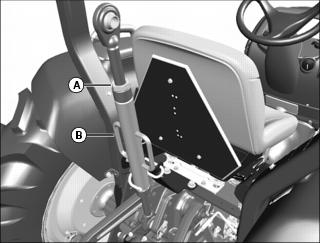
• Place center link (A) in storage hook (B) when the hitch is not in use.
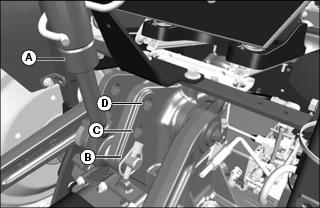
Positioning Center Link
• For light and medium draft loads: Install center link (A) in bottom hole (B) of mounting bracket. Example of light and medium draft load implements would include a landscape rake. A category 1 implement will tilt forward while raising in this position.
• For medium and heavy draft loads: Install center link in middle hole (C) of mounting bracket. Example of medium and heavy draft load implements would include a tiller or box blade. A category 1 implement will tilt forward slightly while raising in this position.
• For very heavy draft loads: Install center link in top hole (D) of mounting bracket. Example of very heavy draft load implements would include a plow or ripper. A category 1 implement will raise, but angle will remain constant.
Using Rockshaft Control Lever
Use rockshaft control lever to raise and lower equipment attached to the 3-point hitch.
The nine positions are identifiers only and do not signify specific operating depths. When the rockshaft control lever is moved forward, the draft arms will lower closer to the ground.
Using Rate of Drop/Lock Valve
IMPORTANT: Avoid damage! To prevent overheating hydraulic oil and damaging machine, do not raise rockshaft when drop/lock valve is closed. |
The rate of drop/lock valve controls the rate of rockshaft drop when the rockshaft control lever is operated. This provides direct rate of drop control for 3-point hitch mounted implements. The valve can also be used to hydraulically lock the rockshaft (three-point hitch) in a desired position. The tractor can be operated with the rate of drop valve closed. With this valve closed, the rockshaft can be raised but not lowered.
Using Draft Links
1. Slowly back machine into position to align draft links with implement lift brackets.
2. Park machine safely. (See Parking Safely in the SAFETY section.)
3. Connect draft links to the implement.
Leveling Implement Front-to-Rear
Leveling a 3-point hitch mounted implement front-to-rear is accomplished by adjusting the length of the center link:
1. Park machine safely. (See Parking Safely in the Safety section.)
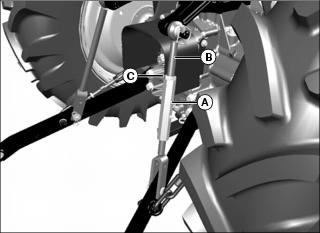
3. Rotate handle (B) to lengthen or shorten the center link.
Leveling Implement Side-to-Side
Use turnbuckle (A) on the right adjustable lift link (B) to level a 3-point hitch implement side-to-side.
1. Park machine safely. (See Parking Safely in the Safety section.)
2. Loosen locknut (C) at top of turnbuckle.
3. Rotate turnbuckle (A) to raise or lower draft link until 3-point hitch mounted implement is level from side-to-side.
4. Tighten locknut (C) to secure position.
Adjusting Implement Side-to-Side Sway
NOTE: Check implement operator’s manual procedure for adjusting sway links. When sway links have been properly adjusted, side sway of implement is controlled by position of links. A small amount of sway, 13 - 25mm (1/2 - 1 in.), is needed for many implements.
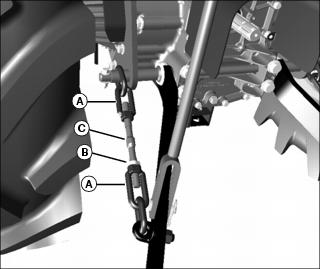
Use left and right sway links (A) to adjust 3-point hitch implement side-to-side sway:
1. Park machine safely. (See Parking Safely in the SAFETY section.)
3. Rotate sway link adjusting rod (C) to adjust 3-point hitch implement side-to-side sway.
Using Optional iMatch™ Quick-Attach Hitch System
The optional quick-attach hitch fits all Category I implements designed to the ASAE Cat I standard for quick-attach hitches.
Installing Hitch
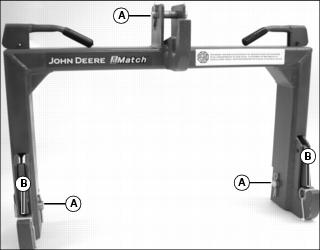
1. Remove three drilled pins (A) and two bushings (B) from quick-attach hitch.
2. Use machine rockshaft control lever to fully lower 3-point hitch draft links.
3. Park machine safely. (See Parking Safely in the SAFETY section.)
4. Position quick-attach hitch near draft links and adjust 3-point hitch sway links to align draft links with quick-attach hitch.
5. Install quick-attach hitch on draft links using drilled pins.
6. Install 3-point hitch center link on quick-attach hitch using center link quick-lock pin and drilled pin.
Connecting Implement
1. Install two bushings included with quick-attach hitch on drilled pins in implement draft link lift brackets.
2. Move levers (A) on quick-attach hitch to unlocked position.
3. Back machine into position and align quick-attach hitch with implement lift brackets.
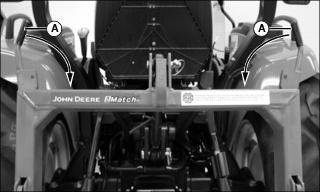
4. Use rockshaft control lever to position quick-attach hitch under lift brackets and lift implement from ground.
5. Fully raise implement. Move levers (A) on quick-attach hitch to locked position.
Using Attachments
When using attachments, check full range of 3 point hitch travel each time a new attachment or implement is mounted. Watch for hoses and attachment parts throughout the 3 point hitch travel range. Adjust the depth stop as needed. Some attachments with very short driveshafts may require an upstop, see your John Deere Dealer. The driveshaft can be damaged if attachments are operated at too high of an angle.
Ballasting Machine
IMPORTANT: Avoid damage! Do not overload tires. Do not exceed tire maximum inflation pressure or maximum load capacity. |
Add weight to machine front end if needed for stability. Heavy pulling and heavy rear mounted implements tend to lift front wheels. Add enough ballast to maintain steering control and prevent tip over. Remove weight when it is no longer needed.
Implement Codes
Use the following tables to determine the number of front weights to use with John Deere implements that show implement code data in the ballasting section of the implement operator’s manual.
Match the implement code from the implement manual with the codes for your machine and type of hitch. If the code falls between two numbers in the table, use the next higher number in the table for the number of front weights to use with that implement.
These codes are for ideal conditions. Actual field conditions may require additional ballast. Some John Deere implements may recommend using a certain number of front weights rather than giving implement codes.
Maximum recommended implement codes:
• Tractor with 305 loader, bucket removed: 36
Tire Capacities
See tire maximum inflation pressure and maximum load capacities in the SPECIFICATIONS section.
Verify maximum tire inflation pressure and maximum load information if embossed into the tire side wall.
Using Optional Rear Cast Iron Wheel Weights
IMPORTANT: Avoid damage! Do not overload tires. Do not exceed tire maximum inflation pressure or maximum load capacity. |
Fasten weight to each rear wheel using a safe lifting device. A total of three weights per wheel may be used. See your implement operator’s manual for installation and number of weights to use.
Rear wheel weights are available from your John Deere Dealer.
Using Optional Rear Ballast Box
IMPORTANT: Avoid damage! Do not overload tires. Do not exceed tire maximum inflation pressure or maximum load capacity. |
The rear ballast box is used for carrying ballast on the 3-point hitch. Approximate weight of different materials is given in the implement operator’s manual.
Using Liquid Weight in Tires
NOTE: Use of alcohol as ballast is not recommended. Calcium chloride solution is heavier and more economical.
A solution of water and calcium chloride provides safe economical ballast, and will prevent freezing. If used properly, it will not damage tires, tubes, or rims.
A mixture of 0.4 kg of calcium chloride per liter of water (3.5 lb/gal), will not freeze solid above -45° C (-50° F).
Fill tubeless tires at least to valve stem level (minimum 75% full). Less solution would expose part of rim, possibly causing corrosion.
Tube-type tires may be filled to any level below 90%.
Optional Front Weights and Front Weight Bracket Extension
Quick-Tatch weights and attaching hardware are available at your John Deere dealer. Each weight is 19 kg (42 lb) or 32 kg (70 lb).
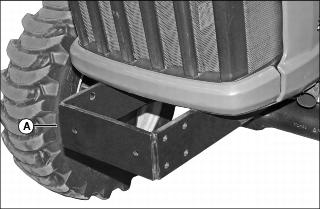
An optional front weight bracket extension kit (A) is available at your John Deere dealer. This optional front weight bracket extension kit will hold up to ten Quick-Tatch weights.
Transporting Machine on Trailer
NOTE: Use a heavy-duty trailer to transport your machine.
1. Drive machine forward onto trailer.
2. Lower any implements to trailer deck.
6. Close the fuel shut-off valve.
7. Fasten machine to trailer with heavy-duty straps, chains, or cables. Both front and rear straps must be directed down and outward from machine. Trailer must have signs and lights as required by law.
Transporting Machine
Driving Machine Safely on Roads
Observe the following precautions when operating the machine on a road:
• Make sure SMV (Slow Moving Vehicle) emblem and warning lights are clean and visible. If towed or rear-mounted equipment obstructs these safety devices, install SMV emblem and warning lights on equipment.
• Rotate light switch to road position.
• Drive slowly enough to maintain safe control at all times. Slow down for hillsides, rough ground, and sharp turns, especially when transporting heavy, rear-mounted implements.
• Adjust tread width position of rear wheels to provide maximum stability.
• Disengage the MFWD to reduce tire wear.
• Never coast machine downhill.
Pushing or Towing Machine
1. Push the PTO knob to the disengaged/off position.
2. Disengage the differential lock.
4. Move the transmission range shift lever to the N (neutral) position.
