
Service Engine
Engine Warranty Maintenance Statement
Maintenance, repair, or replacement of the emission control devices and systems on this engine, which are being done at the customer’s expense, may be performed by any non-road engine repair establishment or individual. Warranty repairs must be performed by an authorized John Deere dealer.
Avoid Fumes
Engine Oil
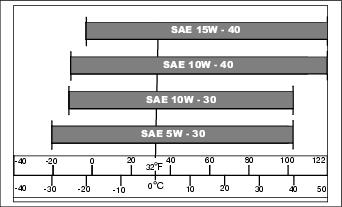
Use oil viscosity based on the expected air temperature range during the period between oil changes.
The following John Deere oils are preferred:
Other oils may be used if above John Deere oils are not available, provided they meet the following specification:
• API Service Classification CH or higher
• ACEA Specification E3 or higher
Checking Engine Speeds
Check engine speeds when engine is warmed up and not under load.
If above engine speeds are not to specifications, see your John Deere dealer.
Checking Engine Oil Level
NOTE: Check oil twice a day if you run engine over 4 hours in a day.
Make sure engine is cold when checking engine oil level.
1. Park the machine safely. (See Parking Safely in the SAFETY section.)
IMPORTANT: Avoid damage! Dirt and contamination can enter engine when checking oil level. Clean area around dipstick before loosening or removing. |
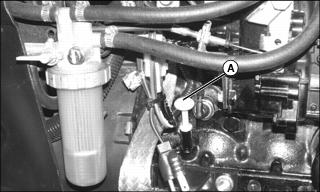
Picture Note: 1023E shown. 1026R similar.
2. Remove dipstick (A), located at the right side of the engine. Wipe with a clean cloth.
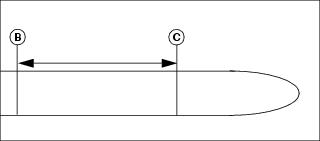
5. Check oil level on dipstick. Oil level should be between levels (B) and (C) on dipstick.
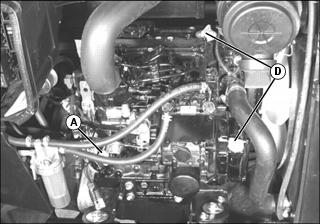
Picture Note: 1023E shown. 1026R similar.
c. Remove either oil fill cap (D).
d. Add recommended engine oil until level is within operating range on dipstick. Do not overfill.
7. If oil is above top hole mark on the dipstick, drain to proper level.
8. Install right side panel if removed.
Changing Engine Oil and Filter
IMPORTANT: Avoid damage! Change the oil more often if the vehicle is used in extreme conditions: |
1. Run engine to warm the oil.
2. Park machine safely. (See Parking Safely in the SAFETY section.)
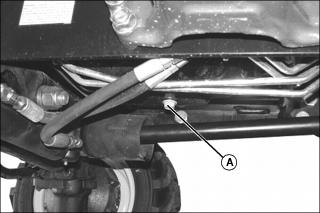
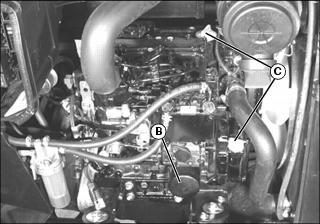
Picture Note: 1023E shown. 1026R similar.
5. Place container under oil drain plug (A) located on under side of engine.
7. Wipe dirt from around oil filter (B).
8. Turn filter counter-clockwise to remove.
9. Put a light coat of clean engine oil on the gasket of new filter.
10. Install replacement oil filter by turning filter clockwise until gasket contacts filter base. Tighten additional one half turn.
11. Install drain plug. Do not overtighten.
12. Remove either oil fill cap (C).
13. Add 2.7 L (2.9 qt) engine oil.
15. Start and run engine at idle to check for leaks.
16. Stop engine. Fix any leaks before operating.
17. Check engine oil level. Add oil if necessary.
Cleaning Dust Unloading Valve
IMPORTANT: Avoid damage! Do not operate engine without air cleaner element and rubber dust unloading valve installed. |
1. Park the vehicle safely. (See Parking Safely in the SAFETY section.)
3. Access the engine compartment.

4. Squeeze dust unloading valve (A) to clean. Remove and replace if damaged.
Checking Air Restriction Indicator (1026R only)
1. Park the machine safely. (See Parking Safely in the SAFETY section.)
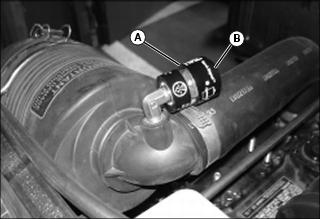
3. Check the service window (A) on the indicator.
• Change the air filter if the service window is red.
• Press the top of the indicator housing (B) to reset the indicator after service.
Servicing Air Filter Elements
Servicing Primary Air Filter Element:
1. Park machine safely. (See Park Safely in the SAFETY section.)
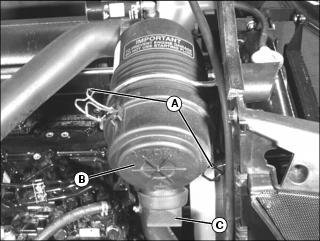
4. Release latches (A) and remove cover (B).
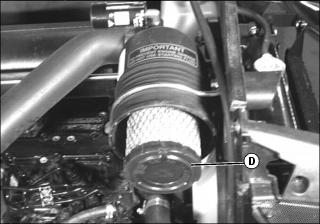
5. Remove and discard primary element (D). Replace with a new primary filter element.
6. Install cover (B) with rubber dust unloading valve (C) pointing downward.
7. Hook latches (A) onto cover.
Servicing Secondary Air Filter Element:
2. Remove and discard primary air filter element.
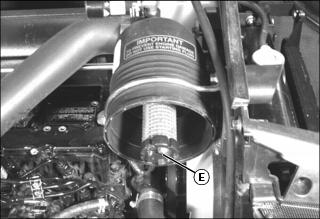
3. Remove and discard secondary air filter element (E). Replace with a new secondary air filter element.
4. Install new primary air filter element.
5. Install cover (B) with rubber dust unloading valve (C) pointing downward.
6. Hook latches (A) onto cover.
Checking Air Filter Intake Hoses and Clamps
1. Park machine safely. (See Parking Safely in the SAFETY section.)
NOTE: Visually inspect hose for cracks and wear. Squeeze hose to check for deterioration. Hose should not be hard and brittle, nor soft or swollen.
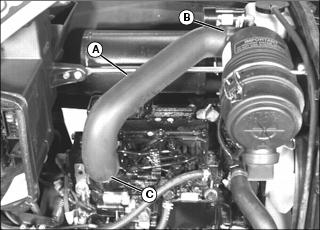
4. Tighten upper (B) and lower (C) clamps if necessary.
Service Cooling System Safely
Recommended Engine Coolant
The engine cooling system is filled to provide year-round protection against corrosion and cylinder liner pitting, and winter freeze protection to -37 degrees C (-34 degrees F). If protection at lower temperatures is required, consult your John Deere dealer for recommendations.
The following coolants are preferred:
• John Deere COOL-GARD™ II Premix
• John Deere COOL-GARD™ II PG Premix
Use John Deere COOL-GARD II PG Premix when a non-toxic coolant formulation is required.
The following engine coolant is also recommended:
• John Deere COOL-GARD™ II Concentrate in a 40—60% mixture of concentrate with quality water.
John Deere COOL-GARD II Premix, COOL-GARD II PG Premix, and COOL-GARD II Concentrate coolants do not require use of supplemental coolant additives.
John Deere COOL-GARD II and COOL-GARD II PG coolants might not be available in the geographical area where service is performed.
If these coolants are unavailable, use a coolant concentrate or prediluted coolant intended for use with heavy duty diesel engines and with a minimum of the following chemical and physical properties:
• Is formulated with a quality nitrite-free additive package.
• Provides cylinder liner cavitation protection according to either the John Deere Cavitation Test Method or a fleet study run at or above 60% load capacity.
• Protects the cooling system metals (cast iron, aluminum alloys, and copper alloys such as brass) from corrosion.
The additive package must be part of one of the following coolant mixtures:
• Ethylene glycol or propylene glycol base prediluted (40—60%) heavy duty coolant.
• Ethylene glycol or propylene glycol base heavy duty coolant concentrate in a 40—60% mixture of concentrate with quality water.
Water Quality
• Water quality is important to the performance of the cooling system. Distilled, deionized, or demineralized water is recommended for mixing with ethylene glycol and propylene glycol base engine coolant concentrate.
IMPORTANT: Avoid damage! Do not use cooling system sealing additives or antifreeze that contains sealing additives. Do not mix ethylene glycol and propylene glycol base coolants. |
Servicing Cooling System
Checking Cooling System
1. Park machine safely. (See Parking Safely in the SAFETY section.)
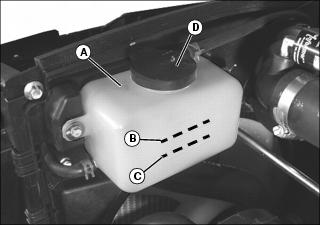
4. Check recovery tank (A) coolant level:
• If engine is warm, coolant level should be between the FULL line (B) and the LOW line (C).
• If engine is cold, coolant level should be at the LOW line (C) on the recovery tank.
5. Remove recovery tank cap (D) if needed to add coolant.
Draining Cooling System
1. Park machine safely. (See Parking Safely in the SAFETY section.)
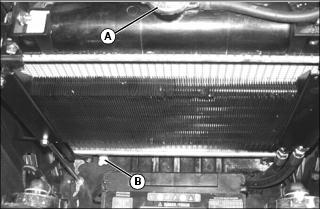
4. Slowly open radiator cap (A) to the first stop to release all pressure.
5. Close radiator cap tightly.
6. Remove radiator screen, remove radiator drain plug (B) and drain coolant.
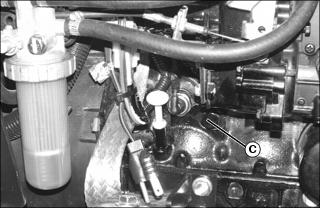
Picture Note: 1023E shown. 1026R similar.
7. Remove engine block drain plug (C) and drain all coolant.
8. When coolant drains from the recovery tank, remove the radiator cap.
9. Install radiator and install engine block drain plugs.
Flushing Cooling System
1. Fill cooling system with clean water and John Deere Cooling System Cleaner, or John Deere Cooling System Quick Flush or an equivalent. Follow directions on the container.
2. Install and tighten radiator cap.
3. Start and run engine until it reaches operating temperature.
5. Remove radiator and engine block drain plugs.
6. Drain cooling system immediately before rust and dirt settle.
7. Install radiator and engine block drain plugs.
Filling Cooling System
NOTE: John Deere COOL-GARD coolant is recommended when adding new coolant to the cooling system.
Follow the directions on the container for correct mixture ratio.
• Cooling system capacity is 3.7 L (3.9 qt).
3. Install and tighten radiator cap.
4. Run engine until it reaches operating temperature.
6. Check recovery tank coolant level and add coolant if necessary
Checking Radiator Hoses and Clamps
1. Park machine safely. (See Parking Safely in the SAFETY section.)
NOTE: Visually inspect hoses for cracks and wear. Squeeze hoses to check for deterioration. Hoses should not be hard and brittle, nor soft or swollen.
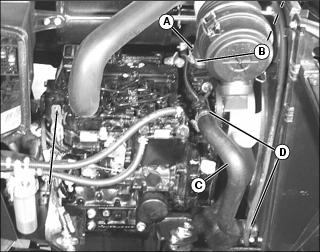
4. Check upper radiator hose (A) for damage or cracking. Replace if necessary.
5. Check hose clamps (B) as needed.
6. Check lower radiator hose (C) for damage or cracking. Replace if necessary.
7. Check hose clamps (D) as needed.
Cleaning Radiator Cooling Screen and Fins
 c CAUTION: Avoid injury! Compressed air can cause debris to fly a long distance. • Clear work area of bystanders. • Wear eye protection when using compressed air for cleaning purposes. |
IMPORTANT: Avoid damage! The radiator cooling screen must be clean to prevent engine from overheating and to allow adequate air intake. |
Cleaning Radiator Cooling Screen
1. Park machine safely. (See Parking Safely in the SAFETY section.) Allow engine to cool.

Picture Note: Screen shown partially removed.
3. Lift tabs (A) to slide radiator screen (B) up out of retaining slot.
4. Clean screen with compressed air, brush or cloth.
5. Install screen in front of radiator.
Cleaning Radiator Cooling Fins
1. Park machine safely. (See Parking Safely in the SAFETY section.) Allow engine to cool.

4. Remove all dirt and debris from fins at front (A) and rear of radiator including fan shroud using compressed air or water.
Servicing the Alternator Belt
|
c CAUTION: Avoid injury! Rotating parts can catch fingers, loose clothing, or long hair. Wait for engine and all moving parts to stop before leaving operator’s station to adjust or service machine.
|
Checking Belt Tension
1. Park machine safely. (See Parking Safely in the SAFETY section.) Allow engine to cool.
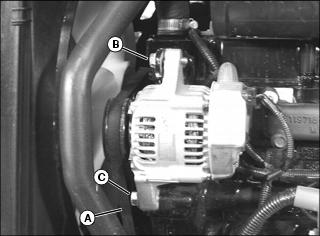
4. Apply moderate thumb pressure to belt (A) halfway between the pulleys. Belt should deflect inward approximately 9 mm (3/8 in.).
5. Adjust belt tension if deflection is more or less than specified.
Adjusting Belt Tension
1. Loosen adjusting bolt (B) and pivot bolt (C).
2. Apply outward pressure to alternator housing until tension is correct.
Replacing Belt
NOTE: Replace alternator belt if excessive wear, damage or stretching is detected.
1. Park machine safely. (See Parking Safely in the SAFETY section.) Allow engine to cool.
4. Loosen adjusting bolt (B) and pivot bolt (C).
5. Apply inward pressure to alternator housing.
6. Remove belt from alternator sheave, fan sheave and crankshaft sheave.
7. Route belt over fan and remove.
8. Install new belt over fan and onto sheaves.
9. Apply outward pressure to alternator housing until tension is correct.
10. Tighten bolts (B) and (C).
11. Check belt tension. Adjust as necessary.
Checking and Cleaning Fuel Filter Sediment Bowl and Replacing Filter
NOTE: Change filter when fuel level is low.
Checking Sediment Bowl
1. Park machine safely. (See Parking Safely in the SAFETY section.) Allow engine to cool.
2. Check fuel sediment bowl. If water and deposits are detected, remove bowl and replace fuel filter.
Cleaning Sediment Bowl and Replacing Fuel Filter
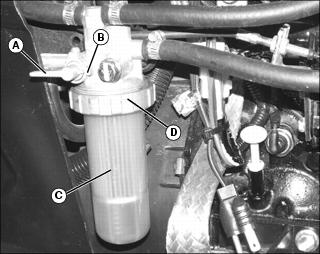
1. Move the fuel shut-off valve (A) to the “C” (closed) position (B).
2. Position drain pan under fuel filter sediment bowl (C).
3. Turn locking collar (D) counterclockwise to remove bowl.
4. Remove and discard the fuel filter.
6. Install new filter to filter head.
7. Install sediment bowl and locking collar.
NOTE: Fuel system is self bleeding.
9. Turn key to the ON position for 10-15 seconds before attempting to start, electric pump will purge air from sediment bowl.
Replacing Inline Fuel Filter
NOTE: Change filter when fuel level is low.
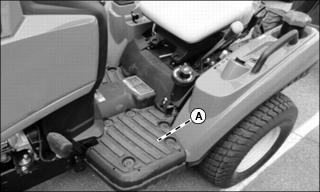
1. Inline fuel filter is located under left foot deck (A)
2. Position drain pan under fuel filter.
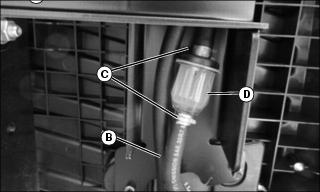
3. Clamp fuel line (B) between filter and tank to prevent fuel draining from fuel tank.
4. Remove two spring clamps (C).
NOTE: Flow direction arrow on filter body should point away from tank.
5. Remove old filter (D) and install new filter.
7. Remove clamp used between filter and tank. Check for leaks.
Fuel Injection Pump
IMPORTANT: Avoid damage! Do not clean a warm or hot fuel injection pump with steam or water. Clean with compressed air if pump is not cooled. |
NOTE: The fuel injection pump is calibrated by the engine manufacturer and should not require any adjustments.
If engine is hard to start, lacks power, or runs rough, see Troubleshooting Section of this manual.
After performing the check in the troubleshooting section and your engine is still not performing correctly, contact your John Deere dealer.
Fuel Injection Nozzles
If injection nozzles are not working correctly or are dirty, engine will run poorly. See your John Deere dealer for service.
Cleaning Front Grille Screens
IMPORTANT: Avoid damage! Grille and side screens must be clean to prevent engine from overheating and to allow adequate air intake. |
1. Check front grille screens for dirt, grass clippings and debris.


