
Service Engine
Avoid Fumes
· If it is necessary to run an engine in an enclosed area, use an exhaust pipe extension to remove the fumes. |
Engine Oil

Use oil viscosity based on the expected air temperature range during the period between oil changes.
The following oil is preferred:
Other oils may be used if they meet one the following:
· API Service Classification SG
· API Service Classification SF
Oils meeting Military Specification MIL-L-46167B may be used as arctic oils.
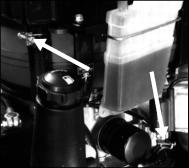
Checking The Engine Oil Level
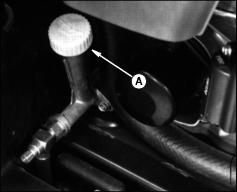
1. Park the Front Mower on hard, level surface.
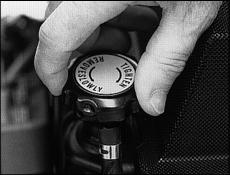
4. Remove the dipstick (A). Wipe it with a clean rag.
5. Install the dipstick in its tube, but do not tighten it: let the dipstick threads rest on top of the tube.
NOTE: The FULL mark on the dipstick is below the word FULL.
6. Remove the dipstick. Check the oil level. Oil should be between the ADD and FULL marks-not above the FULL mark.
7. Add oil if necessary. See Engine Oil above.
8. Install and tighten the dipstick. Lower the hood.
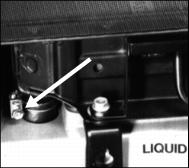
Changing The Engine Oil And Filter

1. Park the Front Mower on a hard, level surface.
2. LOCK the park brake. STOP the engine.
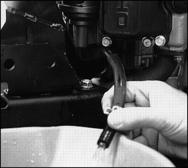
4. Put an oil pan under the drain tube (A).
5. Loosen the drain fitting (B).
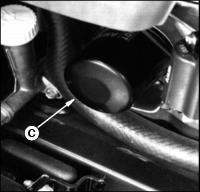
6. While the oil is draining, remove the filter (C): turn it counterclockwise.
7. Put a film of oil on the gasket of the new filter.
8. Install the filter. Turn the filter until the gasket contacts the mounting surface. Then turn the filter BY HAND 3/4 turn more.
9. Tighten the drain fitting. Do not overtighten the fitting. Remove the drain pan.
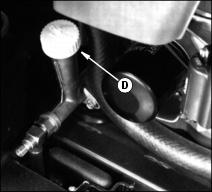
11. Install oil through the dipstick tube.
· F710: Without a filter change: 1.6 L (3.4 pt) oil
· F710: With a filter change: 1.8 L (3.9 pt) oil
· F725: Without a filter change: 1.9 L (4.0 pt) oil
· F725: With a filter change: 2.1 L (4.5 pt) oil
13. Run the engine at HALF SPEED.
14. Stop the engine. Lift the hood. Check for leaks around the filter and drain fitting.
NOTE: The FULL mark on the dipstick is below the word FULL.
15. Check the oil level. Do not tighten the dipstick. Oil should be between ADD and FULL on the dipstick-not above the FULL mark. Install and tighten the dipstick.
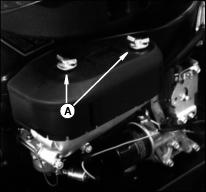
Cleaning The Air Intake Screen

2. Clean the air intake screen (A) with rag, brush, or compressed air.
3. If the screen is very dirty, lift and open the hood.
4. Pull the tab (B) on each side down slightly and turn it to the straight-ahead position.
· Remove the screen and clean it.
· F725: Also clean the screen on top of the radiator.
5. When you install the screen:
· Turn the tabs to the straight-ahead position.
· Install the tabs in the slots.
· Pull the tab (B) on each side down slightly and turn it sideways.
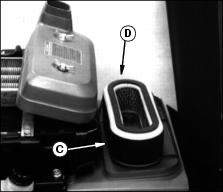
Servicing The Air Cleaner
2. F725: Remove the air intake screen.

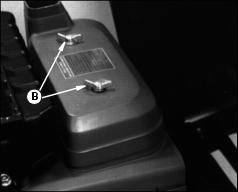
3. Remove the air cleaner cover:
· F710: Loosen the wing nuts (A) to remove the cover.
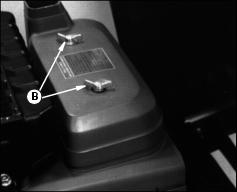
· F725: Loosen the wing nuts (B) to remove the cover.
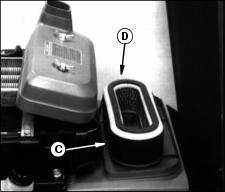
4. Remove the foam element (C) from the paper element (D).
· Wash it in warm water-detergent solution.
· Put 30 ml (1 oz) clean engine oil
on the element. Squeeze it to distribute oil and remove excess
oil.
6. Check the paper element. If element has a break, is very dirty or oily or sooty, replace it.
7. Install the elements and the cover. Lower hood.
· F725: Install air intake screen then lower the hood.
Replacing The Paper Element
2. F725: Remove the air intake screen.
3. Remove the air cleaner cover:
· F710: Loosen the wing nuts (A)
to remove the cover.
· F725: Loosen the wing nuts (B) to remove the cover.
4. Remove the foam element (C) from the paper element (D).
5. Throw away the paper element.
6. If foam element is dirty, clean it as follows:
· Wash it in a solution of warm water and liquid detergent. DO NOT wash paper element.
· Squeeze excess water from foam element.
· Allow foam element to air dry.
· Put approximately 30 ml (1 oz) of
clean engine oil to foam element.
· Squeeze foam element to distribute oil evenly.
7. Install the foam element on the new paper element.
8. Install the elements and cover. Lower hood.
· F725: Install air intake screen then lower the hood.
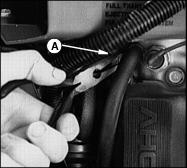
Checking The Spark Plug(s)
2. Disconnect the spark plug wire (A) from each plug. Remove the spark plug(s).
3. Clean the plug(s) carefully with a wire brush.
4. Inspect the plug(s) for damage (cracks, pits, etc.) or excess wear.
5. Adjust the gap to 0.64 mm (0.025 in).
6. Install the plug(s). Connect the wire(s).
NOTE: In Canada use only resistor plug(s).
Replacing The Fuel Filter
To help prevent fire and/or explosion: |
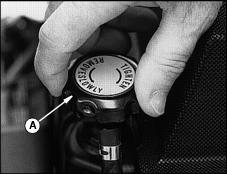
2. Turn the fuel shutoff pointer to the rear to the CLOSED position.
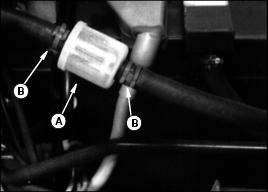
· Use a pliers to open and slide the clamps (B) away from the filter.
· Disconnect the hoses from the filter.
· Install the new filter with the arrow on the filter body pointing forward.
4. Turn the fuel shutoff pointer vertical to the OPEN position.
Service Cooling System Safely (F725)

Engine Coolant (F725)
Use ethylene glycol base coolant. These coolants usually have labels stating "For Automobile and Light Duty Service." These products are also often labeled for use in aluminum engines. Check container label before using.
Engine Coolant (F725) (Continued)
IMPORTANT: Avoid damage! To prevent engine damage, DO NOT use pure antifreeze or more than 50% antifreeze in the cooling system. DO NOT mix or add any other type additives to the cooling system. |
Mix approximately 50 percent antifreeze with 50 percent distilled or deionized water. This mixture will provide freeze protection to -37 degrees C (-34 degree F).
Certain geographical areas may require lower temperature protection. See the label on your antifreeze container or consult your John Deere dealer to obtain the latest information and recommendations.
The recommended antifreeze provides:
· Corrosion-resistant environment within the cooling system.
· Compatibility with cooling system hose and seal material.
· Protection during cold and hot weather operations.
Checking Coolant Level (F725)
1. Check the coolant level when the engine is cool. Do not remove the radiator cap (A) unless the engine is cool.
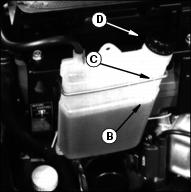
3. Coolant level must be between the LOW and HIGH (B and C) marks on the recovery tank.
4. If the coolant is low, remove the tank cap (D).
5. Add a solution of 50% ethylene glycol (without stop-leak additive) antifreeze and 50% water to the correct level.
6. Install and tighten the tank cap.
7. If necessary, clean debris from the air intake screen and radiator.
8. Check the condition of the hoses and clamps. Check for leaks or loose connections.
Draining Cooling System (F725)
1. STOP engine. Let engine cool.
· Do not remove radiator cap unless engine is cool. |

3. Cover radiator cap with rag, then open cap to release ALL pressure.
5. Remove top hose clamp (A). This is the small hose that runs from the water pump to the cylinder head.
NOTE: Locate the hose on the left side of the engine.
6. Hold a bucket below the hose. Pull hose off of fitting and drain coolant into bucket.
NOTE: There should be very little coolant escape from the cylinder head fitting if the pressure has been released from the radiator and the cap installed tightly.
7. After coolant has drained, install hose and clamp to cylinder head fitting.
8. Flush the cooling system. (See Flushing Cooling System in this section.)
Flushing Cooling System (F725)
IMPORTANT: Avoid damage! To prevent engine damage, DO NOT pour water into a hot engine. DO NOT operate engine without coolant. |
1. Fill cooling system with clean water and John Deere Cooling System Cleaner, or John Deere Cooling System Quick Flush or equivalent. Follow directions on can.
2. Install and tighten radiator cap (A).
3. Start and run engine until it reaches operating temperature.
4. Drain cooling system immediately before rust and dirt settle.
5. Install and tighten drain plug.
6. Fill cooling system. (See Filling Cooling System in this section.)
Filling Cooling System (F725)
IMPORTANT: Avoid damage! To prevent engine damage, DO NOT use straight antifreeze or more than 50% antifreeze in the cooling system. DO NOT mix or add any other type additives to the cooling system. |
· Use a solution of only ethylene glycol antifreeze (without a stop-leak additive) and clean, soft water.
· A chart on antifreeze container tells how much antifreeze to use for freeze protection needed in your area.
2. When operating engine in extremely cold temperatures:
· See your John Deere dealer for information on arctic operation.
3. For temperatures above freezing:
· Fill cooling system with clean, soft water and John Deere Engine Coolant Conditioner.
4. John Deere Cooling System Sealer or its equivalent may be added to radiator to seal leaks. Do not use any other additives in cooling system.
5. Install and tighten radiator cap.
6. Run engine until it reaches operating temperature.
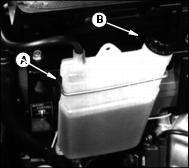
8. After engine cools, check coolant level in recovery tank (A):
· When engine is HOT-Coolant level should be UP to H mark on recovery tank.
· When engine is COLD-Coolant level should be DOWN to L mark on recovery tank.
9. Remove cap (B) to add coolant if necessary.
10. Check condition of coolant system hoses. Install new hoses periodically.
11. Tighten hose clamps regularly.
Tightening The Hose Clamps
Tighten the cooling system hose clamps.
After 3 years of operation, install new hoses.
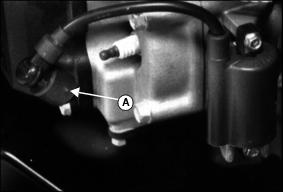
Adjusting PTO Clutch
PTO clutch is on engine crankshaft. Adjust clutch if blade stop time is more than 6 seconds. See Checking Blade Stop Time in Operating The Mower section.
IMPORTANT: Avoid damage! Turn each of the adjusting nuts SAME NUMBER of turns. You may want to mark brake plate and nuts before you adjust them to help keep track of turns. |
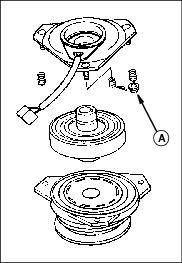
1. Tighten three nuts (A) 1/2 turn.
2. Check blade stop time. See Checking Blade Stop Time in Operation section.
3. If stop time is more than 5 seconds, tighten three nuts 1/4 turn.
4. Start engine and listen for clutch scraping. If clutch is scraping, STOP engine and loosen nuts 1/4 turn.