
Service Transmission
Transmission And Hydraulic Oil
NOTE: NOTE: Tractor is filled with John Deere Low Viscosity
HY-GARD® (J20D) transmission oil at the factory.
DO NOT mix oils.
Use only Low Viscosity HY-GARD® (J20D) transmission oil. DO NOT use type "F" automatic transmission fluid.
IMPORTANT: Avoid damage! When operating in temperatures below -7° C (20°F), you must use Low Viscosity HY-GARD or transmission damage will occur. |
John Deere Low Viscosity HY-GARD® (J20D) transmission oil is specially formulated to provide maximum protection against mechanical wear, corrosion, and foaming.
Checking The Transmission Oil Level
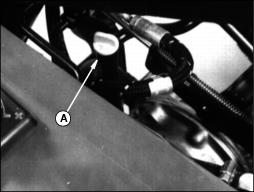
Check the oil level before you start the engine.
1. Lift the seat to the second position.
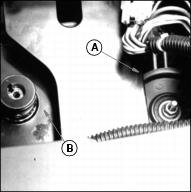
2. Turn the dipstick (A) to remove it.
3. Wipe the dipstick. Install it but do not turn it. Pull it out.
4. Oil should be in the XX area at the bottom of the dipstick.
5. If not, pour oil into the dipstick tube.
6. Install and tighten the dipstick.
Changing The In-line Hydraulic Oil Filter
1. STOP the engine. LOCK the park brake. Wait until the engine and the transmission are cool.

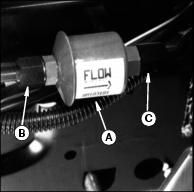
3. Remove the hydraulic filter (A):
· Loosen the two fittings (B).
· Catch dripping oil in a container.
· Install a new filter with an O-ring on each side.
5. Also change the hydraulic sump filter (next).
Changing The Hydraulic Sump (Transaxle) Filter
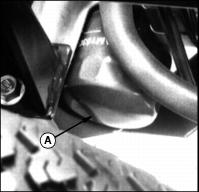
1. Use a filter wrench to turn the sump filter (A) counterclockwise. Remove the filter.
2. Catch dripping oil in a container.
3. Put a film of clean transmission oil on the seal of the new filter.
4. Install the filter. Turn it clockwise
until it contacts the mounting surface.
5. Then turn the filter 1/2 turn more.
6. Run the engine a short time. Stop the engine.
7. Check the hydraulic oil level. See Checking The Transmission Oil Level in this section.
8. Add oil, if necessary. Do not run the engine if the transmission oil level is low.
Changing The Transmission Oil
1. STOP the engine. LOCK the park brake. Wait until the engine and the transmission are cool.
2. Remove the transmission oil dipstick.
3. Put a container under the drain plug (A).
4. Remove the plug. Drain the oil. Install the plug.
5. Pour oil into the dipstick tube. The capacity is 2.4 L (2.5 qt).
6. Install and tighten the dipstick.
7. Run the engine a short time. Stop the engine.
8. Check the transmission oil level. See Checking The Transmission Oil Level in this section.
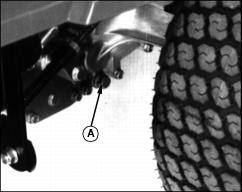
Replacing The Transmission Belt
2. Lift the seat to the second position.
3. Stand on the left side of the Front Mower. Pull and hold the idler sheave toward you (A).
4. Remove the belt from the front sheave (B) and the rear sheave.
5. Pull and hold the idler sheave as you install the new belt.
Adjusting Transmission Neutral
Adjust transmission neutral to assure that machine DOES NOT creep when pedals are in the neutral position.
You will need a jumper wire, floor jack, and jackstand for this procedure.
1. Park machine on level surface. Park brake disengaged. PTO disengaged. Transmission in neutral.
2. Block right drive wheel to prevent machine from moving.
3. Raise left drive wheel off ground with floor jack. Place a jackstand under left axle housing to prevent wheel from dropping.
NOTE: DO NOT engage differential lock during this adjustment.
DO NOT turn PTO switch to the on position as the operator presence circuit is bypassed for this procedure and the PTO could engage.
4. Have someone push down center of seat cushion to activate seat safety switch, or disconnect connector from seat switch and install jumper wire across wiring harness connector posts.
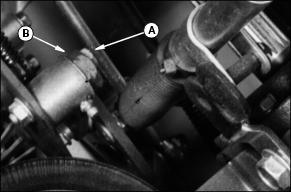
5. Loosen bolt (A) on adjuster cam (B.
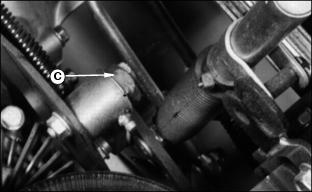
6. Start engine and run at fast idle.
7. Rotate cam (C) until left wheel does NOT spin.
8. Tighten bolt. Readjust cam if wheel begins to spin again.