
Service Engine
Engine Warranty Maintenance Statement
Maintenance, repair, or replacement of the emission control devices and systems on this engine, which are being done at the customers expense, may be performed by any nonroad engine repair establishment or individual. Warranty repairs must be performed by an authorized John Deere dealer.
Avoid Fumes
· If it is necessary to run an engine in an enclosed area, use an exhaust pipe extension to remove the fumes. |
Engine Oil
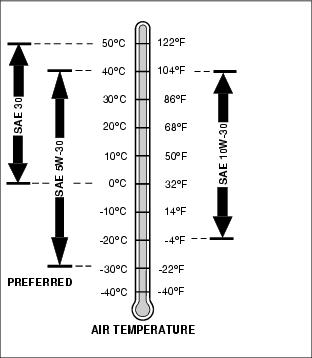
Use oil viscosity based
on the expected air
temperature range during
the period between oil
changes.
The following John Deere
oils are PREFERRED:
The following John Deere
oils are also recommended,
based on their specified
temperature range:
Other oils may be used if above John Deere oils are not available, provided they meet one of the following specifications:
· SAE 30-API Service Classification SC or higher;
· SAE 5W-30-API Service Classification SG or higher;
· SAE 10W-30-API Service Classification SG or higher.
Checking Engine Oil Level
1. Park riding mower on level surface.
2. Put shift lever in N (NEUTRAL) position.
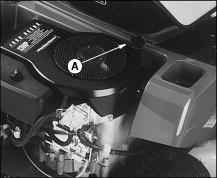
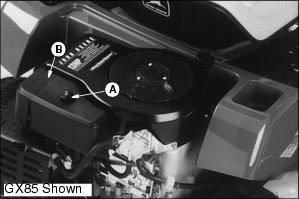
7. Remove dipstick (A). Wipe dipstick with clean rag.
8. Install and tighten dipstick.
9. Remove dipstick. Check oil level on dipstick.
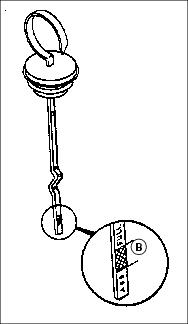
10. Oil level must be between ADD and FULL.
11. If oil level is low, add oil until oil level is no higher than FULL mark (B) on dipstick.
12. Install dipstick securely.
Changing Engine Oil
1. Park riding mower on level surface.
3. Run engine approximately 2 minutes to warm oil.
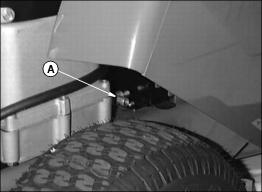
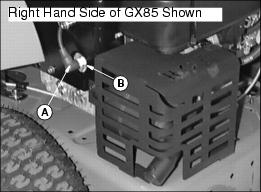
6. Install drain hose on drain valve (A) located on right side of riding mower.
7. Open drain valve by turning knob with wrench. Drain oil into pan or container.
8. Close drain valve after all oil is drained by turning knob with wrench and tighten to 5.65 N·m (50 in-lbs.).
NOTE: Tighten dipstick cap for correct oil level reading.
10. Remove engine dipstick (B).
11. Engine oil capacity is 1.4 L (1 1/2 qt.) when dry. Pour oil into dipstick fill tube.
13. Remove dipstick and check oil level. Add oil if necessary.
Changing Fuel Filter
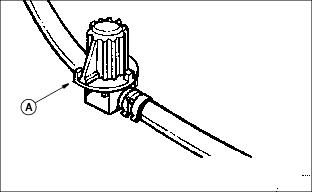
1. Turn fuel shut-off valve (A) to CLOSED position.
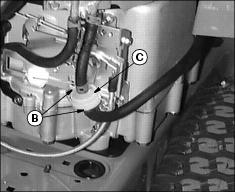
2. Slide clamps (B) back on fuel line.
3. Remove fuel filter (C) from fuel lines.
4. Replace fuel filter. Order filter from your John Deere dealer.
NOTE: Before installing fuel lines on fuel filter, lubricate
with John Deere multi-purpose lubricant.
5. Install fuel lines on fuel filter.
7. Turn fuel shut-off valve so pointer is in line with fuel line:
OPEN position.
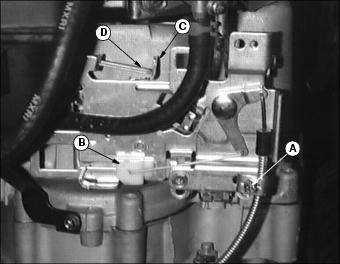
Adjusting Throttle Cable
NOTE: Fuel filter is removed for photo clarity.
1. STOP engine and remove spark plug wire.
2. Put throttle lever at FULL throttle position.
3. Loosen casing clamp screw (A).
4. Move governor control rack (B) until governor control lever (C) just contacts choke rod (D).
5. Tighten casing clamp screw (A).
6. Cycle throttle lever from full throttle to low idle and back
to full throttle a couple of times.
7. Check governor control lever (C) to be sure choke rod (D)
is NOT being depressed. A slight gap is all right.
Adjusting Carburetor
NOTE: The carburetor is calibrated by the engine manufacturer and should not require any adjustments.
If engine is operated at altitudes above 1829 m
(6,000 ft.), some carburetors may require a special high altitude main jet. See your John Deere dealer.
Possible engine surging will occur at high rpm when the transmission is in neutral ("N") and the PTO switch is in the OFF position. This is a normal condition due to the emission control system.
If engine is hard to start or runs rough, check the TROUBLESHOOTING section of this manual.
After performing the checks in the troubleshooting section and your engine is still not performing correctly, contact your John Deere dealer.
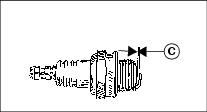
Checking Spark Plug
1. Remove rubber cap (A) and spark plug (B).
2. Clean spark plug carefully with wire brush.
· Pitted or damaged electrodes.
4. Check plug gap with feeler gauge. Gap must be 0.762 mm (0.030-in.)-Dimension (C). Adjust as necessary.
NOTE: Canada: Use resistor plug only.
· If spark plug needs replacing, replace with resistor type plug only. (See Specifications for correct spark plug.)
6. Tighten to 25 N·m (221 lb-in.).
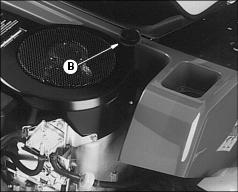
Clean Air Intake Screen
IMPORTANT: Avoid damage! Engine is cooled by air. Plugged air intake screen may cause engine damage. |
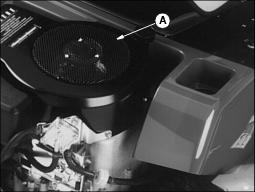
1. Stop engine and remove key.
2. Clean air intake screen (A) with brush or compressed air.
Checking and Cleaning
Precleaner and Air Cleaner Element
IMPORTANT: Avoid damage! When operating in extremely dry and dusty conditions, it maybe necessary to: |
1. Stop engine and remove key.
2. Remove knob (A) and cover (B).
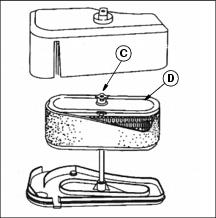
3. Remove wing nut (C) and air cleaner (D) from base.
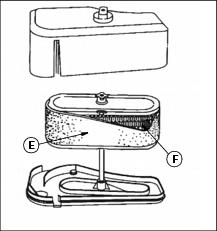
4. If precleaner (E) is dirty, remove from paper element (F).
IMPORTANT: Avoid damage! To prevent engine damage: |
5. If paper element is dirty, tap gently on your hand to remove dust.
NOTE: If precleaner or paper element has a break or is damaged, replace it.
6. If paper element is very dirty or oily, install new element.
7. If precleaner is dirty, wash it in a solution of warm water and liquid detergent. DO NOT wash paper element.
9. Squeeze excess water from precleaner.
10. Allow precleaner to air dry.
11. Put approximately 3 drops of clean engine oil on precleaner. Squeeze precleaner to distribute oil evenly.
12. Install precleaner on paper element.