
Assembly - Plug Aerator
Identify Parts
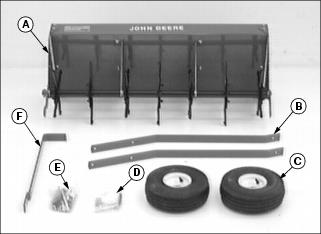
Picture Note: 40-Inch model shown.
NOTE: The following assembly instructions apply to both the 40-Inch and 48-Inch models.
Box of Parts
Bag of Parts
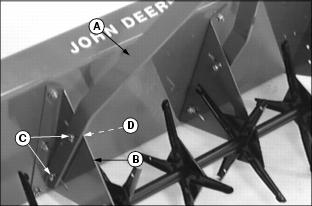
Assemble Tow Bars
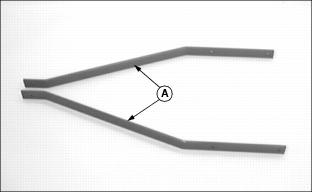
1. Align tow bars (A) as shown.
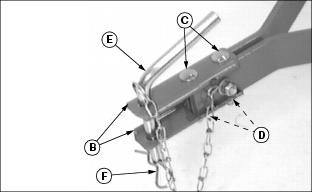
2. Assemble two clevis straps (B) to front of tow bars using two 5/16 x 2-1/4 in. carriage bolts (C) and two locknuts (D). Hand tighten only.
3. Slide clevis assembly forward until front carriage bolt is within 6 mm (1/4 in.) from the end of tow bars.
4. Install hitch pin (E) in clevis and fasten with spring locking pin (F) through chain loop.
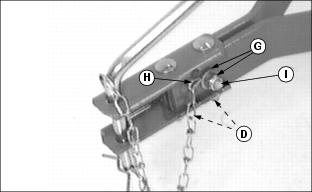
5. Install 5/16 x 1-1/2 in. cross hex bolt (I). Place chain hook (H) around bolt and secure with 5/16 in. flat washer and locknut (I).
6. Align tow bars and clevis. Tighten nuts (D) completely.
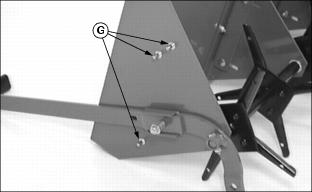
7. Tighten nylock nut (G) while holding chain hook forward and centered between clevis halves.
Install Tow Bars to Tray Assembly
1. Stand plug tray assembly on its rear side.
NOTE: You may want to get a helper or use a hoist to steady tow bars during alignment.
2. Align tow bars (A) to outside of brackets (B) and fasten with two 5/16 x 1 in. hex bolts (C). Secure with 11/32 x 11/16 x1/16 in. flat washers and nylock nuts (D) to the inside of the bracket. Hand tighten only. Repeat for other side.
3. Hold tow bars all the way to top of slots and tighten nylock nuts (D).
Install Lift Lever

1. Slide lift handle (A) into lift arm channel (B). Lift handle offset goes to outside of lift arm.
2. Install 3/8 x 2 in. flat-top carriage bolt (C) with bolt head to inside of lift arm. Slide spring (D) and 13/32 x 13/16 x 1/16 in. flat washer (E) onto bolt.
NOTE: Make sure bolt head (C) is properly seated when tightening locknut.
3. Install and tighten locknut (F) until one full thread is exposed.
4. Install three transport pins (G) with threaded end to the inside. Secure with 5/16 in. lockwashers and 5/16 in. hex nuts on the inside. Tighten nuts completely.
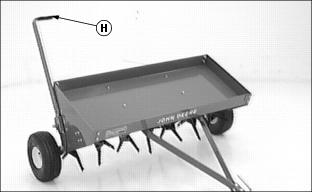
5. Install vinyl handle grip (H) on lift handle.
Assemble Transport Wheels
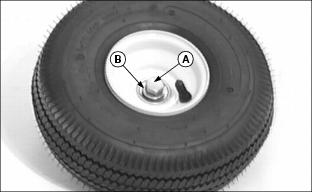
1. Install 1/2 x 3 3/4 in. hex bolt (A) and 17/32 x 1/16 x 3/32 in. flat washer (B) on valve stem side of wheel hub.
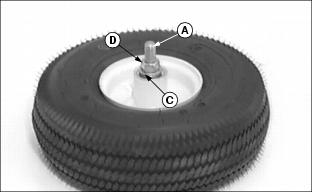
2. Turn wheel over and install 17/32 x 1/16 x 3/32 in. flat washer (C) and 1/2 in. hex nut (D).
3. Tighten nut (D) until washers (B) and (C) keep bearing from turning on bolt without forcing bearings to be pressed inward. After tightening, make sure the wheel can be turned by hand with the bearing remaining stationary on the bolt.
4. Repeat for other wheel assembly.
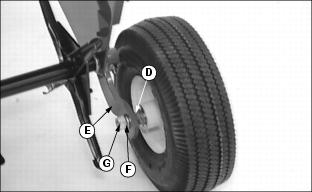
5. Install wheel assembly on lift arm (E). Then install 1/2 in. lockwasher (F) and 1/2 in. hex nut (G). Hold wrench on nut (D) and tighten nut (G) completely. This will ensure the wheel hub remains properly adjusted.