
Operating - Plug Aerator
When to Use the Plug Aerator
The plug aerator will remove plugs of soil up to 76 mm (3 in.) deep, allowing penetration of water and nutrients for a healthier lawn. It also helps reduce compaction of soil.
Use the plug aerator only on an established lawn, never on newly laid sod. The plug aerator should not be used when lawn conditions are too wet or too dry. To determine condition, dig a small amount of your soil, about 76 mm (3 in.) deep:
· If soil appears powdery and brittle, it is too dry. Wait until a later date, after a rainfall. If soil is too dry, the plugging spoons will not penetrate properly.
· If soil appears damp, attempt to roll a small amount into a ball in the palm of your hand. If it forms a ball, the soil is too wet. Ideally, the soil should fall apart. Wait until the soil is more dry. If the soil is too wet, the plugging spoons will stop up and your tractor could lose traction and damage the lawn.
Selecting the Operating Positions
1. Park tractor safely. (See Parking Safely in the SAFETY section.)
2. Install plug aerator to tractor.
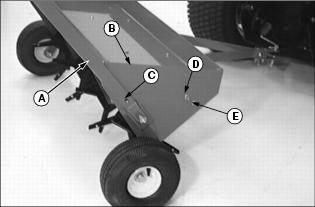
3. Push lift handle (A) toward right side of machine, away from side plate (B).
4. Move handle forward or rearward to engage lock pin into desired position:
· TRANSPORT (C) - Use top lock pin to raise tines so unit can be towed without plugging spoons contacting the ground.
· OPERATE HIGH (D) - Use middle lock pin for minimum plugging spoon penetration.
· OPERATE LOW (E) - Use lowest lock pin for maximum plugging spoon penetration.
Using the Weight Tray
1. Install plug aerator to tractor.
2. Place lift handle in top hole for transport position.
IMPORTANT: Avoid damage! Never exceed the weight tray capacity of 79 kg (175 lb) for 40 in. model, 113 kg (250 lb) for 48 in. model. |

3. Add sand bags, concrete blocks, or other type of weight to weight tray (A). Do not exceed 79.4 kg (175 lb) of weight in 40 in. models, 113.4 kg (250 lb) in 48 in. models. Distribute weight evenly across tray to ensure equal pressure on plugging spoons.
4. If necessary, secure weight in tray using straps.
Checking the Plugging Spoon Operation
Operation of the plugging spoons will vary with soil type, condition, and amount of weight in weight tray. Make sure soil conditions are appropriate for operation. Do not exceed the weight tray capacity to try and improve penetration in overly dry conditions.
Test operation of the plugging spoons by driving the tractor forward about 3 m (10 ft). Observe the operation. A Plug hole should appear every 25 to 30 cm (10 to 12 in.) and not more than 76 mm (3 in.) deep.
Add or remove weight to obtain this condition.
Checking Tractor Ground Speed
· Check ground speed in an open area.
· Measure a test area that is 30.5 m (100 ft) in length.
· Operate the tractor at wide open throttle. Operate tractor at a low speed and drive the tractor the test distance. Record the time needed to travel that distance.
· Make three passes, recording the time for each pass. The average time should be 14 to 23 seconds to achieve the recommended operating speed range:
· at 4.8 km/h (3 mph), the average time traveling the test distance should be 23 seconds.
· at 8 km/h (5 mph), the average time traveling the test distance should be 14 seconds.
· Adjust speed accordingly to achieve the recommended speed range.
Operating Plug Aerator
1. Park tractor safely. (See Parking Safely in the SAFETY section.)
2. Install plug aerator to tractor.
3. Place unit in transport position.
4. Add recommended weight to weight tray.
7. Place unit in desired operating position.
9. Tow plug aerator at 5 to 8 km/hr (3 to 5 mph) for safe and effective operation.
10. Check for proper hole pattern and depth. Park tractor safely before making any adjustments.