Removing
Park Vehicle Safely
· Stop vehicle on a level surface, not on a slope.
· Before you leave the operator's seat, wait for engine and all moving parts to STOP.
Move Implement Lift Lever
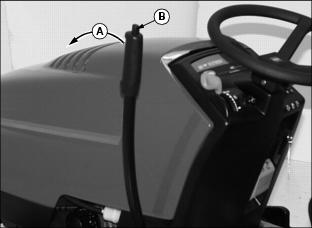
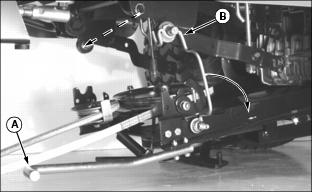
1. Pull implement lift lever (A) rearward slightly, then depress and hold down button (B) to unlock lift lever locking mechanism.
2. Push lift lever (A) forward out of "RAISE" position, release button (B) as you continue to push lift lever all-the-way forward until a loud metallic-click is heard, signalling lever is in "LOCK-OUT" position, then release lift lever-it is now locked into "LOWER" position.
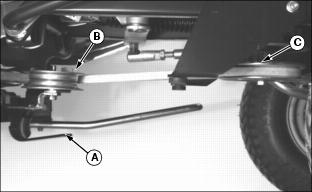
Disconnect Tiller Lift Rod From Tractor Lift Link And Unhook Right Clip Latch
NOTE: Lock implement lift lever into "LOWER" position and unlock tiller housing from "TRANSPORT" position and lower it onto ground before disconnecting tiller lift rod (B)-this allows ease-of-disconnect between tractor lift link (A) and tiller lift rod pin (C).
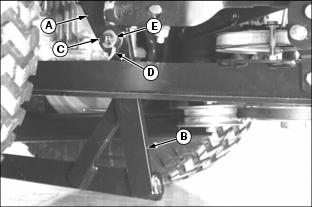
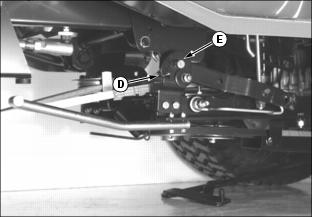
1. Move to right side, under tractor foot rest-remove spring locking ring (D) and washer (E) from tiller lift rod pin (C).
2. Pull tiller lift rod pin (C) from lift link (A) as you lower tiller lift rod (B) inward, onto ground.
3. Store washer (E) and spring locking ring (D) on lift rod pin (C).
4. Remove spring locking pin from clip latch (F) and flip clip of latch rearward to clear tractor mounting pin (G).
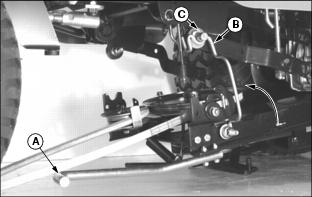
Disengage Belt And Unhook Left Clip Latch
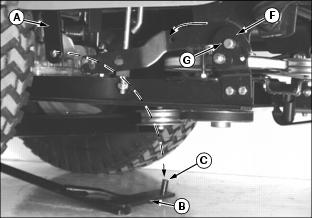
1. Move to right side, under tractor footrest-move belt tensioning idler lever (A) out of "ENGAGED" position into "DISENGAGED" position (pointing toward front of tractor).
2. Pull and hold tensioning idler (B) towards right frame while you remove belt from PTO drive sheave (C).
3. Move to left side, under tractor footrest-remove spring locking pin from clip latch (D) and flip latch of clip reward to clear tractor mounting pin (E). Install spring locking pins in clips for storage when finished removing tiller from tractor.

4. Move to left side of tiller housing-grasp handle (E) to raise tiller housing to align transport locking pin (F) with locking plate hole (G). Continue to hold tiller housing stationary while you rotate transport locking pin handle (H) rearward until spring tension "LOCKS-OUT" pin into "TRANSPORT" position.
5. Slowly lift housing handle (E) up-and-down to ensure pin is "LOCKED-OUT" before letting go of handle.
Engage Frame Support Rod
1. Move to left side, under tractor footrest-push and hold down lift handle (A) as you pivot left-side frame support rod (B) upward so loop in rod is under mounting pin (C) of tractor frame.
2. Slowly release downward pressure on lift handle (A) to engage rod loop.
Lock Frame Wheels Into Engage Position
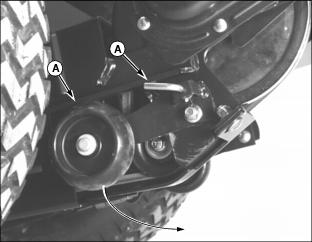
1. Move to left rear, behind tractor drive wheels-pull and hold out wheel locking pin (A).
2. Swing left wheel assembly (B) down into "ENGAGE" position. Make sure locking pin engages hole in locking bracket. Repeat for right frame wheel.
Disengage Frame Support Rod
1. Move to left side, under tractor footrest-push and hold lift handle (A) down.
2. Pivot support rod (B) down into storage position.
3. Slowly release downward pressure on lift handle (A).
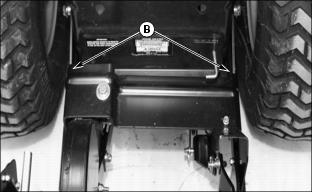
Remove Tiller From Tractor Rear-Frame Mounting Hardware
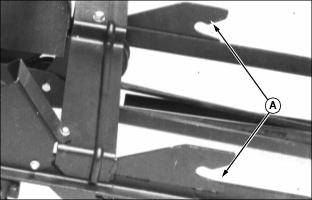
1. Get a helper or use a floor jack with wheels to safely support and slide tiller housing as you slide frame hooks (A) from of rear-frame mounting hardware (B).