
Operating
Raising and Lowering Attachment
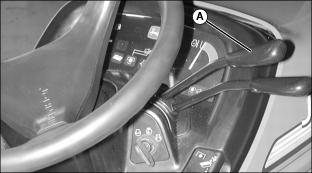
• Push top lever (A) forward to lower blade assembly.
• Pull top lever (A) back to raise blade assembly.
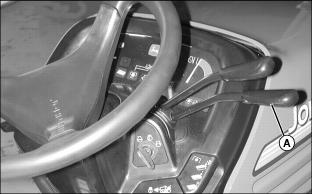
Turning Discharge Chute
NOTE: If chute does not rotate in the direction indicated, reverse hose location in ports.

• Pull lever (A) back to rotate chute to the right.
• Push lever (A) forward to rotate chute to the left.
Adjusting Spout
1. Park machine safely. (See Parking Safely in the SAFETY section.)

3. Move spout to desired position.
Adjusting Skid Shoes
NOTE: Before using attachment on gravel or rough surfaces, mount both skid shoes at lowest position. (A negative clearance means the shoe is mounted above the blade.)
NOTE: Use position A or B with skid shoe mounted inside only.
Use position C with skid shoe mounted either inside or outside.
Use position D with skid shoe mounted outside only.

Picture Note: Skid shoe mounted on inside. Use position A, B, or C.

Picture Note: Skid shoe mounted on outside. Use position C or D.
To clear snow from a smooth surface
1. Lower attachment to the ground.
2. Remove screws and lock nuts on each skid shoe.
3. Insert screws to position A or B.
To clear snow from gravel or rough surface
1. Lower attachment to the ground.
2. Remove screws and lock nuts from each skid shoe.
3. Insert screws in position C or D.
Operating Attachment
NOTE: Lever must be in float position to allow attachment to follow contours of ground.
2. Push lever (A) forward completely to lower attachment to ground and lock in float position.
NOTE: Operate attachment at full throttle position for best performance.
4. Move throttle lever to full throttle position.
NOTE: To improve traction and steering, engage differential lock or engage four-wheel drive, if equipped.
5. Push down on forward foot control pedal to begin forward movement.
Stopping the Attachment
1. Slow the machine forward speed.
2. Move the throttle to slow speed.
3. Run the attachment for several minutes after throwing snow to prevent freeze-up of the auger and impeller.
4. Clean snow from the attachment before storing the machine.