
Installing Attachment
Check Tire Pressure
IMPORTANT: Avoid damage! To prevent tire damage, do not use more than maximum tire pressure shown on sidewall of tire. |
1. Check tire pressure with an accurate gauge.
2. Add or remove air as necessary.
Installing Ballast
NOTE: Additional rear ballast up to maximum rear ballast capacity may be added when operating on uneven terrain to improve traction and maneuverability.
1. A minimum total rear ballast of 338 kg (750 lb) is required.
2. Ballast required at rear axle:
• 2WD Machines: Between 113 kg (250 lb) and 181 kg (400 lb) of total ballast must be applied at rear axle.
• 4WD Machines: A minimum of 113 kg (250 lb) of total ballast must be applied at rear axle.
Required rear axle ballast may be obtained by combining following options:
Fluid (calcium chloride) in rear tires at 45 kg (100 lb) each. |
|
Two plastic coated rear wheel weights at 23 kg (50 lb) each. |
|
• To use rear wheel weights, order appropriate weight and hardware. See your authorized dealer.
NOTE: A 3-point hitch implement of comparable weight may be substituted for ballast in ballast box or on weight bracket.
If 3-point hitch implement is to be operated while loader is attached to machine, put bucket in lowest position that provides ground and obstacle clearance.
3. Remaining rear ballast may be obtained by combining following options:
• To use rear suitcase weights, order rear weight bracket kit. Rear weight bracket holds up to five 18 kg (40 lb) suitcase weights. See your authorized dealer.
• To use fluid filled rear tires or ballast box, order respective parts. See your authorized dealer.
Connecting Hydraulic Hoses
NOTE: Machine and loader must be close enough to connect loader hydraulic hoses to machine couplers.
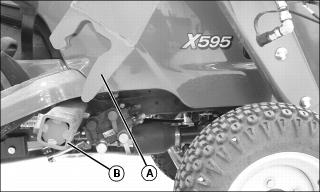
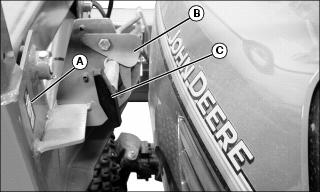
1. Start engine and drive machine between loader masts (A). Locate masts above rear mount tube (B).
2. Raise mower to maximum height.
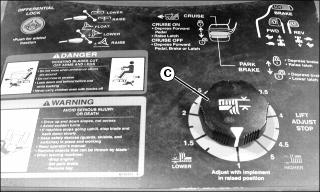
3. Turn mower height adjustment knob (C) to maximum height.
4. Push upper hydraulic control lever forward to stop mid-lift shaft against the depth of the depth stop cam.
5. Park machine safely. (See Parking Safely in the SAFETY section.)
6. Relieve hydraulic pressure by moving machine upper and lower hydraulic control levers back-and-forth several times.
NOTE: Operating loader without hydraulic shut-off valve in closed position will result in poor loader response.
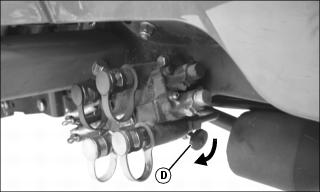
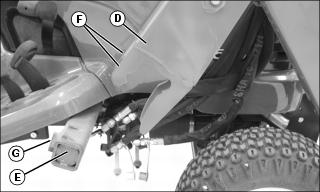
7. Put hydraulic shut-off valve (located under right footrest) in closed position by turning knob (D) clockwise until tight.
8. Remove dust plugs from hydraulic couplers on machine and dust caps from loader hoses.
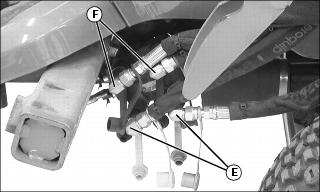
9. Install two lower hydraulic hose couplers (E) (yellow and silver) to hydraulic couplers on machine by matching color coded bands on loader hoses to decal on footrest.
10. Install two upper hydraulic hose couplers (F) (black and green) to hydraulic couplers on machine by matching color coded bands on loader hoses to decal on footrest.
11. Plug four loose dust caps into each other so they are out of the way.
Attaching Loader to Machine
NOTE: Loader can be installed and operated with mower in place. If not using loader, remove it when mowing.
1. Rotate latch keeper (B) up. Grasp handle (C) on latch rod and pull up and out of slot. Push forward to unlatch (remove) position.
2. Start engine and unlock park brake.
NOTE: When mounting loader masts onto rear mount tube, machine may need to be repositioned to obtain correct alignment.
Lower loader masts slowly to prevent loader masts from hitting machine footrests.
3. Push lower hydraulic control lever forward to lower loader masts (D) onto rear mount tube (E). Make sure to center mast hooks (F) over stop blocks (G) on both sides of rear mount tube. Check to ensure that both mast hooks have dropped completely down onto rear mount tube.
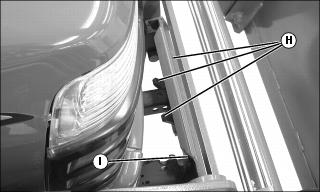
4. Slowly retract boom cylinders until front yoke (H) has fully captured machine front bumper (I).
NOTE: Front wheels must be off ground.
5. Push upper hydraulic control lever forward to roll bucket until front wheels clear ground.
NOTE: Before latching, make sure front yoke plate (H) has fully captured machine front bumper (I). Also check that upright mast hooks (F) have completely captured rear mount tube (G) on both sides.
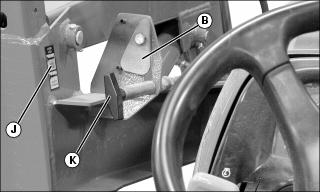
6. Grasp latch rod handle (K) and pull latch rod back and down into slot to latch (use) position.
7. Latch keeper (B) must rotate to down position.
8. Latch rod must rest on bottom of slot. If not, adjust latch rod.
9. Make sure that front yoke (H) has fully captured machine front bumper (I).