
Removing and Storing Attachment
Removing Snowthrower
1. Park machine safely. (See Parking Safely in Safety section.)

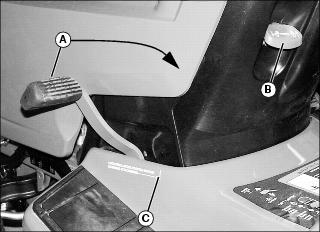
2. Push foot pedal (A) all the way down (towards front of machine), and pull up on lock lever (B) to lock blade into raised position.
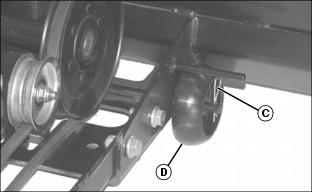
3. Remove wheels (D) from storage position and install one on each side of snowthrower frame. Fasten with quick-release pin (C).
Keep hands and arms from under attachment when in the raised position. |
NOTE: Install all drilled pins and quick-release pins in snowthrower assembly for storage.
4. Push down slightly on foot pedal and push down on lock lever to unlock latch; lift foot pedal towards rear of machine, and pull up on lock lever to lock snowthrower into lowered position.
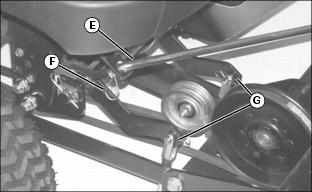
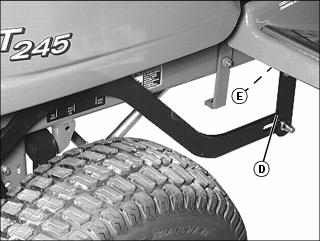
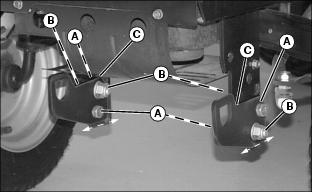
5. Remove sway bar (E) from machine bracket by removing quick-release pin (F).
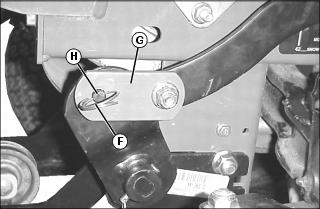
6. Remove yokes (G) from front lift links by removing slotted drilled pins and quick-release pins.
7. Pull back slightly on foot pedal and push down on lock lever to unlock latch; push foot pedal all the way down (towards front of machine), and pull up on lock lever to lock lift into raised position.
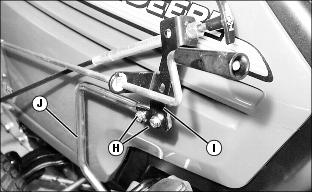
8. Remove nuts (H) and bolts from chute control bracket (I). Remove bracket from support rod (J).
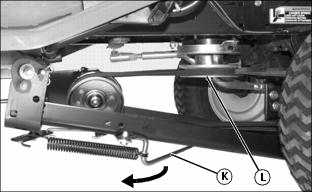
9. Move belt tightener lever (K) out from under frame to unlock and pivot to the rear to loosen belt.
10. Remove belt from machine drive sheave (L).
11. Unlatch snowthrower from pivot points.
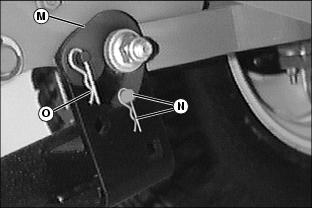
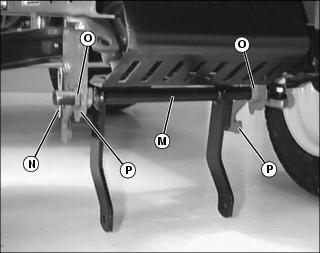
12. Disconnect C-shaped latch (M), one on each side, from draft arm pivot bolt by removing spring locking pin and drilled pin (N).
13. Remove spring locking pin (O) and C-shaped latch from left side to allow easy removal of frame.
14. Slide snowthrower out from under machine.
When the attachment is removed, also remove any ballast that was added to the machine. Use only attachments and accessories recommended by the manufacturer. |
15. Remove any weights that were installed when preparing machine.
Removing Manual Lift Kit
1. Push down slightly on foot pedal (A) and push down on lock lever (B) to unlock latch; pull foot pedal (A) towards rear of machine to lowered position (C), and pull up on lock lever (B) to lock snowthrower into lowered position and remove spring lift tension.
2. Remove lift bar assembly foot lift bracket (D) from pedal (E), by removing two M10x30 bolts and locknuts.
NOTE: Install all drilled pins, spring locking pins, and locking rings onto lift kit assembly parts for storage.
3. Remove opposite end of lift bar assembly:
Picture Note: LX280 with all-wheel steer shown.
• For LX280 machines with all-wheel steering, remove locking ring (F), and slide end of lift extension bracket (G) from lift shaft arm pin (H).

• For all other machines, remove locking ring (F), and slide end of lift bar (I) from lift shaft arm pin (H).

4. Remove small spring locking pin (J) and drilled pin (K). Remove welded lift shaft arm (L) from left side of front lift shaft (M).
5. Remove spring locking pin (N) and slide “D” shaped bearings (O) and front lift shaft (M) from front tractor brackets (P).
Removing Front Brackets (LX280AWS
1. Remove four hex head bolts (A) and locknuts (B) and remove front brackets (C) from machine frame.
2. Put bolts and locknuts in brackets for storage.
Storing Safety
Storing Attachment
NOTE: Some of the following steps may not apply to your attachment.
1. Remove any grass clippings from MCS or bagger attachment.
2. Remove attachment from machine.
3. Clean attachment and driveline, if equipped, with water pressure from a hose.
4. Remove any shields if needed to clean out all debris.
5. Repair or replace worn, bent, or damaged parts. Tighten loose hardware.
6. Apply paint to painted surfaces where needed to prevent rust.
7. Apply thin coat of grease to blades or tines to prevent rust.
8. Lubricate any pivot points with engine oil to prevent rust.
9. Lubricate any grease points.
IMPORTANT: Avoid damage! Abrasive surfaces can damage attachment. Store attachment on non-abrasive surface or on wooden blocks. |
10. If storing attachment outdoors, block up attachment if possible and place a waterproof cover over it.