
Service
Adjusting Bagger Level
IMPORTANT: Avoid damage! Bag frames must be level horizontally or hopper top will not seal properly. |
NOTE: ! Bag frames must be level horizontally or hopper top will not seal properly.

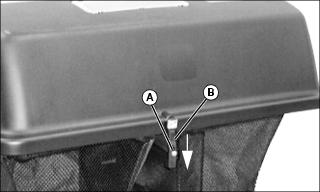
1. Install left and right bags on bag mounting bracket (A).
2. Adjust left and right bags for level:
• Adjust for Front-to-Rear level, by bending tab (B).
• Adjust for Side-to-Side level, by bending tab (C).
Adjusting Hood Hold-Down
NOTE: Prior to adjusting hood hold-down, make sure bags are level.
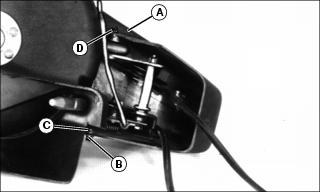
1. Close hopper top and fasten hood hold-down (B) over latch rod (A).
2. Hood hold-down should stretch down 19-25 mm (3/4-1 in.) to be fastened. If it does not stretch, adjust latch rod.

• Remove lock nut (D), flat washer (E) and cap screw (G).
• Add additional flat washer (C) between latch rod (F) and bag mounting bracket.
• Install and tighten cap screw (G), flat washer (E) and lock nut (D).
Adjusting Hopper Top Hinge Tightness
NOTE: Prior to adjusting hopper top hinge tightness, make sure bags are level.
1. With bags installed, fully raise and lower hopper top several times.

2. Tighten or loosen hardware (A) to adjust hopper top hinge tightness.
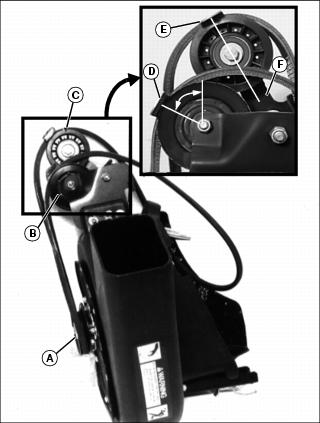
Removing Power Flow Belt
NOTE: One washer is on each side of blower cover.
1. Remove and save two M6 lock nuts (A & B) and four washers.
2. Pull cover off bottom bolt (C) and top bolt (D).

3. Push cover forward, grasp at location (E) and pull downward to release cover from lower lip. Cover will release from upper lip and can be removed.
|
• Belt must be installed as shown for proper blower operation. • Note position of belt guides when loosening nuts and removing old belt. Return guides to original position. |

4. Loosen belt guide lock nuts (F) and (G) enough to slide belt guide away from sheave and remove belt.
5. Remove and save sheave lock bolt (H) and sheave (I).

NOTE: If sheave (K) and idler arm (L) ever need to be removed or replaced, they must be installed using the correct mounting hole as shown:
Installing Power Flow Belt
• Install new belt on sheave (A).
• Install sheave with washer and lock bolt removed earlier.
IMPORTANT: Avoid damage! To avoid damage to drive belt: |
• Install belt up around sheave (B) and (C).
IMPORTANT: Avoid damage! To avoid damage caused by thrown belts, make sure belt guides are properly adjusted. |
• Adjust position of belt guide (D) so center of belt guide is at a 60° angle (10 o’clock position) to top of sheave (B). Adjust position of belt guide (E) so center of belt guide is aligned with center of arm (F).
• Maintain correct position of belt guides (D) and (E) and tighten the belt guide lock nuts.
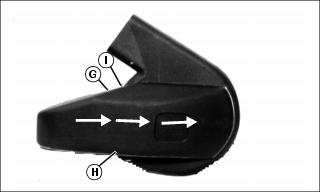
• Spread cover apart at locations (G) and (H) and put top slotted hole (I) over top mounting bolt.
• Push cover forward and over bottom lip.
• While pushing forward, hit cover with an upward stroke to engage over upper lip.
• Pull cover rearward so cover is engaged over front lip.
• Install cover hole on lower bolt.
NOTE: One washer is on each side of blower cover. Large washers are on top bolt and small washers are on bottom bolt.