
Assembly
Identify Parts
Bag of Parts
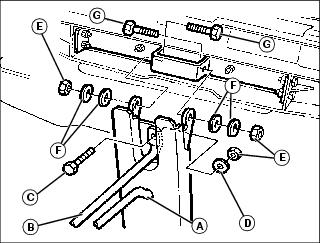
Assemble Bagger Support Rod

1. Fit tabs (A) on cargo mount bracket (B) into slots (C) on mounting post (D).
2. Insert bagger support rod (E) between cargo mount bracket and mounting post.
3. Insert round head bolt (F) through cargo mount bracket and into hole (G) in mounting post.
4. Secure bolt with M8 lock nut (H) and flat washer (I).
Assemble Hopper Top
1. Install mounting post on machine, refer to Installing Section later in this manual for installing instructions.
2. Insert lower part of latch rod (A) through hole in post.
3. Fasten upper part of latch rod (B) with M8x25 hex bolt (C) through latch rod, post hole, flat washer (D), and secure with a M8 lock nut (E).
NOTE: Spring washers (F) must be installed with cup of washers facing each other. Do not over-tighten.
4. Fasten hopper top to mounting post with two M8x25 hex bolts (G), four spring washers (F) and two M8 lock nuts (E).
5. Raise and lower hopper top several times. Tighten or loosen hardware to adjust hopper top hinge tightness.
Install Hopper Screen
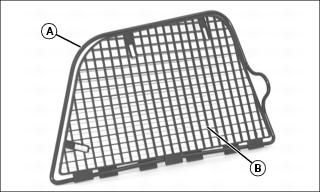
1. Attached screen wire form (A) to screen (B).
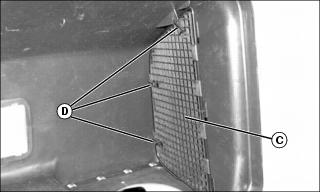
2. Fasten hopper screen (C) to inside of hopper top with three tie bands (D). Put tie bands through holes in hopper top tabs and slots in screen.
3. Pull tie bands tight and cut off excess.
Install and Adjust Grass Bags
NOTE: Bag frames must be level horizontally or hopper top will not seal properly.
1. Install left and right grass bags on mounting post (A).
NOTE: Prior to adjusting bags for level, check machine for level: proper tire inflation and parked on a level surface.
2. Adjust left and right grass bags for level:
• Adjust for front-to-rear level, by bending tab (B).
• Adjust for side-to-side level, by bending tab (C).
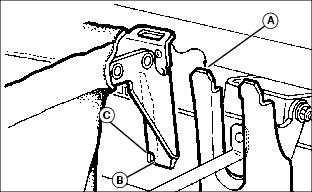
Adjust Hopper Top Latch
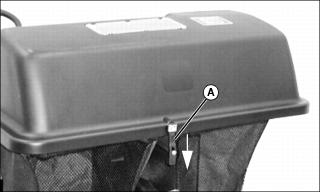
1. Close hopper top and fasten hood hold-down (A) over latch rod.
2. Hood hold-down should stretch down 19-25 mm (3/4-1 in.) to be fastened. If it does not stretch, adjust latch rod.
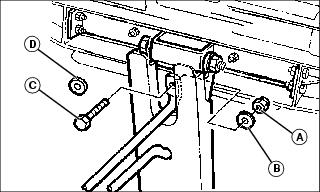
• Remove lock nut (A), flat washer (B) and hex bolt (C).
• Add additional flat washer (D) between latch rod and bag mounting bracket.
• Install and tighten hex bolt (C), flat washers (B & D) and hex flanged lock nut (A).