
Service Transmission
Transaxle Oil
IMPORTANT: Avoid damage! Use recommended oil only. Do not use engine oil or “Type F” automatic transmission fluid. |
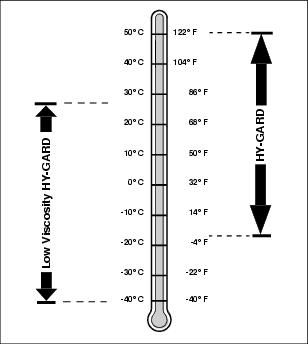
Use oil viscosity based on the expected air temperature range during the period between oil changes.
John Deere Low Viscosity HY-GARD® Transmission/Hydraulic Oil is recommended. Standard John Deere HY-GARD® Transmission/Hydraulic Oil may also be used.
Other oils may be used if they meet John Deere standard JDM J20D or J20C.
Checking Transaxle Oil Level
IMPORTANT: Avoid damage! Hot hydraulic oil will expand and show incorrect oil level. Check reservoir tank: |
1. Park the vehicle safely. (See Parking Safely in the SAFETY section.)
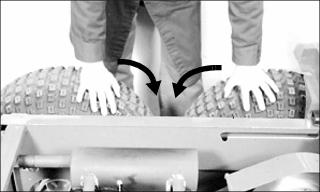
2. Raise and secure cargo box.
IMPORTANT: Avoid damage! Dirt and debris in oil may cause damage to the transaxle. Clean area around opening before removing dipstick. |

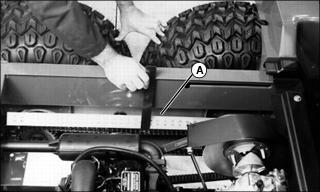
3. Remove dipstick (A) located on the top of the transaxle housing. Wipe dipstick clean.
4. Check oil level by screwing dipstick fully into transaxle case, then unscrewing and checking oil level.
5. Add oil as needed through the dipstick fill hole.
6. Install and tighten dipstick.
Changing Transaxle Oil
IMPORTANT: Avoid damage! If brakes start to chatter or are noisy when applied, change transaxle oil before waiting until the service interval. |
1. Park the vehicle safely. (See Parking Safely in the SAFETY section.)
2. Raise and secure cargo box.
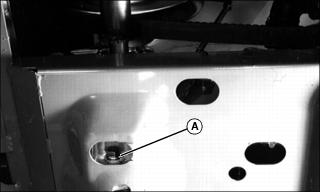
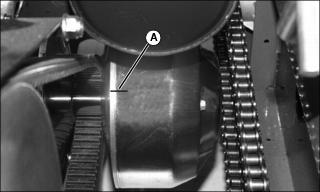
3. Access drain plug (A) through slot on underside of machine.
4. Drain oil. Install and tighten drain plug.
IMPORTANT: Avoid damage! Dirt and debris in oil may cause damage to the transaxle. Clean area around opening before removing dipstick. |
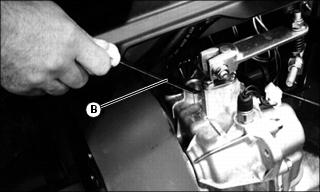
5. Remove dipstick (B) located on top of transaxle housing. Wipe dipstick clean.
6. Add approximately 4.5 L (4.8 qt) of oil.
7. Check oil level by screwing dipstick fully into transaxle case, then removing to check level.
8. Wait for two minutes then check oil level. Add oil if necessary.
9. Install dipstick and tighten.
Checking Drive Belt
1. Park the vehicle safely. (See Parking Safely in the SAFETY section.)
2. Raise and secure cargo box.
3. Rotate and inspect belt for wear or damage.
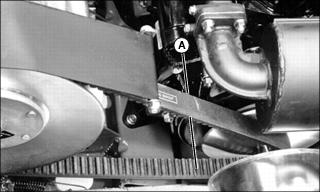
4. Measure width (A) of belt on top surface. Dimension should be a minimum of 27 mm (1.1 in.).
5. Replace belt if worn beyond limit.
Replacing Drive Belt
1. Park the vehicle safely. (See Parking Safely in the SAFETY section.)
2. Raise and secure cargo box.
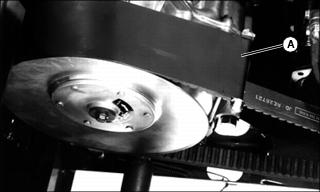
3. Remove hardware securing belt shield (A). Remove belt shield.
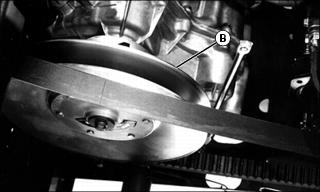
4. Route belt over pulley (B) of driven clutch.
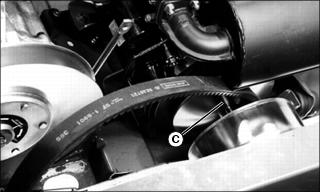
5. Remove belt from drive pulley (C).
IMPORTANT: Avoid damage! Install the drive belt so the indicator arrow on the belt points in the direction of belt rotation (toward front of vehicle). |
6. Make sure arrow on smooth side of drive belt points toward front of vehicle. Install new belt by routing over drive pulley and then over the driven clutch pulley.
Checking Drive Chain Tension
1. Stop vehicle on level surface. Stop engine, but do not lock parking brake.
2. Put transmission in neutral and differential lock in off position.
3. Use a safe lifting device to raise all four rear wheels off ground. Place jack stands or wooden blocks under vehicle.
4. Raise and secure cargo box.
5. Rotate rear wheels toward each other so that chain sag is at top of chain.
6. Place straight edge (A) across top of sprockets and measure distance (sag) from bottom of straight edge to top of chain. Slack should be 13 to 38 mm (0.5 to 1.5 in.).
7. Adjust chain tension if necessary.
Adjusting Drive Chain Tension
1. Park vehicle on a level surface. Stop engine, but do not lock parking brake.
2. Put transmission in neutral and differential lock in off position.
3. Use a safe lifting device to raise all four rear wheels off ground. Place jack stands or wooden blocks under vehicle.
4. Raise and secure cargo box.
IMPORTANT: Avoid damage! Avoid stripping threads from adjustment bolt (C). Loosen housing nuts (A) before turning adjustment bolts. |

5. Loosen four nuts (A) for both axles so axle housings (B) can slide easily forward and rearward.
IMPORTANT: Avoid damage! Do not adjust chain too tightly or it could be damaged. All slack should be out of chain without pulling chain tight. |
6. Turn adjustment bolts (C) at both sides to remove chain sag. Make sure chain tension is the same at both sides of vehicle.
7. Tighten axle housing nuts (A) to 90 N•m (70 lb-ft), then back off adjustment bolts (C) one half turn to relieve force on bolt.
8. Check for proper and equal chain tension at both sides of vehicle.
9. Rotate drive wheels approximately 120?. Check again at both sides of vehicle for equal chain tension, making sure no tight spots exist. Repeat two more times.
10. Remove jack stands and lower vehicle to ground.
Cleaning Primary Drive Clutch
1. Park the vehicle safely. (See Parking Safely in the SAFETY section.)
2. Using a marking pen, place an alignment mark on top of clutch cover (A) where it meets the clutch.
3. Remove three screws securing clutch cover. Remove cover.
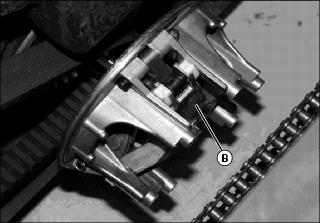
4. Use compressed air to blow out all surfaces of clutch (B).

5. Wipe out inside surface of clutch cover with a clean, dry cloth.
6. Install clutch cover so marks are aligned. Secure with original hardware.
Checking Secondary Driven Clutch Buttons
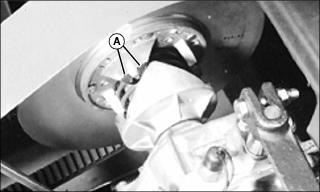
Check for missing or worn clutch buttons (A):
• There should not be any excessive wear, or metal-to-metal contact.
• If replacement is necessary, see your John Deere dealer, or consult the technical manual.