
Service Electrical
Battery Statement
Cleaning or Replacing Battery
· Wear eye protection and gloves. · Do not allow direct metal contact across battery posts. |
1. Park the vehicle safely. (See Park Safely in the SAFETY section.)
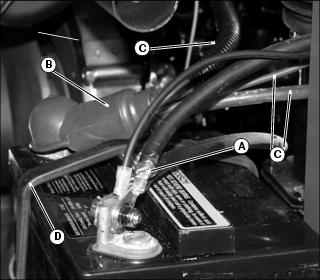
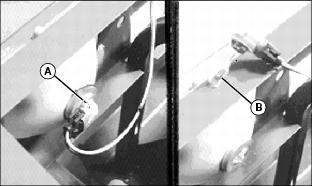
3. Disconnect black negative (-) cables (A) from battery.
4. Slide red positive terminal cover (B) back and disconnect red positive (+) cables (C).
5. Disconnect black rubber hold-down strap (D).
6. Clean battery with a brush or damp cloth. Keep dirt out of battery cells.
NOTE: If a thorough cleaning of the battery and surrounding area is needed, or battery replacement is necessary, remove battery from the utility vehicle.
7. Remove corrosion from battery terminals and cable ends with a wire brush.
8. Clean battery, battery terminals, cable ends, battery box, and other parts with a solution of one part baking soda and four parts water. DO NOT allow solution to enter battery cells.
9. Rinse all parts with clean water and allow to dry.

11. Connect red positive (+) cables (E) to battery terminal first. Slide red terminal cover (F) down to cover terminal.
12. Connect black negative (-) cables (G). Make sure connections are tight.
13. Apply petroleum jelly or silicone spray on battery terminals to help prevent corrosion.
14. Install black rubber hold-down strap (H).
15. Lower utility vehicle cargo box.
Checking Battery Electrolyte Level
1. Park the vehicle safely. (See Parking Safely in the SAFETY section.)
2. Remove battery from vehicle and set it on a level surface.
3. Remove battery manifold cap. Be sure breather tube does not come off cap.
IMPORTANT: Avoid damage! Do not fill cells to the bottom of filler neck (A). Electrolyte can overflow when battery is charged and cause damage. |
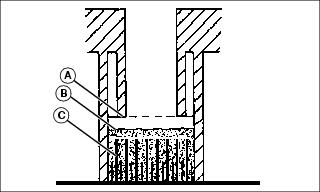
4. Electrolyte (B) should be 6 mm (1/4 in.) above plates (C).
5. Add distilled water if necessary.
6. Install manifold cap. Check vent tube is attached to cap and routed down out of vehicle frame.
Using Booster Battery
IMPORTANT: Avoid damage! There are two 12 volt batteries connected in parallel. This IS NOT a 24 volt system. |
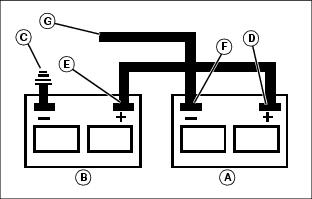
1. Connect positive (+) booster cable to booster battery (A) positive (+) post (D).
2. Connect the other end of positive (+) booster cable to the disabled vehicle battery (B) positive (+) post (E).
3. Connect negative (-) booster cable to booster battery negative (-) post (F).
4. Connect the other end (G) of negative (-) booster cable to a metal part of the disabled machine frame away from battery.
5. Start the engine of the disabled machine and run machine for several minutes.
6. Carefully disconnect the booster cables in the exact reverse order: negative cable first and then the positive cable.
Replacing Headlight Bulb
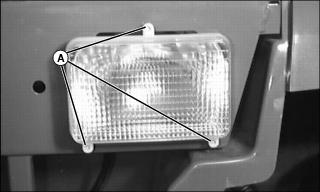
2. Rotate bulb socket (A) 1/3 of a turn and remove socket from housing.
IMPORTANT: Avoid damage! Do not touch glass portion of new bulb with bare skin. Contact with oils or dirt will reduce bulb life. Handle bulb by the base or with a clean cloth or gloves. |
3. Install new bulb (B) into socket, and install socket into housing.
IMPORTANT: Avoid damage! Vibration of hood against headlight housing may cause headlight lamps to fail early. Allow clearance around headlight housings when installing hood. |
Replacing Headlight Housing
2. Disconnect bulb socket from housing.
4. Install new assembly and install screws.
IMPORTANT: Avoid damage! Vibration of hood against headlight housing may cause headlight lamps to fail early. Allow clearance around headlight housings when installing hood. |
Replacing Instrument Panel Bulbs
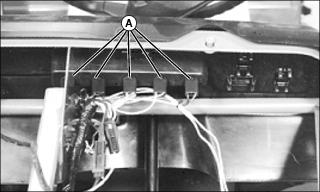
Picture Note: Hood shown removed for clarity. Removal of hood not required.
1. Reach under dash panel and remove appropriate bulb socket (A) from plastic housing.
· Rotate bulb socket 1/4 turn.
· Pull socket straight outward.
2. Remove bulb from socket. Discard bulb.
3. Install new bulb in socket.
4. Align and insert bulb socket into plastic housing. Turn socket 1/4 turn to lock in place.
Checking and Adjusting Alternator Belt
1. Park vehicle safely. (See Parking Safely in the SAFETY section.)
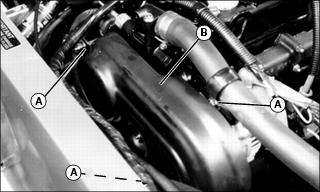
2. Remove hardware (A). Lift belt guard (B) from vehicle.
3. Apply moderate thumb pressure to belt halfway between pulleys. Belt should deflect approximately 13 mm (1/2 in.).
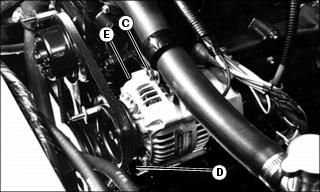
a. Loosen screw and nut (C) and screw (D).
b. Move alternator (E) away from engine to tighten belt or toward engine to loosen belt.
c. Hold alternator in position to maintain proper belt tension. Tighten hardware (C) and (D).