
Assembly
Install Cargo Box

1. Remove spring pin (A) and drilled pin (B).
NOTE: Lift front of cargo box high enough to allow lock pin to clear engine panel when positioning the cargo box for assembly.
2. Position cargo box onto machine frame so hinges are aligned with rear most set of pivot holes.
3. Apply a spray lubricant to the pivot hardware and hinges.
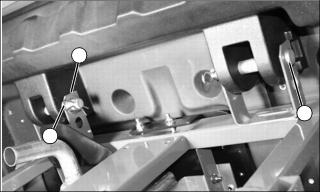
4. Install drilled pin (B) from the outside.
5. Install the flat washer (C) and spring pin (A).
6. Raise and lower the cargo box to check the operation of the support rod and the lock latch.
Checking Tire Pressure
NOTE: Refer to the SPECIFICATIONS section for tire pressures.
2. Check tire pressure with an accurate gauge.
3. Add or remove air, if necessary.
Charge and Connect Battery
IMPORTANT: Avoid damage! Follow instructions carefully. Battery and battery cables must be installed correctly. |
2. Raise and secure cargo box.
3. Remove engine access panel.
4. Remove protective caps from battery terminals.
5. Charge battery fully. Full charge is 12.6 volts.
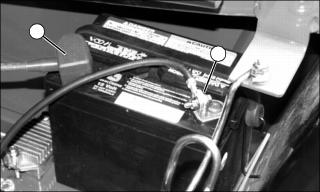
6. Connect red positive cable (A) to positive (+) battery terminal. Tighten the connection.
7. Apply general purpose grease or silicone spray to terminal to help prevent corrosion. Slide red cover over positive (+) terminal.
8. Connect black negative cable (B) to negative (-) battery terminal. Tighten the connection.
9. Apply general purpose grease or silicone spray to terminal to help prevent corrosion.
10. Install engine access panel.
Hook Passenger Seat Retention Strap

Wrap the strap (A) around the hand rail tube and thread back through the loop fastener. Fold the strap over and secure by pressing the strap end and strap together.
Prepare Brakes
NOTE: This procedure shall be completed only once, prior to first use of vehicle.
Seat Brakes
1. Push brake pedal fully to the floor panel and release.
2. Repeat this procedure 10 - 15 times.
Burnish Brakes

2. Hold throttle pedal at half speed position. Allow engine to warm 30-60 seconds.
4. Shift transaxle to forward position and drive 6 - 9 m (20 - 30 ft) forward while applying medium pressure to the brake pedal.
5. Shift transaxle to reverse position and drive 6 - 9 m (20 - 30 ft) rearward while applying medium pressure to the brake pedal.
Test Safety Start System
Test the safety start system. (See Testing Safety Systems in the Operating section.)