
Operating
Adjusting Lift Height
The snowblower should be approximately 10.2 cm (4 in.) off the ground when fully raised. If the lift height is adjusted too high, the front hitch pivot will bottom out, and the lift pedal lock handle will not engage.The lift height will be slightly less if machine is equipped with HDAP tires.
1. Park machine safely. (See Parking Safely in the SAFETY section.)
2. Set mower height of cut knob to lowest position.
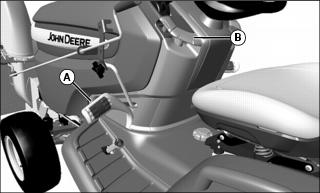
3. Lower attachment. With attachment lowered, pull back firmly on lift pedal (A), then pull up on lift lock handle (B) to lock the pedal.
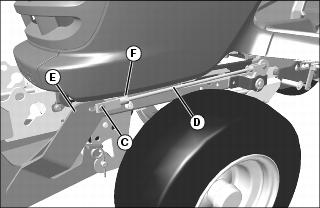
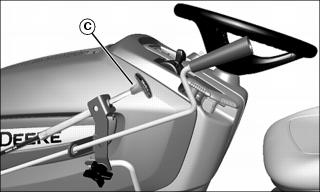
4. Remove front locking ring and 10 x 28 mm drilled pin (C), and remove front of outer lift rod (D) from front attachment hitch bracket (E).
5. Loosen nut (F) and turn end of outer lift rod clockwise to gain lift height, and counterclockwise to reduce lift height. Tighten nut (F).
6. Install front of lift rod with drilled pin and locking ring.
7. Lift snowblower and engage lift lock handle to check adjustment.
8. Repeat above steps, if necessary.
Adjusting Lift Pedal Spring Tension
2. Park machine safely. (See Parking Safely in the SAFETY section).

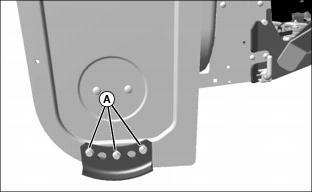
3. Make sure yellow indicator (A) at front of lift assist spring is aligned with proper mark for snowblower model. If not, adjust lift assist spring so indicator is aligned with correct mark on decal.
4. Turn adjusting bolt (B) in right front frame tunnel to adjust lift assist spring:
• Clockwise - Increases spring tension and moves indicator toward front of machine. This will reduce lift pedal effort.
• Counterclockwise - Decreases spring tension and moves indicator toward rear of machine.
Too much spring tension may cause snowblower to “float” too easily, reducing effectiveness.
Turning Discharge Chute
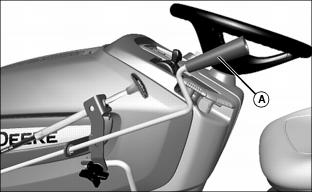
• Turn handle (A) counter-clockwise to rotate chute to the right.
• Turn handle (A) clockwise to rotate chute to the left.
Adjusting Spout
NOTE: Pivot tension of spout (A) is not adjustable. A return spring in the chute / spout assembly assists the spout cable (B) to adjust spout angle.
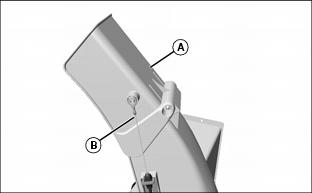
1. Pull handle (C) to pivot spout down.
2. Push handle (C) to pivot spout up.
Adjusting Skid Shoes
NOTE: Before using snow removal attachment on gravel or uneven surfaces, lower skid shoes fully. Both skid shoes must be in the same position.
1. Park machine safely. (See Parking Safely in the Safety section.)
2. Loosen bolts (A) on each skid shoe.
3. To clear snow from a flat surface, lower skid shoes so that scraper blade is 2–3 mm (1/16–1/8 in.) above surface.
4. To clear snow from a rough or a gravel surface, raise skid shoes so that scraper blade has maximum clearance.
Raising and Lowering Snowblower
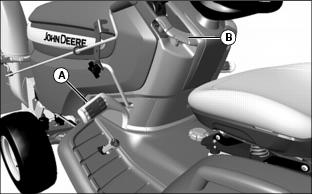
• To raise snowblower: Push lift pedal (A) forward.
• To lock snowblower in raised / transport position: Push lift pedal (A) forward fully and pull up on lift lock handle (B).
• To lower snowblower: Push lift pedal (A) partway, push down on lift lock handle (B) to unlock, then slowly release pressure on lift pedal.
Using Winter Grille Covers (Optional Accessory)
Winter Grille Covers are available as an accessory for the Select Series™ X300 and air-cooled X500 Multi-Terrain™ models.
When operating in certain cold weather conditions, a winter grille cover can be installed to prevent snow from entering the air supply system. The winter grille cover should only be used on models with air-cooled engines; do not use the winter grille cover on models with liquid-cooled engines.
Remove the winter grille cover when the outside temperature reaches 4 degrees C (40 degrees F) or higher.
Contact your John Deere servicing dealer for ordering information.
Operating Snowblower
NOTE: Operate snowblower at full throttle for best performance.
4. Move throttle lever to full throttle position.
NOTE: It is not necessary to pull the PTO switch up while beginning tractor movement to allow the attachment to continue running in reverse.
5. Push down on forward or reverse foot control pedal to begin movement.
Stopping Snowblower
1. Slow the machine forward speed.
2. Move the throttle to slow speed.
3. Run snowblower for several minutes after blowing snow to prevent freeze-up of the auger and impeller.
4. Disengage PTO and allow auger to stop.
5. Clean snow from snowblower before storing the machine.
Inspect, Unplug, or Park Attachment Safely
2. Lower attachment to the ground.
7. Wait for engine and all moving parts to stop before leaving operator’s seat.
Transporting
1. Drive machine and attachment onto heavy-duty trailer equipped with lights and signage required by law.
2. Lower attachment to trailer deck.
5. Fasten machine and attachment to deck with straps, chains, or cables.