
Operating
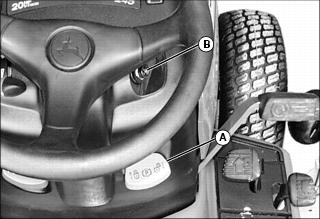
Stopping Machine and Blade
When stopping machine, do the following:
1. Put transmission in NEUTRAL position.
Releasing Blade from Tripped Position
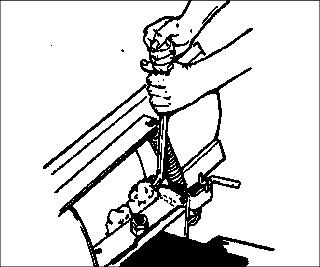
• Keep hands, feet and clothing away from blade.
• Keep clear of blade. Pry objects from between blade and blade support with a safe tool.
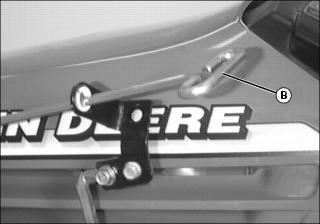
Raising and Lowering Blade
Raising Blade:
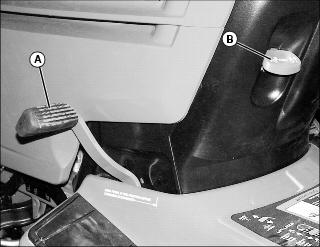
1. Push and hold lift pedal (A) down.
2. Pull lift lever (B) up to lock blade in the transport position.
3. Release lift pedal. Pedal should stay down and lift lever should stay locked.
Lowering Blade:
1. Push and hold lift pedal down.
2. Push lift lever down to unlock.
3. Release lift pedal to lower blade to the ground.
Adjusting Lift Pedal Spring Tension
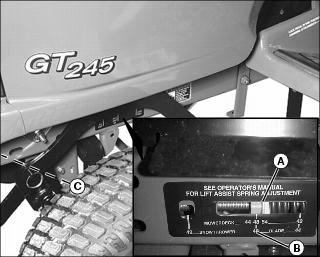
• Be sure lift spring adjustment bar (A) is set to 48 blade setting (B). Adjust tension, by rotating adjusting bolt (C) (in left front frame tunnel) clockwise to increase tension, and counterclockwise to decrease tension.
• If blade’s lift effort is too high increase spring tension, by rotating adjusting bolt (C) (in left front frame tunnel) clockwise to increase tension, and counterclockwise to decrease tension, however too much spring tension may cause blade to “float” along surface being bladed.
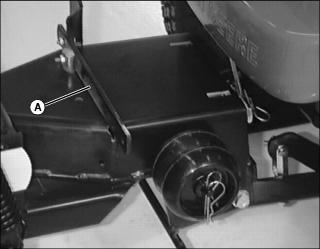
Adjusting Lift Height
1. Park machine safely. (See Parking Safely in the SAFETY section.)
2. Blade Lift can be adjusted by turning two yokes (A) on blade frame (B).
NOTE: Approximate setting for adjusting: adjust jam nuts until bolt exposed inside of yoke, dimension (C), is approximately 7 - 9 mm (0.28 - 0.35 in.).
• To INCREASE lift height: Loosen jam nut (D) and turn yokes (A) clockwise.
• To DECREASE lift height: Loosen jam nut (D) and turn yokes (A) counterclockwise.
3. Lift blade to check adjustment and make further adjustments, if necessary.
Leveling Side to Side
1. Park machine safely. (See Parking Safely in the SAFETY section.)
2. Blade must be level side-to-side in RAISED position.
3. To level blade, adjust yokes on blade frame:
• Loosen jam nut (A) on yoke (B) on Low side of blade.
• Adjust yoke until blade is level.
Adjusting Skid Shoes
NOTE: Each Skid Shoe MUST be set at the same height.
FOR LEVELING OR CLEARING:
Lower each skid shoe to help prevent gouging.
FOR DIGGING:
Raise each skid shoe to lower working height of blade.
1. Park machine safely but do not lower blade. (See Parking Safely in the SAFETY section.)
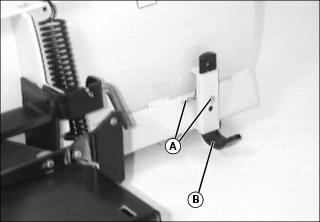
2. Remove spring locking pin and drilled pin (A) on both skid shoes.
3. Move each skid shoe (B) to desired position.
4. Install drilled pin and fasten with spring locking pin.
Adjusting Blade Angle
Blade can be LOCKED in five positions:
To angle blade WITHOUT a Manual Angling Kit:
1. Park machine safely. (See Parking Safely in the SAFETY section.)
3. Move blade to desired position and release lever. Move blade until it locks.
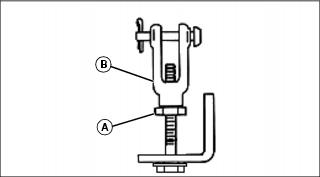
To angle blade WITH a Manual Angling Kit:
1. Park machine safely. (See Parking Safely in the SAFETY section.)
2. Turn handle (B) to the left.
3. Push or pull handle to angle blade.
5. Push or pull handle until blade LOCKS.
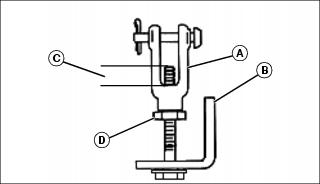
Using Spring Trip
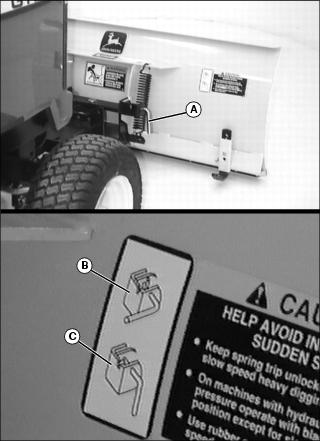
FOR NORMAL OPERATION:
• Put latch pin (A) in the UNLOCKED position (B).
FOR DIGGING OR SPECIAL OPERATION:
• Put latch pin (A) in the LOCKED position (C).
Operating Tips
1. Operate blade at slow travel speed.
2. This is a light material blade. Blade is not intended to move large amounts of heavy material. Use common sense when you move material.
3. Operate engine at full throttle for best performance.
4. If blade penetrates too much:
• Adjust height of skid shoes.
5. Angle blade to left or right:
• To clear material by moving it to the side.
• To clear and level at same time.
• To clear snow or light material.
• To lessen power needed to move material.
6. Use blade in straight-across position:
• To move material straight ahead.
7. To remove wet material - snow or slush - from a hard surface, install optional rubber squeegee. (See your John Deere dealer.)
8. After you are finished using blade:
• Park machine safely. (See Parking Safely in the SAFETY section.)
• Clean blade with water under pressure.
Transporting
1. Drive machine and attachment onto heavy-duty trailer equipped with lights and signage required by law.
2. Lower attachment to trailer deck.
5. Fasten machine and attachment to deck with straps, chains, or cables.