
Operating
Raising and Lowering Broom
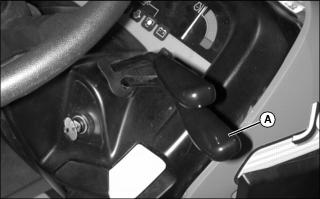
Lowering the Broom
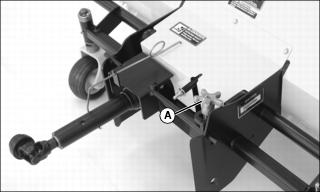
Push forward slowly on lower hydraulic control lever (A) to lower the broom:
• To lock broom in float position for operation on uneven ground contour, push lever completely forward until it locks in place.
• To lock broom in desired lowered position, lower broom and return lever to center position.
Raising the Broom
Run engine at idle speed. Pull rearward slowly on lower hydraulic control lever (A) until broom is at desired height. Release lever.
Using Parking Stands
1. Start the engine. Raise the broom.
2. Park machine safely with broom raised. (See Parking Safely in SAFETY section.)
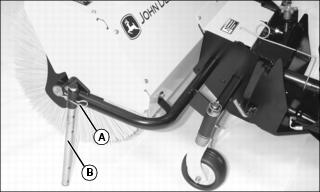
3. Remove spring pin (A) from bracket on side of broom.
4. Slide stand (B) to desired position and insert spring pin.
Adjusting Broom Angle

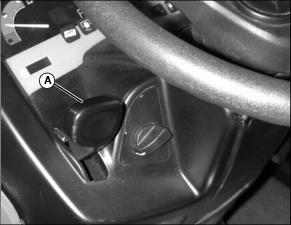
2. Use upper hydraulic control lever (A) to adjust broom angle:
• Pull lever rearward to angle broom to the right.
• Push lever forward to angle broom to the left.
Engaging and Disengaging Broom
1. Review tractor operator’s manual for instructions on using PTO.
3. Move throttle lever to 1/3 throttle position.
5. Move throttle lever to appropriate operating speed for the job.
Adjusting Brush Speed
Use the slowest effective attachment speed to reduce risk of thrown objects. |
NOTE: Increase throttle speed slightly if brush stalls frequently. Use correct brush type and travel speed to prevent stalling.
Move throttle lever (A) to control brush speed:
• Push throttle lever forward to increase brush speed.
• Pull throttle lever rearward to decrease brush speed.
Checking Brush Contact Area
IMPORTANT: Avoid damage! Check and adjust brush contact area on a regular basis to prevent excessive brush wear. Keep vehicle tires at correct pressure. |
2. Park machine safely with broom raised. (See Parking Safely in the SAFETY section.)
3. Install parking stands in the raised position.
4. Drive machine to an unswept hard surface.
5. Engage the PTO. Lower broom to surface and lock in float position. Run broom for several seconds without moving machine.
6. Raise boom and disengage the PTO. Watch behind machine and back away.
NOTE: Brush contact area should be reduced to 2.5 cm (1 in.) or less when using optional thatching kit.
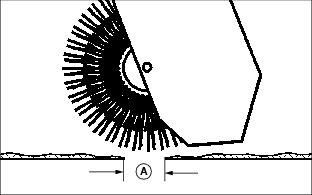
8. Check area of brush-to-surface contact (A). Cleared area should be 51-102 mm (2-4 in.) wide along entire width of broom. If not, adjust brush contact area.
Adjusting Brush Contact Area
Adjust brush contact area with brush adjustment knob (A):
• To make the brush contact area wider, lower the brush head assembly by turning the adjustment knob counterclockwise.
• To make the brush contact area narrower, raise the brush head assembly by turning the adjustment knob clockwise.
Operating Tips
General Sweeping
• Use a sweeping pattern that will prevent debris from blowing back when windy conditions exist. Sweep with wind at your back or in direction broom is angled.
• Minimize dust by reducing brush speeds. Sweep on days when ground surface is moist.
• Sweep with the tips of the bristles, not the sides, for best operation.
• Angle broom 30° left or right when sweeping light materials.
• Angle broom 30° left or right and reduce brush speed when sweeping heavy material.
Lawn Thatching
• Raise height of broom to minimize ground contact. Brush bristle ends should only slightly make contact with the grass when thatching. Thatch should roll up into a windrow.
• Use slow brush and travel speeds when thatching. This will allow broom to remove dead grass and debris and minimizes bouncing of the brush head.
• Help minimize dust by sweeping when the grass is moist, but not overly wet. Use sweeping pattern that will prevent thatch from blowing back toward machine or operator.
Snow Removal
• Always sweep with broom angled to clear snow out of the operating path of the machine.
• Faster brush speeds perform better on wet, heavy snow or slush. Try different brush speeds to find best results.
• Broom will operate most efficiently on snow depths 15.2 cm (6 in.) or less. In deeper snow, reduce travel speed and make more than one pass.
• Use a sweeping pattern that will prevent snow from blowing back toward operator. Sweep so discharged snow blows away from machine and areas previously swept.
Sweeping Leaves
• Raise height of broom to minimize ground contact. Brush bristle ends should only slightly make contact with the ground when sweeping leaves.
• Use slow brush speeds and slow-to-medium travel speeds when sweeping leaves.
• For best results, sweep leaves on days when leaf moisture is high. Sweep so discharged leaves follow the direction of the wind.