
Service Mower
Removing Mower
1. Park machine safely. (See Parking Safely in Safety section.)
2. Press lift pedal and pull lift lock handle up to raise mower to transport position.
3. Turn mower height control knob to "0" position.
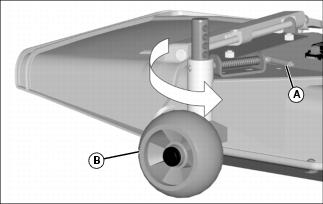
4. 54 Inch Mower Only - Rotate all mower wheels to allow mower deck to be rolled outward away from machine:
b. Rotate mower wheel (B) 90° and align hole in wheel shaft with pin.
c. Release pin to lock mower wheel in rotated position.
Lock lift pedal in rearward position before removing or installing mower. |
5. Press lift pedal and push down lift lock handle to lower mower to the lower/down position.
6. Decrease spring tension on lift assist spring. (See Adjusting Lift Assist Spring in Service Mower section.)
7. Pull lift pedal back by hand and pull up on lift lock handle to lock mower in the lowered position.
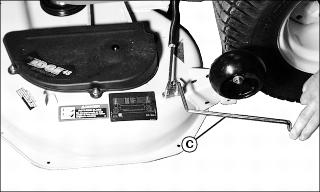
![]() c CAUTION: Avoid injury! Drive belt tension rod is spring-assisted and under tension. Keep a secure grasp on rod at all times while releasing or applying drive belt tension.
c CAUTION: Avoid injury! Drive belt tension rod is spring-assisted and under tension. Keep a secure grasp on rod at all times while releasing or applying drive belt tension.
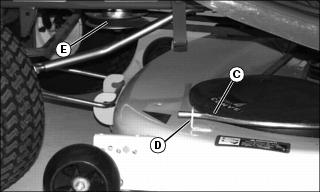
a. Grasp and hold tension rod (C) securely.
b. Disengage rod from retaining bracket (D).
c. Move rod as far as possible toward rear wheel to remove all belt tension.
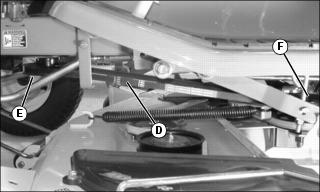
9. Hold tension rod in released position. Remove mower drive belt (E) from engine drive sheave.
10. Move tension rod to latched position.

11. Pull out and push down on lever (F) to release front lift rod assembly.
12. Remove front lift rod assembly (G) from machine and mower deck.
NOTE: It may be necessary to manually lift up on rear of mower deck to pull out J-pins.
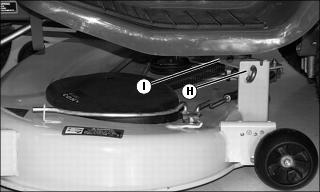
13. Pull outward on J-pin (H) at both sides of mower to disconnect lift arm (I).
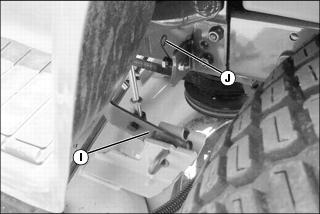
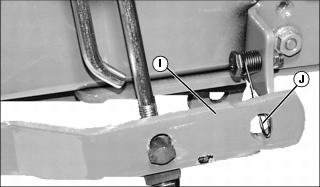
Picture Note: Closeup of lift arm on spring holder
14. Install lift arm (I) on spring holder (J) on both sides of machine.
15. Slide mower deck out from under machine. Remove 54 Inch mower from right side only.
Installing Mower
IMPORTANT: Avoid damage! If equipped, remove tire chains before installing mower to machine to prevent mower damage. |
1. Park machine safely. (See Parking Safely in Safety section.)
2. Decrease spring tension on lift assist spring. (See Adjusting Lift Assist Spring in Service Mower section.)
3. Pull lift pedal back by hand, push down lift lock handle, and slowly allow pedal to move forward.
4. Turn mower height control knob to "0" position.
Lock lift pedal in rearward position before removing or installing mower. |
5. Pull lift pedal back by hand and pull up lift lock handle to lock mower in lowered position.
7. Remove lift arms from spring holders.
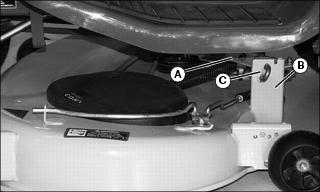
8. Place lift arms (A) between mower lift brackets (B).
9. Release J-pin (C) to connect mower deck to lift arms. Repeat on other side.

10. Hook front lift rod assembly (D) into mower bracket.

11. Place front lift rod (E) into frame hooks so lever (F) is at left side of machine. Make sure rod is seated in frame hooks.
12. Push up lever (F) until tab (G) locks into hole in frame.
![]() c CAUTION: Avoid injury! Drive belt tension rod is spring-assisted and under tension. Keep a secure grasp on rod at all times while releasing or applying drive belt tension.
c CAUTION: Avoid injury! Drive belt tension rod is spring-assisted and under tension. Keep a secure grasp on rod at all times while releasing or applying drive belt tension.
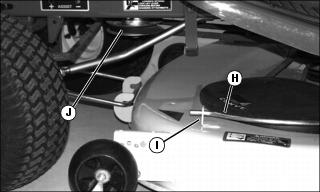
13. Remove drive belt tension rod (H) from bracket (I) and pivot rod as far as possible toward rear wheel to remove all belt tension.
14. Hold tension rod in released position. Install mower drive belt (J) onto engine drive sheave.
![]() c CAUTION: Avoid injury! Drive belt tension rod is spring-assisted and under tension. Keep a secure grasp on rod at all times while releasing or applying drive belt tension.
c CAUTION: Avoid injury! Drive belt tension rod is spring-assisted and under tension. Keep a secure grasp on rod at all times while releasing or applying drive belt tension.
15. Pivot drive belt tension rod toward front of machine to tighten drive belt. Hook tension rod into bracket on mower.
16. 54 Mower Only - Rotate mower wheels to operating position.
17. Adjust mower level front-to-rear and side-to-side.
18. Adjust mower wheels for desired cutting height.
19. Pull back on lift pedal and push down lift lock handle to unlock.
20. Adjust lift assist spring if necessary.
Replacing Mower Drive (Primary) Belt
1. Park machine safely. (See Parking Safely in the SAFETY section).
2. Lower the mower completely.
![]() c CAUTION: Avoid injury! Drive belt tension rod is spring-assisted and under tension. Keep a secure grasp on rod at all times while releasing or applying drive belt tension.
c CAUTION: Avoid injury! Drive belt tension rod is spring-assisted and under tension. Keep a secure grasp on rod at all times while releasing or applying drive belt tension.
a. Grasp and hold tension rod (A) securely.
b. Disengage rod from retaining bracket (B).
c. Move rod as far as possible toward rear wheel to remove all belt tension.
4. Hold tension rod in position (C) while removing drive belt.
5. Remove mower drive belt (D) from machine drive sheave (E) and mower drive sheave (F).
6. Clean belt with a clean cloth.
7. Inspect belt for wear or damage. Replace as necessary.
8. Install belt on mower sheave and engine sheave.
9. Pivot the drive belt tension rod toward front of machine to tighten drive belt. Hook tension rod into bracket on mower.
Replacing Mower Deck (Secondary) Belt
1. Park machine safely. (See Parking Safely in the SAFETY section).

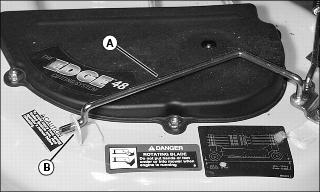
3. Remove locknuts securing belt shields (A). Remove belt shields.
4. Disconnect idler spring (B) from hook (C).

6. Clean upper mower deck and sheaves.
7. Inspect belt for wear and damage. Replace if necessary.
Adjusting Lift Assist Spring
NOTE: Weight of mower or attachment affects ease of lifting. Adjust lift assist spring for your particular mower deck model.
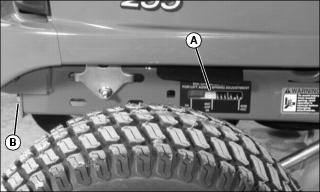
1. Make sure yellow indicator (A) is aligned with proper mark for mower deck model installed. If not, adjust lift assist spring so indicator is aligned with correct mower deck mark.
2. Press lift pedal forward and lock in transport position.
3. Turn adjusting bolt (B) at front of machine frame to adjust lift assist spring:
· Clockwise - Increases spring tension and moves indicator toward front of machine for heavier mowers.
· Counterclockwise - Decreases spring tension and moves indicator toward rear of machine for lighter mowers.
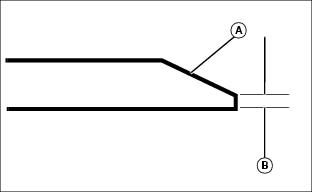
Checking for Bent Mower Blades
1. Park machine safely. (See Parking Safely in the SAFETY section.)
2. Raise mower to highest position to access blades.

Picture Note: Mower deck with side discharge used for illustration
3. Measure distance (A) between blade tip and flat ground surface.
4. Rotate blade 180° and measure distance between other blade tip and flat ground surface.
5. Install new blade if the difference between the two measurements is more than 3 mm (1/8 in.).
Servicing Mower Blades
Removing Mower Blades
1. Raise or remove mower deck.
2. Park machine safely. (See Parking Safely in the SAFETY section.)
3. Block mower blade with a piece of wood to prevent it from spinning.
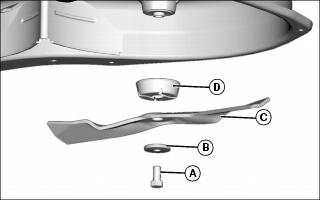
4. Loosen and remove bolt (A), washer (B), and blade (C).
5. Inspect blade condition. Sharpen, balance, or replace blades as necessary.
Installing Mower Blades
1. Make sure deflector cup (D) is seated properly between mower spindle and blade.
2. Position mower blade (C) with cutting edge towards the ground onto the mower spindle.
3. Install blade washer (B) with cup side toward the blade.
4. Install and tighten bolt (A) by hand until mower blade is in full contact (fully seated) with spindle.
5. Block mower blade with a piece of wood to prevent spinning.
6. Tighten blade bolt to 68 N·m (50 lb-ft).
Sharpening Blades
· Sharpen blades with grinder, hand file, or electric blade sharpener.
· Keep original bevel (A) when grinding.
· Blade should have 0.40 mm (1/64 in.) cutting edge (B) or less.
· Balance blades before installing.
Balancing Blades
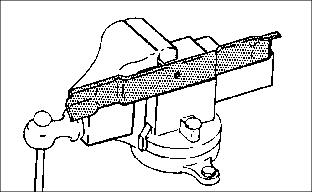
2. Put blade on nail in a vise. Turn blade to horizontal position.
3. Check balance. If blade is not balanced, heavy end of blade will drop.