
Installing
Ballasting Requirements
• All tractors require one of the following be installed when using the tiller:
Serial Number ( - 020000)
• A minimum of two front weights when tilling level ground.
• Four front weights when tilling on slopes.
Serial Number (020001 -)
NOTE: Models with serial number (020001 - ) and above have a shorter front bumper and will not accept the front quik-tatch weights.
• Two 30 lb. cast iron front wheel weights.
Use the following recommendations to help improve traction:
• Install bar tires on the tractor.
Ballast and wheel weights can be purchased from your John Deere Dealer. See your machine operator’s manual for additional further information.
Lower Tractor Lift System
1. Set depth control knob to zero to rotate lift shaft downward
Hydraulic Lift
• Push lift lever down to rotate lift shaft downward.
Foot Lift
• Pull back lift pedal by hand to put tiller in the lower/down position. Pull up lock lever to lock attachment in the lowered position.
Put Wheels in Down Position
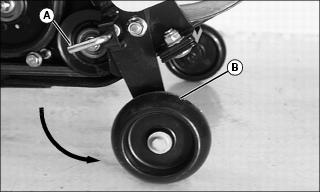
1. Pull and hold out wheel locking pin (A).
2. Swing wheel assembly (B) into down position. Make sure locking pin engages to lock wheel in down position. Repeat for other wheel assembly.
Put Tiller in Transport Position

1. Grasp handle (A) and pull slightly upward on tiller to relieve tension on transport lever (B). Pull out and rotate the transport lever to engage locking pin in slot (C).
2. Pivot tiller up and forward as far as it will go.
3. Rotate transport lever (B) until locking pin disengages from slot (C). Allow transport lever to lock into hole in shield (D).
Install Spring
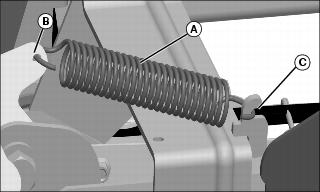
1. Install spring (A) in hole (B) on tiller housing and carefully pull spring to notch (C) on tiller frame.
Install Tiller on Rear Tractor Frame
NOTE: Depending on tire configuration it may be necessary to raise the rear wheels slightly in order to install tiller onto tractor frame.
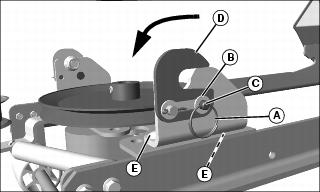
1. Remove locking ring (A), washer (B), and drilled pin (C).
2. Open tiller clip latch (D) at both sides of tiller.
3. Loosen carriage bolts (E) on both sides of tiller frame for first time installation, if not already done.
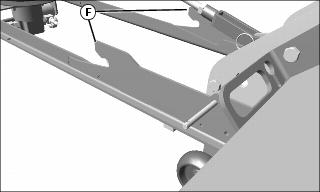

4. Place tiller frame hooks (F) over rear support pins (G) at rear tractor frame.
Fasten Clips and Install Belt
NOTE: Be sure the mower lift arm assemblies remain outside of the tiller frame when lowering the tiller.
1. Carefully lower tiller housing so that clip latch (A) engages around mounting pins (B).
2. Install drilled pin (C) washer and secure with locking ring (D) to prevent latches from opening.
3. Tighten four carriage bolts (E), if previously loosened, two on each clip assembly.
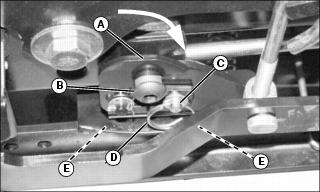
4. Swing idler sheave towards right side of tractor to loosen belt tension.
5. Install belt on tractor drive sheave.
6. Slowly release idler sheave to tighten belt.
Lock Wheels in Up Position
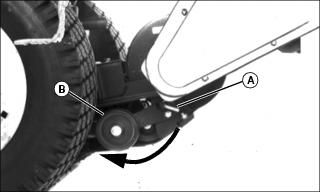
1. Pull and hold out wheel locking pin (A).
2. Swing wheel assembly (B) into up position. Make sure locking pin engages to lock wheel in up position. Repeat for other wheel assembly.
Install Lift Rod
NOTE: Jam nuts (F) may need to be loosened and rod (G) adjusted to install yokes (A).
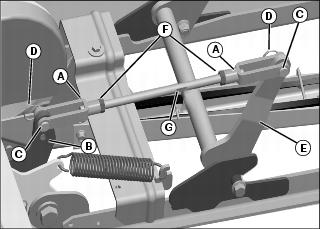
Picture Note: Assembly shown out of tractor for clarity
1. Install yoke (A) to the top hole of the rear lift link (B) on foot lift tractors, and on hydraulic lift tractors install yoke (A) in the bottom hole of the link of the tiller with a drilled pin (C), and locking ring (D).
2. Install yoke (A) to lift bracket (E) (assembled earlier to tractor) and secure with a drilled pin (C), and locking ring (D).
Adjust Tiller Lift Height
NOTE: On foot lift tractors set the tractor lift spring as specified in the operating section.
1. Raise tiller as high as it will go.
2. Measure distance between lowest tine and ground. On foot lift tractor the distance should be 75 mm (3.0 in.) to allow a maximum of 150 mm (6 in.) tilling depth. On hydraulic lift tractors the distance should be 108 mm (4.25 in.) to allow a maximum of 150 mm (6 in.) of tilling depth. See Adjusting Tilling Depth in the Operating section.
3. Adjust the secondary tiller belt (See procedure in Service section).