Service
Service Intervals
Before Each Use
100 Hours
As Required
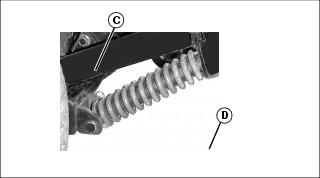
Priming Tiller Hydraulic System
IMPORTANT: Avoid damage! Reservoir is empty for shipping. Hydraulic System must be primed before operating for the first time. |
1. Start engine and pull hydraulic control lever up to raise tiller so tines clear ground.
2. Move throttle lever to 2/3 position and pull PTO handle up to engage.
3. Check tines: Tines should rotate within 20 seconds. If tines do not rotate within 20 seconds:
• Disengage PTO and stop engine.
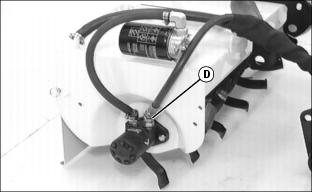
• Loosen fitting (D) to expel trapped air in the system.
• Start up tractor and run engine until oil is coming out of fitting (D).
• Stop engine and tighten fitting (D).
• Start engine and make sure tines are turning.
4. Disengage PTO and lower tiller to the ground on a level surface.
5. Stop engine and lock park brake.
6. For initial assembly and installation: Put another 3.8 L (1 gal) of John Deere HY-GARD™ J20C or equivalent into reservoir. Total capacity should now be 20.8 L (5-1/2 gal). Do not overfill.
Check Condition of Tiller
1. Replace cut, kinked, or dented hydraulic hoses. Check for hydraulic oil leaks. Fix any leaks before operating tiller.
2. Keep hose clamps and fittings tight. When you tighten connections, use two wrenches to prevent bending or breaking tubing and fittings.
• Tines are sharp. Wear heavy gloves when working around tines. • Do not work under raised attachment unless it is safely supported. |
3. Straighten or replace bent tines.
4. Tighten any loose hardware. Use proper size parts to replace missing hardware.
Replacing Tines
• Tines are sharp. Wear gloves when replacing tines. • Make sure to support raised tiller safely before doing any service on the tiller. |
1. Raise the tiller all the way and support.
2. Stop the engine and lock the park brake.
3. Raise and lock shield in highest position which allows chain links to remain locked. Too high a position will cause chain links to slip out of key-hole slots.
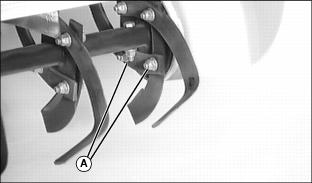
4. Remove two bolts and nuts (A) for each tine.
5. Install new tine with same bolts and nuts.
Replace Shear Bolt and Shear Pin
IMPORTANT: Avoid damage! Replacement shear bolts must be same as original shear bolts on attachment: |
1. Park machine safely. (Refer to Parking Safely in the Safety Section.)
2. Remove broken shear bolt or pin, if necessary.
3. Line up holes in auger with hole in auger shaft.
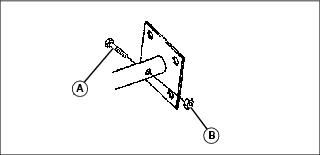
4. Install new shear bolt (A) and nut (B).