
Installing
Ballasting Requirements
Use weights to improve stability when operating on slopes or using attachments. |
Your tractor must be equipped with:
• Four front suitcase weights on front frame of machine. Weights are available from your John Deere dealer.
• To help improve traction: Bar Tires are recommended along with three rear suitcase weights or rear wheel weights.
• Do not use tire chains for tilling.
Installing Tiller on Tractor
NOTE: Depending on tire configuration it may be necessary to raise the rear wheels slightly in order to install tiller onto tractor frame.
1. Park safely. (Refer to Parking Safely in the Safety section.)
NOTE: If tiller is latched in the transport position, tiller must be unlatched out of transport position.
3. Align tractor with tiller frame.
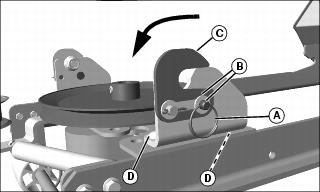
4. Remove locking ring (A), washer and drilled pin (B).
5. Open tiller clip latch (C) at both sides of tiller.
6. Loosen carriage bolts (D) on both sides of tiller frame for first time installation, if not already done.
7. Stop engine and lock park brake.
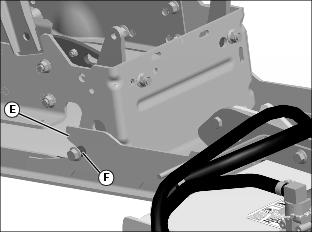
9. Slide tiller under tractor and raise back side of tiller frame to align and engage frame slots (E) with rear mounting bolts (F).
NOTE: Jam nuts (M) may need to be loosened and rod (N) adjusted to install yokes (H)
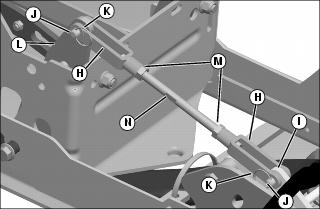
10. Install yoke (H) to the rear lift link (I) with a drilled pin (J) and locking ring (K).
11. Install yoke (H) to lift bracket (L) and secure with a drilled pin (J), and locking ring (K).
NOTE: Be sure the mower lift arm assemblies remain outside of the tiller frame when lowering the tiller.
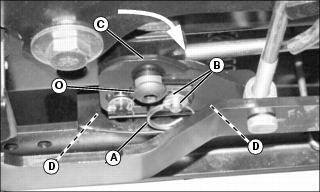
12. Start the tractor and slowly raise tiller with the hydraulic system until the front clips (C) on the tiller frame seat on the mounting pin (O).
13. Install drilled pin washer (B) and secure with locking ring (A) to prevent latches from opening.
14. Tighten four carriage bolts (D), if previously loosened, two on each clip assembly.
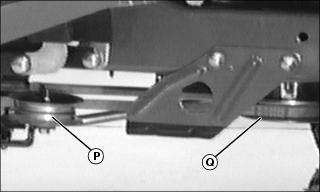
15. Move idler sheave (P) to the right and install belt onto PTO sheave (Q).
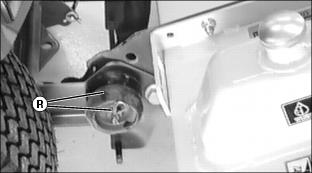
16. Remove tiller frame wheels (R) and two spring locking pins and store as shown.
17. For first time use only, prime tiller hydraulic system before operating.
Adjust Lift Rod
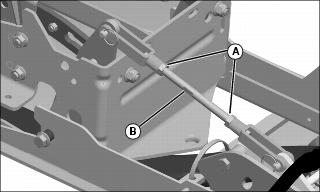
• Loosen jam nuts (A) and adjust rod (B) so that the transport latch aligns with the engagement hole and can be engaged when the tiller is in the raise position.
Partially Fill Hydraulic Reservoir
IMPORTANT: Avoid damage! Reservoir is empty for shipping. Hydraulic System must be primed before operating for the first time. |
NOTE: Position tiller so reservoir is level for initial filling. See Priming Tiller Hydraulic System in Installing section before filling to capacity.
1. Make sure tiller is on a level surface.
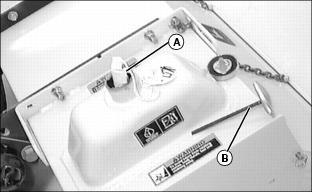
2. Remove and discard shipping reservoir cap and moisture absorption packet (A).
3. Partially fill reservoir with approximately 17 L (4-1/2 gal) of John Deere HY-GARD™ J20C or equivalent. Do not fill to capacity.