
Installing
Attaching Wheeled Sprayer to Machine
NOTE: 40 Gallon Wheeled Sprayer - In order for the sprayer to completely empty the tank, the sprayer frame should be as level as possible. Adjust the sprayer drawbar to match the height of the machine hitch.
Picture Note: 40 Gallon Wheeled Sprayer Shown
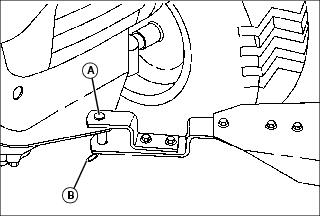
1. Put hitch pin (A) into hole in clevis and through hitch.
2. Fasten with spring locking pin (B).
Picture Note: 40 Gallon Wheeled Sprayer Shown
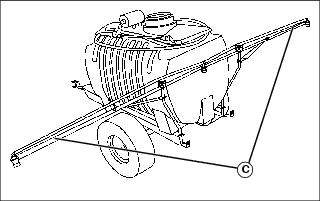
3. For 25 and 40 Gallon Sprayers, swing out boom extensions (C) and lock in place.
4. Connect sprayer pump to machine battery.
Attaching Portable Sprayer
Be sure that the carrying vehicle is capable of carrying the 25 gallon portable sprayer fully loaded. When loaded it will weigh about 103 kg (227 lb). It is important that the sprayer be secured properly and that the carrying vehicle can safely carry that load.
Install Wiring Harness (For Machines With Mid-Mounted Battery)
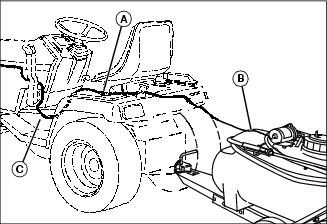
NOTE: Switch (A) is not located at center of main wiring harness. The harness plug connector nearest to the switch gets connected to the pump leads.

Picture Note: Wheeled Sprayer Shown
2. Connect main wiring harness to pump leads (B).
3. Route main harness as shown and clip in place at foot rest side panel (C). On some units route harness on right side of fuel tank filler neck.
IMPORTANT: Avoid damage! Avoid damage to wiring. Make sure hood does not close on wiring harnesses. Keep wiring harnesses away from all moving parts and hot surfaces. |
4. Connect other end of main harness to fused battery lead (D).
Install Wiring Harness (For Machines With Upper Front-Mounted Battery)
NOTE: Switch (A) is not located at center of main wiring harness. The harness wiring connector nearest to the switch gets connected to the pump leads.

Picture Note: Wheeled Sprayer Shown
2. Connect main wiring harness to pump leads (B).
3. Route main harness as shown. Clip harness in place at foot rest side panel (C). On some units route harness on right side of fuel tank filler neck.
IMPORTANT: Avoid damage! Avoid damage to wiring. Make sure hood does not close on wiring harnesses. Keep wiring harnesses away from all moving parts and hot surfaces. |
4. Make sure harness extension (D) passes between the left side hood rods. Connect the main harness to the wiring harness extension.
Install Wiring Harness (For Machines With Lower Front-Mounted Battery)
NOTE: Switch (A) is not located at center of main wiring harness. The harness wiring connector nearest to the switch gets connected to the pump leads.
Picture Note: Wheeled Sprayer Shown
2. Connect main wiring harness (B) to pump leads.
3. Route main harness along fender as shown and clip in place at foot rest side panel (C).
IMPORTANT: Avoid damage! Avoid damage to wiring. Make sure hood does not close on wiring harnesses. Keep wiring harnesses away from all moving parts and hot surfaces. |
4. For most machines, route main harness along the top of side panel, and connect main harness plug to harness extension.