
Service Transmission
Transaxle and AWD Differential Oil
IMPORTANT: Avoid damage! Do not use engine oil, "Type F" (Red) Automatic Transmission Fluid or BIO-HY-GARD. Do not mix any other oils in this transmission. |
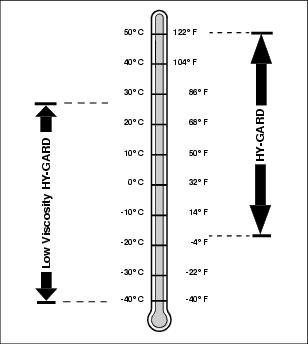
Use oil viscosity based on the expected air temperature range during the period between oil changes.
John Deere Low Viscosity HY-GARD® Transmission/Hydraulic Oil is recommended. Standard John Deere HY-GARD® Transmission/Hydraulic Oil may also be used.
Other oils may be used if they meet John Deere standard JDM J20C.
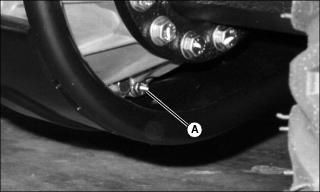
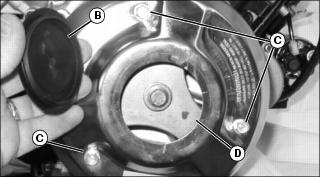
Checking AWD Differential Oil Level - HPX 4x4 and Trail HPX 4x4
1. Park machine safely. (See Parking Safely in the SAFETY section.) Allow machine to cool down for at least one hour.
IMPORTANT: Avoid damage! Dirt and debris in oil may cause damage to the AWD differential. Clean area around opening before removing plug. |
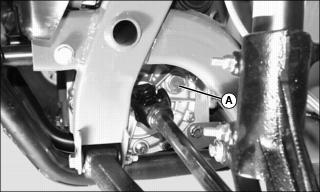
Picture Note: Left front wheel removed for clarity.
2. Remove fill plug (A) located on left side of AWD differential.
3. Oil should be level with the bottom of the fill port. If oil level is low:
a. Add oil through fill port until level is correct.
b. Install and tighten fill plug to 44 - 54 N·m (32.5 - 39.9 lb-ft).
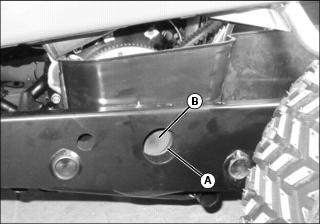
Changing AWD Differential Oil - HPX 4x4 and Trail HPX 4x4
1. Operate machine to warm AWD differential oil.
2. Park machine safely. (See Parking Safely in the SAFETY section.)
IMPORTANT: Avoid damage! Dirt and debris in oil may cause damage to the AWD differential. Clean area around opening before removing plug. |
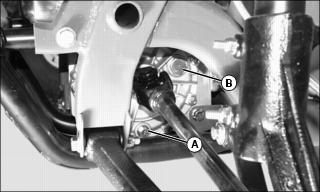
Picture Note: Left front wheel removed for clarity.
3. Position drain pan under AWD differential drain plug (A).
4. Remove fill plug (B) located on left side of AWD differential.
5. Remove AWD differential drain plug (A) and allow oil to drain.
6. Install and tighten drain plug to 30-35 N·m (22.1-25.8 lb-ft) after all oil has drained.
7. Add approximately 1.4 L (1.48 qt) of oil until the level is even with the bottom of the fill port.
8. Check washer on drain plug. Replace if missing or in poor condition.
9. Install and tighten fill plug to 44 - 54 N·m (32.5 - 39.9 lb-ft).
10. Check AWD differential oil level again after the first several hours of operation.
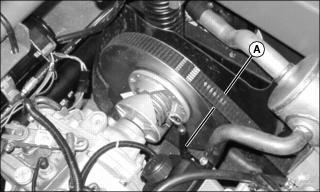
Checking Transaxle Oil Level
IMPORTANT: Avoid damage! Hot hydraulic oil will expand and show incorrect oil level. Check oil level: |
1. Park the vehicle safely. (See Parking Safely in the SAFETY section.)
2. Raise and secure cargo box.
IMPORTANT: Avoid damage! Dirt and debris in oil may cause damage to the transaxle. Clean area around opening before removing dipstick. |
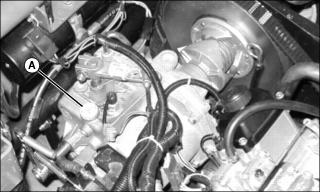
3. Remove dipstick (A) located on the top of the transaxle housing. Wipe dipstick clean.
4. Check oil level by setting dipstick on threads in transaxle case, then removing and checking oil level.
5. Add oil as needed through the dipstick fill hole.
6. Install and tighten dipstick.
Changing Transaxle Oil
1. Park the vehicle safely. (See Parking Safely in the SAFETY section.)
2. Raise and secure cargo box.
IMPORTANT: Avoid damage! Dirt and debris in oil may cause damage to the transaxle. Clean area around opening before removing dipstick. |
3. Position drain pan under transaxle drain plug (A).
5. Check washer on drain plug. Replace if missing or in poor condition.
6. Install and tighten drain plug to 44 - 54 N·m (32.5 - 39.9 lb-ft).
7. Remove dipstick located on top of transaxle housing. Wipe dipstick clean.
8. Add approximately 4.0 L (4.2 qt) of oil.
9. Check oil level by setting dipstick on threads in transaxle case, then removing and checking oil level.
10. Wait for two minutes then check oil level. Add oil if necessary.
11. Install dipstick and tighten.
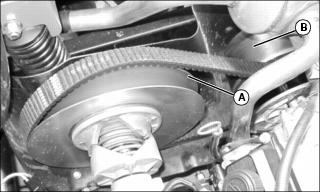
Checking Drive Belt
1. Park the vehicle safely. (See Parking Safely in the SAFETY section.)
2. Raise and secure cargo box.
3. HPX Trail Gator 4x4: Remove clutch enclosure cover.
4. Rotate and inspect belt for wear or damage.
5. Measure the top surface of the belt width at (A). Dimension should be a minimum of 27 mm (1.1 in.).
6. Replace belt if worn beyond limit.
7. HPX Trail Gator 4x4: Install clutch enclosure cover.
Replacing Drive Belt
1. Park the vehicle safely. (See Parking Safely in the SAFETY section.)
2. Raise and secure cargo box.
3. HPX Trail Gator 4x4: Remove clutch enclosure cover.
4. Route the belt over pulley (A) of the driven clutch. Rotating the driven pulley will aid in removing the belt.
5. Route belt over drive pulley (B) to remove.
6. Install new belt by routing over drive pulley and then over the driven clutch pulley.
7. HPX Trail Gator 4x4: Install clutch enclosure cover.
Checking Secondary Driven Clutch Buttons
1. Park the vehicle safely. (See Parking Safely in the SAFETY section.)
2. Raise and secure cargo box.
3. HPX Trail Gator 4x4: Remove clutch enclosure cover.
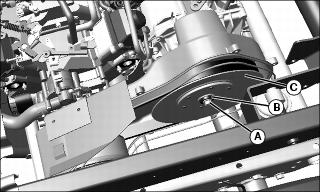
4. HPX Trail Gator 4x4: Remove secondary clutch mounting bolt (A) and washer (B).
5. HPX Trail Gator 4x4: Slide secondary clutch (C) away from transaxle far enough to see clutch buttons.
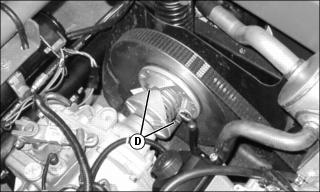
6. Check for missing or worn clutch buttons (D).
· There should not be any excessive wear, or metal-to-metal contact.
· If replacement is necessary, see your John Deere dealer.
7. HPX Trail Gator 4x4: Slide secondary clutch in towards transaxle.
8. HPX Trail Gator 4x4: Install secondary clutch mounting bolt and washer and tighten to 70 N·m (52 lb-ft).
9. HPX Trail Gator 4x4: Install clutch enclosure cover.
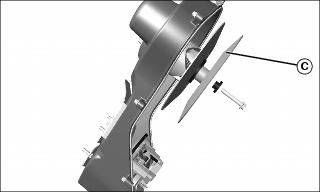
Cleaning Primary Drive Clutch
1. Park the vehicle safely. (See Parking Safely in the SAFETY section.)
2. Raise and secure cargo box.
3. Through access hole (A), remove clutch cover plug (B).

4. Remove three screws (C) securing clutch cover. Pull cover away from clutch.
Picture Note: Engine removed for clarity. Engine does not need to be removed to clean clutch.
5. Through access hole (D), use compressed air to blow dust and debris out of clutch. Also blow dust and debris out from underneath the belt along the main shaft.
6. Install clutch cover and tighten screws (C).