
Assembly
What You Need to Assemble this Attachment
Time Needed and Skills Required
• Assembly for this attachment should take the average homeowner with basic technical skills an average of two hours.
Preparing the Machine
• If your machine is equipped with the sun canopy, the rear support posts of the sun canopy will interfere with installation and operation of the two-bag bagger assembly. The hopper top will not open completely and grass bag removal will be restricted.
Tools Required
• Metric socket wrench set with 13mm socket
Assemble Hopper Screen to Hopper Top
1. Place hopper top upside down on a protective surface.
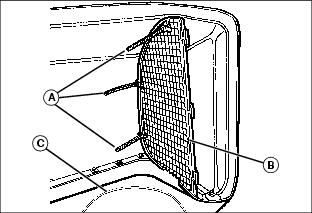
2. insert the hopper screen (B) inside the hopper top so it fits between tabs located between chute hole (C) and side of hopper top.
Fasten hopper screen to tabs with three tie straps (A). Put tie straps through holes in hopper top tabs and slots in screen.
3. Pull tie straps tight and cut off excess.
Assemble Bagger Support Rod to Cargo Mount Bracket
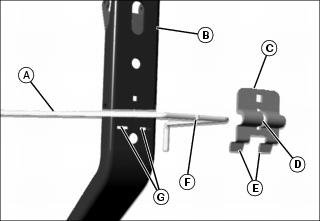
1. Fit tabs (E) on cargo mount bracket (C) into slots (G) on mounting post (B).
NOTE: Assemble bagger support rod with bent ends pointing down as shown.
2. Insert bagger support rod (A) between cargo mount bracket and mounting post.
• Tab (F) on bagger support rod must fit into slot (D) on cargo mount bracket before tightening.
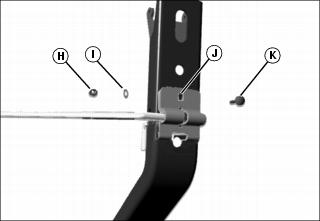
3. Insert round head bolt (K) through cargo mount bracket and into hole (J) in mounting post.
4. Secure bolt with flat washer (I) and M8 lock nut (H).
Assemble Latch Rod to Mounting Post
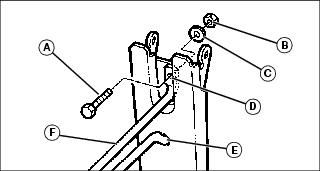
1. Insert lower part of latch rod (F) through hole (E) in mounting post.
2. Fasten upper part of latch rod with hex bolt (A) through latch rod end (D) and post hole, and secure with flat washer (C) and M8 lock nut (B).
Assemble Mounting Post to Hopper Top
NOTE: After hopper top is installed to the machine, raise and lower hopper top several times and adjust hardware if necessary for tightness.
1. Place hopper top upside down on a protective surface.
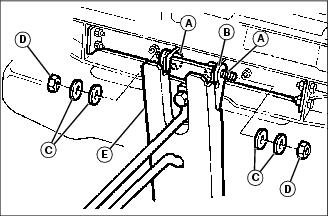
2. Install mounting post (E) to hopper top hinge (B).
3. Install hex bolts (A) from inside of hinge.
NOTE: Spring washers (C) must be installed with cup of washers facing each other. Do not over-tighten.
4. Install two spring washers (C) and M8 lock nut (D) on each hex bolt and tighten.
5. Fully raise and lower hopper top several times.
6. Tighten or loosen hardware (A) to adjust hopper top hinge tightness.