
Service Transmission
Transaxle Oil
Use the appropriate oil viscosity based on these air temperature ranges. Operating outside of these recommended oil air temperature ranges may cause premature hydrostatic transmission or hydraulic system failures.
John Deere J20C HY-GARD™ transmission and hydraulic oil is recommended. John Deere J20D Low Viscosity HY-GARD™ transmission and hydraulic oil may be used, if within the specified temperature range.
Other oils may be used if above recommended John Deere oils are not available, provided they meet one of the following specifications:
• John Deere Standard JDM J20C;
• John Deere Standard JDM J20D.
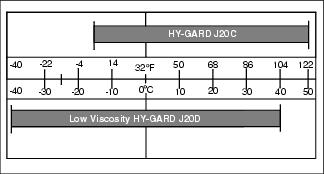
4WD Front Differential Oil
Use the appropriate oil viscosity based on these air temperature ranges. Operating outside of these recommended oil air temperature ranges may cause premature hydrostatic transmission or hydraulic system failures.
John Deere J20D Low Viscosity HY-GARD™ transmission and hydraulic oil is recommended.
Other oils may be used if above recommended John Deere oils are not available, provided they meet the following specifications:
• John Deere Standard JDM J20D.
Checking 4WD Front Differential Oil Level
1. Park machine safely. (See Parking Safely in the SAFETY section.) Allow machine to cool down for at least one hour.
IMPORTANT: Avoid damage! Dirt and debris in oil may cause damage to the 4WD differential. Clean area around opening before removing plug. |
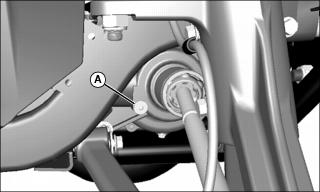
Picture Note: Left front wheel removed for clarity.
2. Remove fill plug (A) located on right side of 4WD front differential.
3. Oil should be level with the bottom of the fill port. If oil level is low:
a. Add oil through fill port until level is correct.
b. Install and tighten fill plug to 11 - 40 N•m (8 - 30 lb-ft).
Changing 4WD Front Differential Oil
NOTE: It may be necessary to remove front skid plate to access drain plug.
1. Operate machine to warm 4WD front differential oil.
2. Park machine safely. (See Parking Safely in the SAFETY section.)
IMPORTANT: Avoid damage! Dirt and debris in oil may cause damage to the 4WD differential. Clean area around opening before removing plug. |

Picture Note: Left front wheel removed for clarity.
3. Position drain pan under 4WD front differential drain plug (A) at bottom of housing.
4. Remove fill plug (B) located on right side of 4WD front differential.
5. Remove 4WD front differential drain plug (A) and allow oil to drain.
6. Check washer on drain plug. Replace if missing or in poor condition.
7. Install and tighten drain plug to 7-14 N•m (5-10 lb-ft) after all oil has drained.
8. Add approximately 150 ML (5 oz) of oil until the level is even with the bottom of the fill port.
9. Install and tighten fill plug to 11-40 N•m (8-30 lb-ft).
10. Check 4WD front differential oil level again after the first several hours of operation.
Checking Transaxle Oil Level
IMPORTANT: Avoid damage! Hot hydraulic oil will expand and show incorrect oil level. Check oil level: |
1. Park the vehicle safely. (See Parking Safely in the SAFETY section.)
2. Raise and secure cargo box.
IMPORTANT: Avoid damage! Dirt and debris in oil may cause damage to the transaxle. Clean area around opening before removing dipstick. |

3. Remove dipstick (A) located on the top of the transaxle housing. Wipe dipstick clean.
4. Check oil level by setting dipstick on threads in transaxle case, then removing and checking oil level.
5. Add oil as needed through the dipstick fill hole.
6. Install and tighten dipstick.
Changing Transaxle Oil
1. Park the vehicle safely. (See Parking Safely in the SAFETY section.)
2. Raise and secure cargo box.
IMPORTANT: Avoid damage! Dirt and debris in oil may cause damage to the transaxle. Clean area around opening before removing dipstick. |

3. Position drain pan under transaxle drain plug (A).
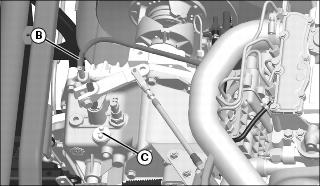
4. Remove and place a plug in the transaxle vent hose (B).
5. Make sure the oil fill plug (C) is tightly sealed, and remove the oil drain plug. There will be a small stream of oil, and then the flow will slow to a trickle.
6. Slowly open the oil fill plug just until the oil begins to steadily flow.
7. Check washer on drain plug. Replace if missing or in poor condition.
8. Install and tighten drain plug to 44 - 54 N•m (32.5 - 39.9 lb-ft).
9. Remove dipstick located on top of transaxle housing. Wipe dipstick clean.
10. Remove plug from transaxle vent hose and install back onto transaxle.
11. Add approximately 3.8 L (4.0 qt) of oil.
12. Check oil level by setting dipstick on threads in transaxle case, then removing and checking oil level.
13. Wait for two minutes then check oil level. Add oil if necessary.
14. Install dipstick and tighten.
Inspecting Driveline CV Boots
1. Park the vehicle safely. (See Parking Safely in the SAFETY section.)

Picture Note: Right rear shown, with rear wheel removed for clarity only.
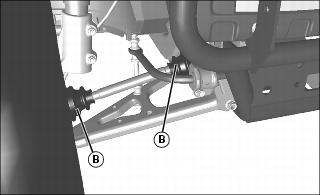
Picture Note: Right front shown.
2. Inspect two right rear CV boots (A) and two right front CV boots (B) for tears or punctures. Repeat for opposite side of machine.
3. Inspect rear drive shaft boot (C) for tears or punctures.
4. If replacement of a boot is necessary, see your John Deere dealer.
Checking Drive Belt
1. Park the vehicle safely. (See Parking Safely in the SAFETY section.)
2. Raise and secure cargo box.
3. Rotate and inspect belt for wear or damage.

4. Measure the top surface of the belt width at (A). Dimension should be a minimum of 27 mm (1.1 in.).
5. If replacement of belt is necessary, see your John Deere dealer.
Checking Secondary Driven Clutch Buttons
1. Park the vehicle safely. (See Parking Safely in the SAFETY section.)
2. Raise and secure cargo box.

3. Check for missing or worn clutch buttons (A).
• There should not be any excessive wear, or metal-to-metal contact.
• If replacement is necessary, see your John Deere dealer.
Cleaning Primary and Secondary Clutches
1. Park the vehicle safely. (See Parking Safely in the SAFETY section.)
2. Raise and secure cargo box.

3. Use compressed air to blow dust and debris out of primary drive clutch (A) and secondary (B) driven clutch, and from bottom of belt cover (C).