
Preparing Vehicle
Remove Mower
2. Remove drive belt from machine and store with mower deck.
Install Rockshaft Assembly

1. Remove bolt (A) and nut under left side of fenderdeck.
• X300R only: The X300R does not have this deck up-stop, so an additional M10x30 bolt, M10 nut, and M10 washer are provided.
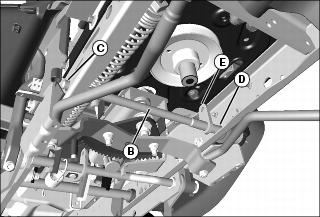
2. Install small end of rockshaft (B) through hole (C) on right side of machine frame, then pull large splined end through hole (D) on left side of machine frame. Make sure bracket (E) on rockshaft is pointing up.
3. Install one bearing (F) on end of shaft, with flange end of bearing against machine frame.
4. Install support bracket (G) on end of shaft.

5. Install rockshaft bracket (H) facing upward, as shown. Secure with 6 x 40 mm clevis pin (I) and 2.5 x 16 mm cotter pin (J).
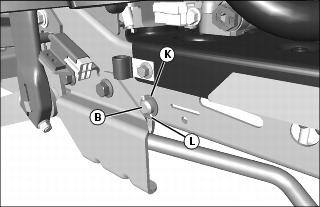
6. Secure right side of rockshaft (B) with bushing (K) and 2.5 x 20 mm cotter pin (L).
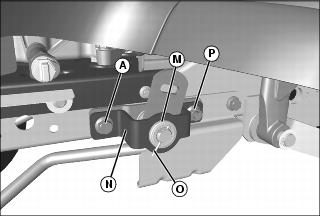
7. Install second bearing (M) onto mounting plate (N), and install assembly onto shaft. Secure with 3.2 x 32 mm cotter pin (O).
8. Secure front side of assembly with bolt (A) and nut removed earlier.
• X300R only: Secure front side of assembly with M10x30 flange bolt and M10 flange nut provided.
9. Secure rear side of assembly with M10x30 flange bolt and M10 flange nut (P).
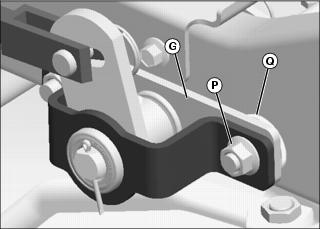
Picture Note: X300R model shown.
• X300R only: Secure rear side of assembly with M10x30 flange bolt and M10 flange nut (P), with M10 washer (Q) under bracket (G).
Check Tire Pressure
IMPORTANT: Avoid damage! To prevent tire damage, do not use more than maximum tire pressure shown on sidewall of tire. |
NOTE: See your Tractor Operator’s Manual for correct tire pressure.