Service
Service Intervals
After Each Use
• Clean under mower deck and inside rear discharge chute and grass collector using cleanout port on mower deck.
• Clean debris from top of mower deck and from behind belt shields.
Every 10 Hours
• If operating in dry conditions, clean debris from mower.
Every 25 Hours
Every 100 Hours
Every 500 Hours
Grease
The following greases are preferred:
• John Deere Multi-Purpose SD Polyurea Grease
• John Deere Multi-Purpose HD Lithium Complex Grease
If not using any of the preferred greases, be sure to use a general all-purpose grease with an NLGI grade No.2 rating.
Wet or high speed conditions may require use of a special-use grease. Contact your Servicing dealer for information.
Gear Case Oil
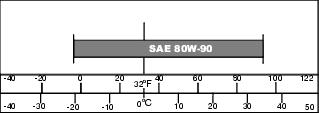
Use the following oil viscosity based on the air temperature range. Operating outside of the recommended oil air temperature range may cause premature gear case failure.
IMPORTANT: Avoid damage! ONLY use a quality oil in this gear case. DO NOT mix any other oils in this gear case. DO NOT use BIO–HY–GARD® in this gear case. |
The following John Deere gear case oil is preferred:
• GL-5 GEAR LUBRICANT®—SAE 80W-90
Other gear case oils may be used if recommended John Deere gear case oil is not available, provided they meet the following specification:
• API Service Classification GL–5.
Lubricating Mower
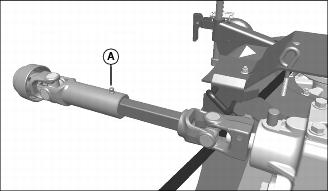
Driveline
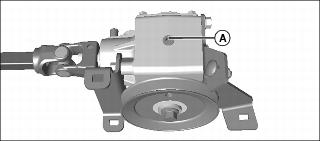
Lubricate grease fitting (A) with recommended grease.
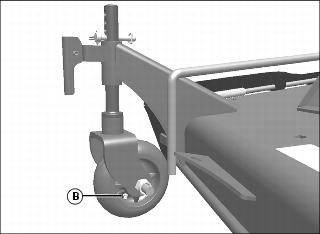
Wheels
Lubricate grease fittings (B) on each wheel with recommended grease.
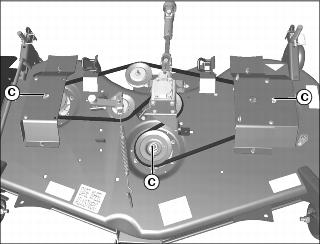
Spindles
1. Lubricate grease fittings (C) with recommended grease.
Servicing Gearbox
Checking Oil Level
1. Remove plug side of gearbox.
2. Oil level should be even with bottom edge of plug hole.
3. If oil is low, add recommended oil.
Changing Oil
1. Remove gearbox bracket with gearbox. (See Removing Belt in the Servicing Mower Belt procedure.)
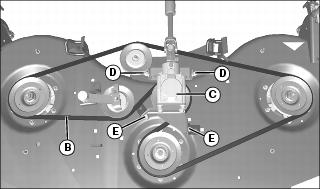
2. Remove plug (A) on side of gearbox.
3. Lift and turn gearbox bracket on side to drain oil from gearbox.
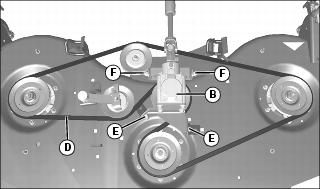
4. Make sure belt (B) is installed around deck sheaves, as shown.
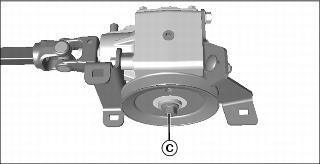
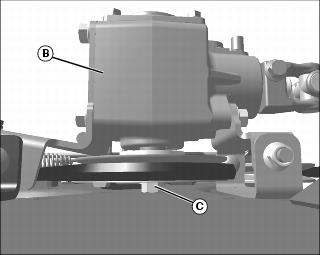
5. Install belt on gearbox (C) sheave, and lower gearbox onto deck. Secure gearbox bracket with four bolts (D) and (E) and locknuts, but do not tighten. Leave all gearbox mounting hardware loose at this time.
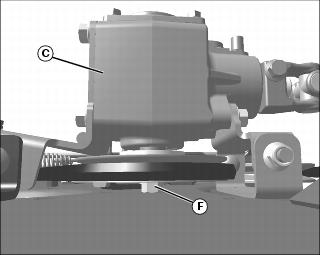
6. Place a thin shim under sheave bolt (F) or hold gearbox (C) upward to hold bolt off of deck for clearance, and tighten four gearbox mounting bracket M10 locknuts to 73 N•m (54 lb-ft).
7. Add recommended oil to bottom edge of plug hole in gearbox.
Servicing Mower Belt
Removing Belt
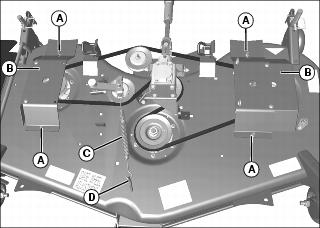
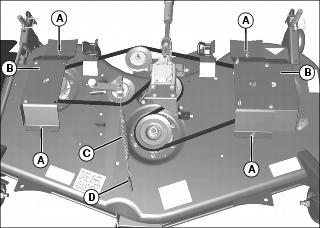
2. Loosen four locknuts (A). Slide both ramps (B) forward and remove from deck.
3. Clean top of mower deck and area around all of the sheaves of debris.
IMPORTANT: Avoid damage! Do not clean belts using parts cleaning solvent or belt dressing. They soften belts and shorten belt life. |
4. Clean and inspect belt for damage:
• If belt does not need to be replaced, stop here. Install deck ramps.
• If belt does need to be replaced, continue with next step.
5. Remove idler tension spring (C) from hook (D) on deck.
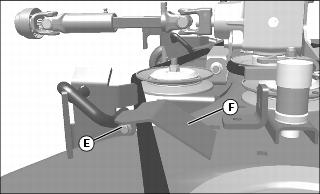
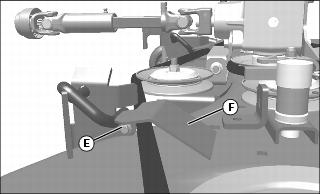
6. Remove self-tapping screw (E) and belt guide (F) on each side of mower deck.
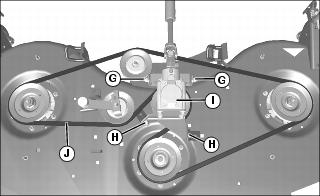
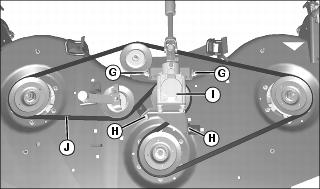
7. Loosen two locknuts and bolts (G), and remove two locknuts and bolts (H), and rotate gearbox bracket with gearbox (I) rearward, and remove belt (J) from gearbox sheave.
8. Remove belt from remaining sheaves.
Installing Belt
1. Install belt (J) around deck sheaves, as shown.
2. Install belt on gearbox (I) sheave, and lower gearbox onto deck. Secure rear of gearbox bracket with two bolts (H) and locknuts, but do not tighten. Leave all gearbox mounting hardware, (G) and (H), loose at this time.
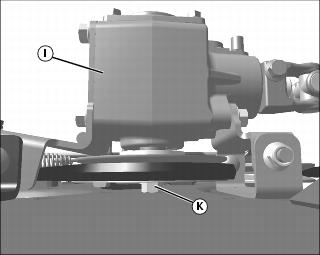
3. Place a thin shim under sheave bolt (K) or hold gearbox (I) upward to hold bolt off of deck for clearance, and tighten four gearbox mounting bracket M10 locknuts to 73 N•m (54 lb-ft).
4. Install belt guide (F) and secure with self-tapping screw (E) on each side of mower deck.
5. Install idler tension spring (C) onto hook (D) on deck.
6. Install two deck ramps (B) and secure with four locknuts (A).
Servicing Mower Blades
Checking for Bent Mower Blades
1. Park machine on a level surface, not on a slope.
7. Wait for engine and all moving parts to stop before you leave the operator’s seat.
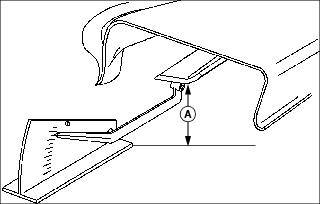
9. Measure the distance (A) from blade tip to level surface with a ruler or a leveling gauge available at your John Deere dealer.
10. Rotate blade 180 and measure the distance between other end of blade and surface.
11. Check all blades. Install new blade if difference between measurements is more than 3 mm (1/8 in.).
Removing Mower Blades
1. Park machine safely. (See Parking Safely in SAFETY.)
3. Use a suitable lifting device to raise mower to gain access to blades.
4. Insert wood block between blade and mower to prevent blade from turning when removing bolt.
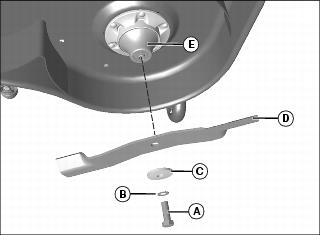
5. Remove bolt (A), small washer (B), large washer (C) and blade (D).
Installing Mower Blades
1. Check that deflector cup (E) is properly seated between mower spindle and blade.
2. Install blade (D) with cutting edge toward the ground.
3. Install large washer (C), small washer (B) and bolt (A).
4. Insert wood block between blade and mower to prevent blade from turning when tightening bolt. Tighten to 122 N•m (90 lb-ft).
Sharpening Blades
1. Sharpen blade with grinder, hand file or electric blade sharpener.
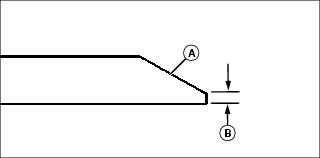
• Keep original bevel (A) when grinding.
• Blade should have 0.40 mm (1/64 in.) cutting edge (B) or less.
2. Balance blade before installing.
Balancing Blades
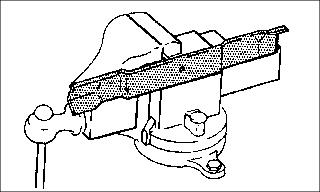
2. Put blade on a nail in a vice or in a vertical wall stud. Turn blade to horizontal position. If blade is not balanced, heavy end of blade will drop.
3. Grind bevel of heavy end. Do not change blade bevel.
Replacing Mower Wheels
1. Park machine on a level surface, not on a slope.
7. Wait for engine and all moving parts to stop before you leave the operator’s seat.
Front Wheels
1. Remove nut (A), bolt (B), wheel (C), and two washers (D) as shown.
2. Install new wheel with one washer on each side of wheel, and secure with bolt and nut. Tighten nut to 68 N•m (50 lb-ft).
Rear Wheels
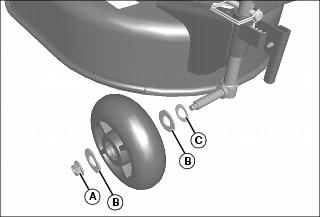
1. Remove nut (A), wheel, two washers (B), and small washer (C), as shown.
2. Install new wheel with washers and nut, reverse of removal. Tighten nut to 50 N•m (37 lb-ft).
Replacing Sheaves
2. Remove two deck ramps and idler tension spring on deck. (See Removing Belt in the Servicing Mower Belt procedure.)
NOTE: To remove sheave nuts, use a block of wood to prevent the blade from turning for each sheave. Use an impact wrench to remove each nut.
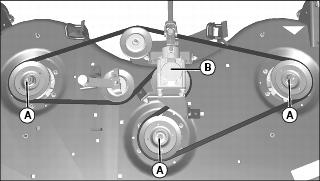
3. Remove nuts (A) from each sheave on top of mower.
5. Remove gearbox bracket with gearbox (B). (See Removing Belt in the Servicing Mower Belt procedure.)
NOTE: Gearbox sheave bolt has left-hand threads, so you will need to remove bolt by turning it clockwise instead of counterclockwise.
6. Remove bolt (C) and washer from sheave installed on gearbox.
7. Replace sheaves and install hardware.
• Tighten spindle sheave nuts to 142 N•m (105 lb-ft).
• Tighten gearbox sheave bolt to 130 N•m (95 lb-ft).
8. Install belt (D) around deck sheaves, as shown.
9. Install belt on gearbox (B) sheave, and lower gearbox onto deck. Secure rear of gearbox bracket with two bolts (E) and locknuts, but do not tighten. Leave all gearbox mounting hardware, (E) and (F), loose at this time.
10. Place a thin shim under sheave bolt (C) or hold gearbox (B) upward to hold bolt off of deck for clearance, and tighten four gearbox mounting bracket M10 locknuts to 73 N•m (54 lb-ft).
11. Install idler tension spring and two deck ramps back onto deck. (See Installing Belt in the Servicing Mower Belt procedure.)
Cleaning Mower Deck
NOTE: Follow this procedure after each use to prevent buildup and remove corrosive lawn chemicals.
1. Park machine safely. (See Parking Safely in the SAFETY section.)
2. Push top hydraulic lever forward to lower deck to the ground.
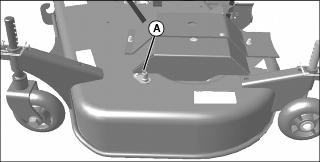
3. Attach a garden hose with quick-coupler to cleanout port (A) on left side of mower deck.
6. Push throttle lever to full throttle position. Engage mower deck and allow water to flush under deck for one minute.
7. Shut off mower deck and stop engine.
8. Turn off water and remove garden hose from cleanout port.
