
Operating
Daily Operating Checklist
o Check for loose or missing hardware.
o Make sure all connections are tight.
o Make sure attachment responds properly to controls.
o Check for debris build-up that could obstruct proper motion of the blade trip components.
Raising and Lowering Blade
NOTE: Key switch must be in RUN position for blade switch to function.
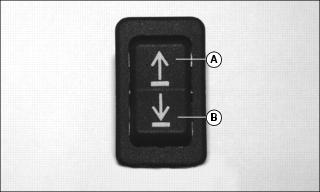
Raising Blade
1. Press and hold top (A) of switch to raise blade to desired height.
Lowering Blade
1. Press and hold bottom (B) of switch to lower blade to desired height.
Transporting Blade
Avoid contact with objects such as trees or fences. Be aware of blade end position while transporting. Blade makes a wide arc when turning.
Transport with blade raised to the highest position. Do not exceed 8 km/hr (5 mph).
Setting Blade Angle
1. Raise blade slightly off ground.
2. Park machine safely. (See Parking Safely in the SAFETY section.)
Straight Blade
b. Swing blade to right or left position.
c. Release lever and make sure it locks into right position notch (B) or left position notch (C).
V-Blade
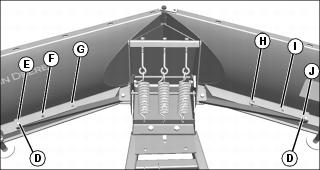
• Install pins and spring locking pins (D) into holes for desired blade angle:
Adjusting Skid Shoes
1. Raise blade slightly off ground.
2. Park machine safely. (See Parking Safely in the SAFETY section.)
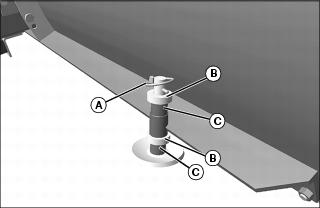
4. Remove or add washers (B) and/or spacers (C) to attain desired ground clearance.
5. Lower blade to ground and check adjustment.
Setting Blade Tilt
1. Raise blade slightly off ground.
2. Park machine safely. (See Parking Safely in the SAFETY section.)
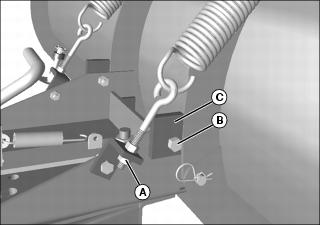
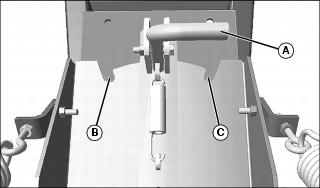
Picture Note: Blade stop setting on straight blade shown in perpendicular blade position.
3. Loosen locknut (A) on each eyebolt to reduce spring tension.
4. Loosen bolt (B) on both sides of blade frame.
NOTE: The blade stops can be rotated to allow four possible blade tilt positions. Perpendicular blade position is recommended for best performance. Both stops must be adjusted to the same position.
5. Rotate blade stop (C) on both sides to desired tilt position.
6. Tighten bolts to 41 N•m (30 lb-ft).
NOTE: Spring trip must be adjusted each time blade tilt is changed.
7. Adjust the blade spring trip.
Adjusting Spring Trip
Straight Blade

Picture Note: Blade stop setting on straight blade shown in perpendicular blade position.
1. Adjust to initial setting by tightening locknuts (B) on eyebolts so 15 mm (9/16 in.) of thread is exposed. Tighten top nut (C).
2. Operate blade to determine if spring tension is sufficient for the type of material and terrain conditions.
3. Adjust spring trip if needed:
• Tighten locknuts (B) equal amounts to increase tension.
• Loosen locknuts (B) equal amounts to decrease tension.
4. Tighten top locknut (C) to secure eyebolt position.
V-Blade
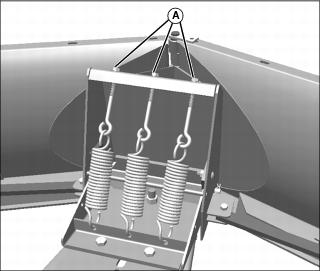
1. Adjust to initial setting by tightening three locknuts (A) on eyebolts so 15 mm (9/16 in.) of thread is exposed.
2. Operate blade to determine if spring tension is sufficient for the type of material and terrain conditions.
3. Adjust spring trip if needed:
• Tighten locknuts (A) equal amounts to increase tension.
• Loosen locknuts (A) equal amounts to decrease tension.
Checking Blade for Obstructions
2. Park vehicle safely. (See Parking Safely in the Safety section.)

3. Check for obstructions around the springs and between the blade and blade frame. Use a long pry bar to remove obstructions.