
Service Miscellaneous
Using Proper Fuel
Use regular grade unleaded fuel with an octane rating of 87 octane or higher. Fuel blends containing up to 10% ethanol or up to 15% MTBE reformulated fuel are acceptable. Do not use fuel or additives containing methanol as engine damage can occur.
Always use fresh, clean fuel that is purchased in a quantity that can be used within approximately 30 days, or add fuel stabilizer.
Fuel is blended to give best seasonal performance. To avoid engine performance problems such as hard starting or vapor lock, use in-season fuel. Use fuel during warm weather that was purchased during that season, and use fuel during cold weather that was purchased during that season.
Fuel can become stale in machines with engines that are used seasonally or infrequently during a season. Stale fuel can produce varnish and plug carburetor components which can affect engine performance.
Keep fuel storage container tightly covered and in a cool area out of direct sunlight. Fuel can break down and degrade if not sealed properly or exposed to sun and heat.
Condensation may collect in the fuel tank because of a variety of operating or environmental conditions and, over time, may affect your machine’s operation. Fill fuel tank at the end of daily use and store fuel in plastic containers to reduce condensation.
For best year-round performance and fuel-handling, add stabilizer to fuel immediately after fuel purchase. Such practice helps prevent engine performance problems and allows fuel storage in the machine all year without draining.
Filling Fuel Tank
Fill fuel tank at the end of each day’s operation to prevent condensation and freezing during cold weather.
1. Park machine safely. (See Parking Safely in the SAFETY section.)
3. Remove any trash from area around fuel tank cap.
4. Remove fuel tank cap slowly to allow any pressure built up in tank to escape.
5. Fill fuel tank only to bottom of filler neck.
Removing and Installing Wheel Assembly
Removing
1. Park machine safely. (See Parking Safely in the Safety section.)
IMPORTANT: Avoid damage! Place jack stands under frame, not under transmission or engine, when raising or supporting machine. |
2. Raise machine with a safe lifting device and lower machine onto jack stands or other stable supports. Block wheels remaining on the ground to prevent machine movement.
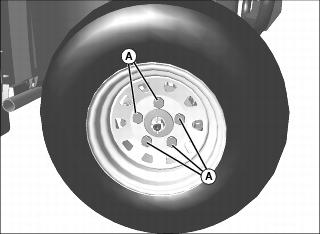
Picture Note: Wheel may or may not have a cap to remove when removing the wheel.
3. Remove the wheel bolts (A).
5. Take wheel assembly to an authorized service dealer for repairs.
Installing
1. Install wheel assembly with valve stem to the outside.
2. Tighten wheel bolts evenly in alternating sequence until snug.
3. Lower machine completely to the ground.
• Standard wheel assembly - 108 N•m (80 lb-ft)
• Sport wheel assembly - 142 N•m (105 lb-ft)
5. If new bolts or wheels are used, tighten wheel bolts again after 8 hours of vehicle use.
Removing and Installing Seats
Removing
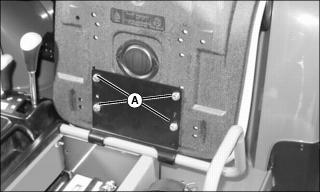
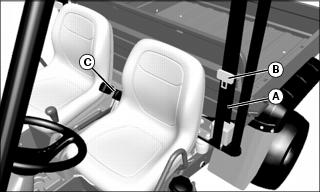
2. Hold onto seat and remove all screws (A).
3. Remove seat and seat bracket from support rail.
Installing
1. Position seat bushings (B) on support rail so tabs face toward rear of vehicle.
2. Position seat bracket (C) onto support rail so hinges (D) fit around rubber bushing tabs.
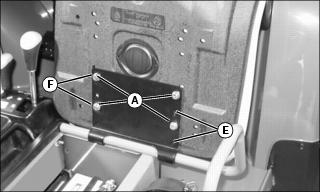
Picture Note: Rear position shown.
3. Rotate seat bracket upward. Position bottom of seat against bracket and align correct holes with holes in seat.
4. Slide seat to the forward (E) or rearward (F) position.
5. Install original screws (A) to secure seat.
6. Tighten seat bracket hardware to 10 N•m (88.5 lb-in.).
Opening and Closing Hood
Opening Hood
1. Park the vehicle safely. (See Parking Safely in the SAFETY section.)
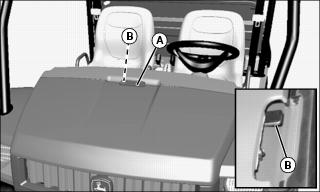
2. Stand in front of machine and grasp hood lift handle (A).
3. Pull up on hood release handle to unlock latch (B).
4. When the hood latch is released, pull upward on the hood to pivot to full open position.
Closing Hood
1. Grasp hood lift handle (A).
2. Pivot hood downward to closed position.
3. Press down on hood to latch hood in closed position.
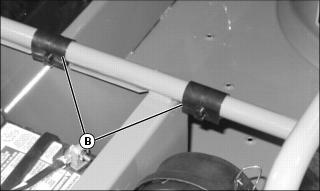
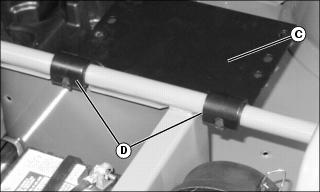
Removing and Installing Storage Tray
Removing
1. Park the vehicle safely. (See Parking Safely in the SAFETY section.)
3. Remove all contents from storage tray.
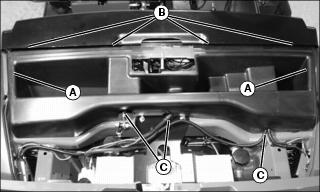
4. Grasp outer edges of the storage tray (A).
5. Flex storage tray to fit past dash panel (B) while lifting the storage tray out of machine.
Installing
1. Position storage tray over frame.
2. Flex storage tray (A) to fit under dash panel (B) while lowering storage tray into position.
3. Check alignment of cables and harnesses with routing notches (C).
4. Secure all items to prevent damage from movement while operating the machine.
Inspecting Seat Belt
• Hand wash webbing (A) with warm water and mild soap. Rinse thoroughly and air dry.
• Inspect outer seat belt connector (B) and inner connector (C) for damage or wear. If assembly does not operate properly or if the webbing is torn or frayed, the seat belt must be replaced.
Cleaning Vehicle Surfaces
Cleaning:
Keeping your vehicle clean will maintain its appearance and can also extend the life of various components. Immediately after your vehicle has been exposed to salt water or operated on muddy trails, rough terrain, or in dusty conditions, wash your vehicle. With some precautions, your vehicle can be cleaned much like a sport utility vehicle.
Washing Vehicle:
The recommended and safest way to clean your vehicle is with a garden hose and a pail of mild, soapy water. Use a professional type wash mitten. Clean the upper body first and the lower parts last. Rinse frequently with water and dry with a chamois to prevent water spotting.
1. Rinse hood and entire machine with clean water to remove dirt and dust that may scratch the surface.
2. Wash surface with clean water and a mild liquid automotive washing soap.
3. Immediately after washing, lubricate all grease fittings with grease.
4. Dry thoroughly to avoid water spots.
5. Wax the surface with a liquid automotive wax. Use products that specifically say “contains no abrasives.”
6. Buff applied wax by hand using a clean, soft cloth.
Cleaning and Repairing Metal Surfaces
Cleaning:
Follow automotive practices to care for your vehicle painted metal surfaces. Use a high-quality automotive wax regularly to maintain the factory look of your vehicle’s painted surfaces.
Repairing Minor Scratches (surface scratch):
1. Clean area to be repaired thoroughly.
2. Use automotive polishing compound to remove surface scratches.
3. Apply wax to entire surface.
Repairing Deep Scratches (bare metal or primer showing):
1. Clean area to be repaired with rubbing alcohol or mineral spirits.
2. Use paint stick with factory-matched colors available from your authorized dealer to fill scratches. Follow directions included on paint stick for use and for drying.
3. Smooth out surface using an automotive polishing compound. Do not use power buffer.
Checking Windshield or Windscreen Regularly
The windshield and windscreen are a polycarbonate material which is softer but stronger than glass. It will scratch.
Before washing, flush as much loose dirt off as possible by thoroughly rinsing with warm water using a soft cloth or sponge. Wash with mild soap or detergent and rinse thoroughly with clean water. The following cleaning agents are compatible with polycarbonate when used according to the manufacturer’s recommendations: Formula 409™ (without ammonia), Joy™, and Palmolive Liquid™. To prevent water spots, thoroughly dry the windshield with a chamois or moist sponge. Do not use abrasive cleaners. Avoid cleaning in direct sunlight to prevent streaking.
To minimize scratches and improve visibility by filling in existing scratches, it is recommended that the windows be polished or waxed regularly. Some commercially-available polishes and waxes that are recommended include: Meguiar’s PlastX™ Clear Plastic Cleaner and Polish, and Johnson’s Paste Floor Wax. First, test effectiveness of polish or wax in a small corner of the windshield.