
Operating
Before Operating the Spreader
1. Inflate tires to 30 psi (2 bar) (207 kPa) maximum.
2. Check bushings and bearing surfaces for proper lubrication (See Service section).
3. Be sure controls operate smoothly and spreader wheels turn freely.
4. Before filling hopper, practice spreading. Become accustomed to operating the on/off control lever while spreader is in motion.
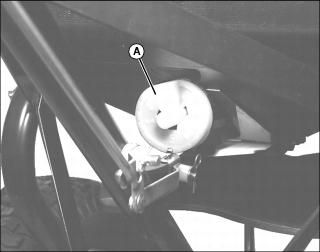
On/Off Control Lever

1. Use On/Off control lever (A) to open and close hopper gate while spreader is in motion. This starts and stops material flow.
2. Move control lever towards spreader to open flow gate.
3. Move control lever away from spreader to close flow gate.
Using Flow Control Dial

Flow control dial (A) rotates to adjust the opening size in hopper bottom. Dial has nine numbers with ten positions between each number for fine adjustment. Small numbers provide the smallest opening.
Turn dial to adjust for desired application flow.
Determining Application Flow Setting
1. Check material manufacturer’s container for recommended application flow and setting for John Deere spreaders. If no recommendation is found for John Deere spreaders, use setting for similar type spreaders sold by other companies.
2. Use application flow setting charts when spreading grass seed or when material size and desired coverage is known, but no setting is recommended by the material manufacturer.
Understanding Full and Half Flow Settings
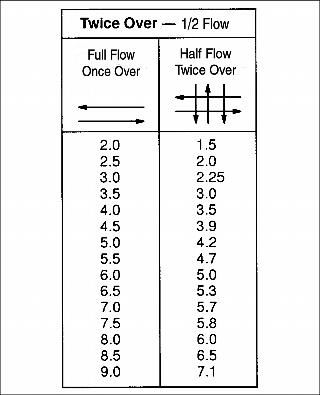
“Full Flow” setting is used when single pass (once over) operation is planned.
“Half Flow” setting is used for two pass (twice over) operation and improved coverage.
Filling the Spreader
1. Attach hitch to tractor/mower with hitch pin. Fasten with spring pin.

2. Use on/off control lever (A) to close product gate at hopper bottom.
NOTE: Fill spreader on a flat, level surface. Spreader may be unstable when fully loaded on an incline.
3. To avoid material loss, fill spreader on a sidewalk, driveway, plastic sheet or cardboard.
Adjusting Spread Pattern

Adjusting knob (A) moves diffuser plate (B) forward and backward to center spread pattern and reduce side-throw (or skewing).
Many variables can affect the spreading pattern:
• Product size, weight, shape, surface finish
• Spreading rate (light, medium, heavy)
• Condition of spreader and spreader spinner
Because of these variables, the diffuser plate must be set for each type of application. Use the following procedure when setting spread pattern:
1. On a flat, bare surface such as a paved driveway, operate the spreader and observe the spreading pattern. If spreading pattern is centered around spreader, do not adjust diffuser.
2. If spreading pattern is not centered around spreader, adjust as follows and retest:
NOTE: Adjusting spread pattern will not change the width of spread.
Never adjust so the diffuser plate splits the material flow to both center and outside of spreader. (Knob centered between full clockwise and full counterclockwise.)

If spreading is long to the left of center, turn diffuser knob counterclockwise all the way; then turn knob clockwise until edge of diffuser plate (B) directs material slightly to outside of spreader as it falls on the spinner and test pattern is centered.
If spreading is long to the right of center, turn diffuse knob clockwise all the way; then turn knob counterclockwise until edge of plate directs material slightly to center of spreader as it falls on the spinner. Continue to turn knob in small increments until test pattern is centered.
Operating Tips for Uniform Spreading
1. Keep spinner blades clean. A buildup of material on the spinner blades can cause uneven spreading.
2. Use on/off control to open and close product gate only when spreader is in motion. Close product gate as you enter turn-around areas.
3. Maintain even, normal travel speed of 3 mph/264 fpm (4.8 kph/80 meters per min). Faster travel throws material further for a wide spread pattern and lighter coverage. Slower travel spreads a narrow pattern with heavier coverage.
4. Travel in straight rows. Keep your eyes on the far end of the area to keep spreader in alignment with previous pass.
Spreading the Material
Two methods of spreading the material, Dual Pass and Single Pass are described below:
Dual Pass Coverage - (Preferred Method)
1. Set flow control dial (A) to “Half Flow” setting described in “Understanding Full and Half Flow”.
NOTE: “Half Flow” is a proportional reduction of “Full Flow”, not one-half of “Full Flow”. See Flow Setting Tables.
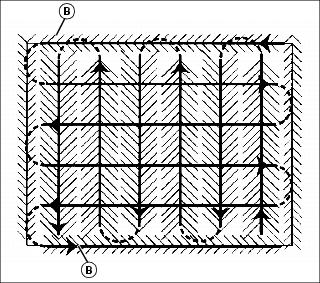
2. Spread header strips (B) at each end of area. This allows a turn-around area to align spreader for next pass.
3. Make passes between header strips at each end of area. (Refer to “Keys to Uniform Spreading” covered previously in manual.) (See center illustration.)
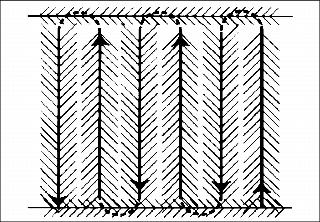
4. Repeat steps two and three using passes in cross direction to those used previously. (See bottom illustration.)
Single Pass Coverage
1. Set flow control dial to “Full Flow” setting (see flow setting tables earlier in this manual.).
2. Perform steps two and three under “Dual Pass Coverage”.
Spreading Rock Salt
NOTE: Use higher flow settings (5 - 9) for wider product opening when spreading salt.
1. Remove Hopper Grate to prevent damage from larger salt aggregate.
2. Install agitator to break up clumps.
3. Starting with flow setting at 5, make a trial pass over the spreading area and check coverage. Adjust flow setting up to improve coverage or down to reduce coverage.
IMPORTANT: Avoid damage! Clean and lubricate axle bearings after spreading salt to avoid damage to bearings. |
4. After spreading, be sure to thoroughly rinse salt dust from all surfaces, as salt is highly corrosive.
Cleaning and Lubricating after Each Use
Clean and oil spreader immediately after each use. Choose one of the following methods:
• Wash, rinse and dry spreader. Drying takes time since moisture trapped in bearing areas is slow to drain or evaporate.
• Wipe spreader thoroughly with an oily cloth.
• Clear work area of bystanders. • Wear eye protection when using compressed air for cleaning purposes. |
• Blow off spreader with compressed air. (Keep spreader dry.)
Above methods are listed in order of preference. A good oil wiping or dry cleaning is preferable to poor washing and drying. It is almost impossible for rust and corrosion to form on a clean, dry, oiled surface.
When spreader is completely dry, lubricate all moving parts, especially spinner drive, hopper bottom, wheel bushings and gears. See Service Section for procedures.