
Assembly
Identify Parts (48)
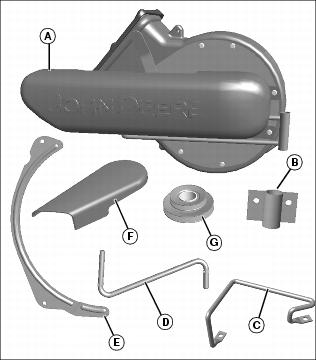
Bag of Parts
Identify Parts (54)
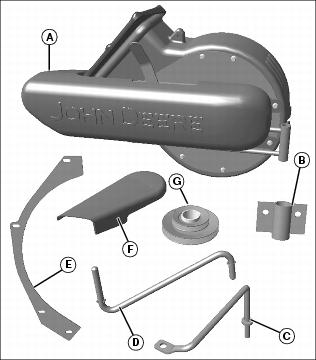
Bag of Parts
Identify Parts (62)
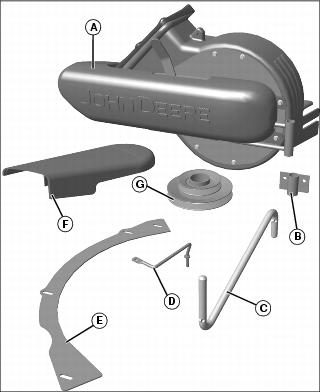
Bag of Parts
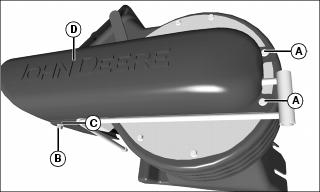
Modify Mower Deck Belt Shield and Discharge Chute
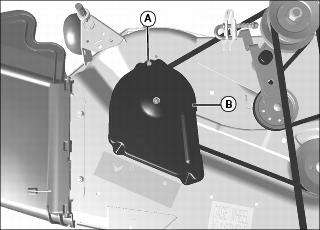
2. Remove right deck belt shield (B) from slots.
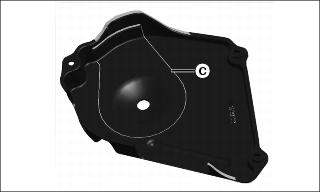
3. Locate embossed cutout line (C) on bottom of deck belt shield.
4. Cut out area inside embossed line.
Picture Note: View from under 54 shown.
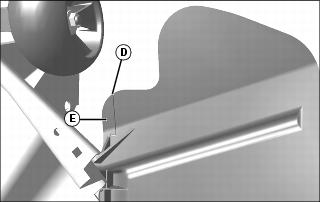
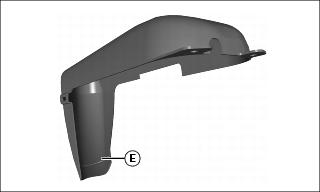
5. Locate embossed cut line (D) on deck discharge chute. Cut along line and remove section (E).
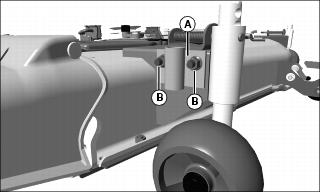
Install Double Sheave
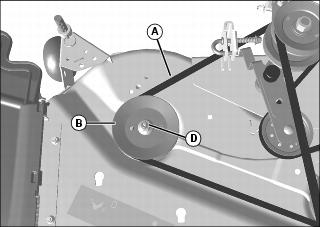
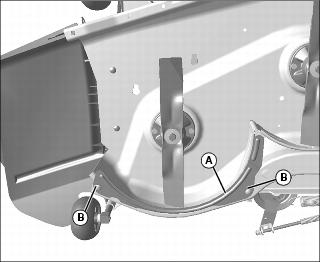
2. Remove mower deck belt (A) from right spindle sheave (B). Inspect and replace belt if needed.
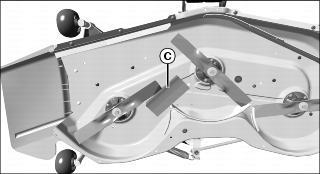
3. Wedge a block of wood (C) between outer edge of blade and deck opening to prevent blade from turning.
NOTE: Support the blade and spindle shaft assembly. After the spindle nut is removed, the entire blade and spindle shaft assembly is free to fall out.
4. With blade held stationary against wood block, remove and keep spindle nut (D). Remove right spindle sheave (B).

5. Install double sheave (E) on spindle shaft with large pulley against deck.
6. With blade held stationary against wood block, install spindle nut (D) and tighten to 163 N•m (120 lb-ft).
7. Install original mower deck belt (A) in lower groove of double sheave.
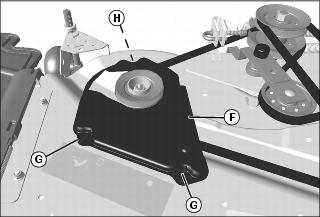
8. Install modified mower deck belt shield (F) into slots (G). Install original bolt (H).
9. Safely unblock and lower mower deck to ground.
10. Clean and store right spindle sheave for use if POWER FLOW and double sheave are removed.
Modify Shields (48)
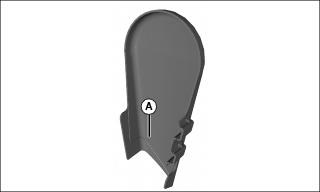
1. Locate embossed cut line (A) on deck belt shield. Cut along line and remove section.
Modify Shields (54 and 62)
1. Remove two bolts (A), nut (B) and washer (C) attaching belt shield (D) to POWER FLOW.
2. Locate embossed cut line (E) on belt shield. Cut along line and remove section.
3. Install belt shield on POWER FLOW using two bolts (A) , washer (C) and nut (B).
Install Rear Baffle Plate
1. Turn mower deck over and clean underside.
48 Mower Decks
• Install rear baffle plate (A) to right rear side of deck with two M8x16 bolts (B) and M8 locknuts. Tighten to 10-30 N•m (8-22 lb-ft).
54 Mower Deck
• Install rear baffle plate (A) to right rear side of deck with four M8x16 bolts (B) and M8 locknuts. Tighten to 10-30 N•m (8-22 lb-ft).
62 Mower Deck

• IInstall rear baffle plate (A) with four M8x16 carriage bolts (B) and M8 locknuts. Tighten to 10-30 N•m (8-22 lb-ft).
Install Front Mounting Bracket
NOTE: Remove wheel for easy installation.
Picture Note: 54 shown. For 48 Rotatable, rotate bracket 180°.
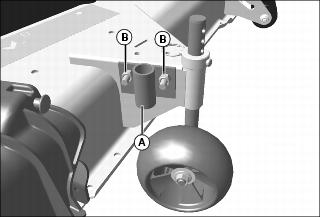
1. Install front mounting bracket (A) on mower deck right front gage wheel bracket with two M8x25 bolts and M8 locknuts (B). Tighten to 20-40 N•m (15-29 lb-ft).
Assemble and Install Blower Belt Shield
48 in. Deck
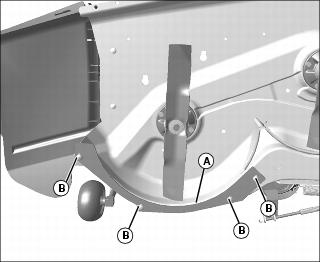
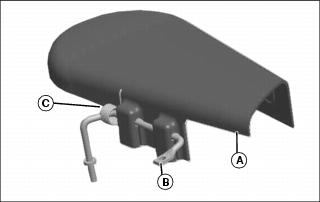
1. Assemble blower belt shield (A), wire form support shield rod (B), and hinge spring (C).
2. Install blower belt shield:
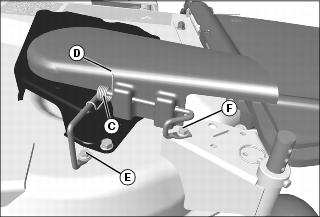
• Install straight end of hinge spring through blower belt shield hole (D). Loop the curved end of hinge spring (C) over the wire form shield support rod.
• Place M6 Washer on M6x25 flange bolt (E), and install through wire form shield support rod and top of mower deck. From under mower deck, install M6 washer and M6 flange locknut.
• Install M6x25 flange bolt (F) through opposite end of wire form shield support rod into right rear gage wheel bracket. Install M6 washer and M6 flange locknut on bolt from beneath gage wheel bracket.
3. Tighten all locknuts to 12-18 N•m (9-14 lb-ft).
4. Check for proper operation and alignment of blower belt shield and hinge spring.
5. Loosen locknuts and reposition blower belt shield and hinge spring for alignment if needed.
54 in. Deck
1. Assemble blower belt shield (A), wire form support shield rod (B), and hinge spring (C).
2. Install blower belt shield:
• Install straight end of hinge spring through blower belt shield hole (D). Loop the curved end of hinge spring (C) over the wire form shield support rod.
• Install rod end through mower belt shield and secure beneath mower deck with M6 Washer and flange locknut (G).
• Install an M6 washer on M6x25 flange bolt (F) and install through opposite end of wire form shield support rod into right rear gage wheel bracket. Install M6 washer and M6 flange locknut on bolt from beneath gage wheel bracket.
3. Tighten all locknuts to 12-18 N•m (9-14 lb-ft).
4. Check for proper operation and alignment of blower belt shield and hinge spring.
5. Loosen locknuts and reposition blower belt shield and hinge spring for alignment if needed.
62 in. Deck
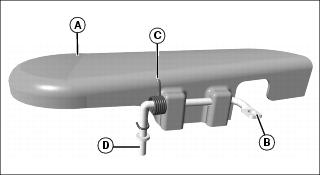
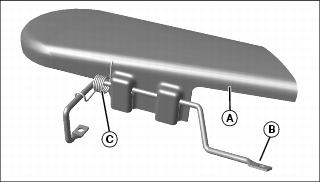
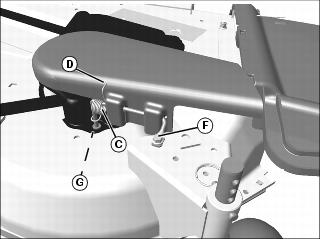
1. Install deck belt shield (A) on short bent pin (B), aligning hole in shield (C) with end of spring. Install end of spring in shield hole.
2. Install M6 washer on threaded end (D) of short bent pin.
3. Install blower belt shield:
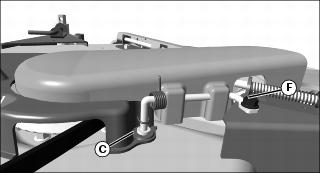
• Install threaded end of short bent pin with washer in mower deck belt shield (E). Install M6 washer and M6 flanged locknut on threaded end from beneath deck.
• Install M6x25 flanged bolt (F) through slotted end of bent pin into right rear gage wheel bracket. Install M6 washer and M6 flanged locknut on bolt from beneath deck.
4. Tighten all locknuts to 20 - 40 N•m (15 - 29 lb-ft).
5. Check for proper operation and alignment of blower belt shield and hinge spring.
6. Loosen locknuts and reposition blower belt shield and hinge spring for alignment if needed.
Install Gage Wheel Adjuster Pin

1. Remove spring pin (A) from right rear gage wheel adjuster pin (B).
2. Remove adjuster pin (B), washer (C) and compression spring (D). Keep washer and spring.
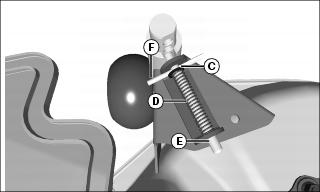
3. Install new gage wheel adjuster pin (E), compression spring (D), washer (C) and new spring pin (F).
Install Front Mounting Bracket
NOTE: Remove wheel for easy installation.
1. Install front mounting bracket (A) on mower deck right front gage wheel bracket with two M8x25 bolts and M8 flanged locknuts (B). Tighten to 20-40 N•m (15-29 lb-ft).