
Service Transmission
Transaxle Oil
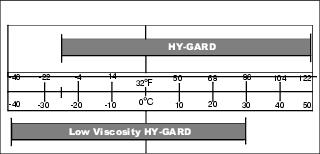
Use oil viscosity based on the expected air temperature range during the period between oil changes.
John Deere HY-GARD™ transmission and hydraulic oil is recommended for most normal operating temperatures.
NOTE: For temperatures below -13? C (0? F) John Deere low viscosity HY-GARD™ may be used. If used at temperatures above -13? C (0? F) some brake squeal may be heard due to lower viscosity of the oil at higher temperatures.
Other oils may be used if they meet John Deere standards JDM J20C and JDM J20D.
Checking Transaxle Oil Level
IMPORTANT: Avoid damage! Hot hydraulic oil will expand and show incorrect oil level. Check oil level: |
1. Park the vehicle safely. (See Parking Safely in the SAFETY section.)
2. Raise and secure cargo box.
IMPORTANT: Avoid damage! Dirt and debris in oil may cause damage to the transaxle. Clean area around opening before removing dipstick. |
3. Remove dipstick (A) located on the top of the transaxle housing. Wipe dipstick clean.
4. Check oil level by setting dipstick on threads in transaxle case, then removing and checking oil level.
5. Add oil as needed through the dipstick fill hole.
6. Install and tighten dipstick.
Changing Transaxle Oil
1. Park the vehicle safely. (See Parking Safely in the SAFETY section.)
2. Raise and secure cargo box.
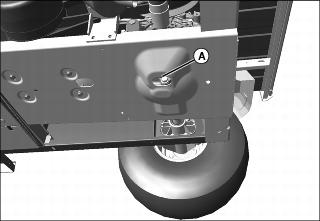
3. Position drain pan under transaxle drain plug (A).
5. Check washer on drain plug. Replace if missing or in poor condition.
6. Install and tighten drain plug to 30 - 35 N•m (22 - 26 lb-ft).
7. Remove dipstick located on top of transaxle housing. Wipe dipstick clean.
8. Add oil: Start by adding approximately 4.7 L (5.0 qt).
9. Check oil level by setting dipstick on threads in transaxle case, then removing and checking oil level.
10. Wait for two minutes then check oil level. Add oil if necessary.
11. Install dipstick and tighten.
Replacing Drive Belt
1. Park the vehicle safely. (See Parking Safely in the SAFETY section.)
2. Raise and secure cargo box.
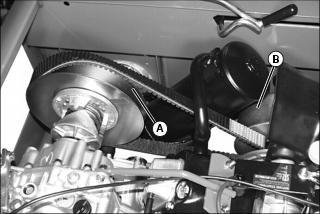
3. Route the belt over pulley (A) of the driven clutch. Rotating the driven pulley will aid in removing the belt.
4. Route belt over drive pulley (B) to remove.
5. Install new belt by routing over drive pulley and then over the driven clutch pulley.
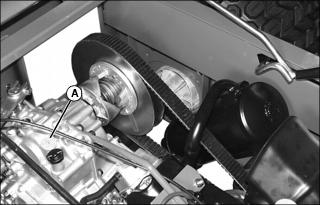
Checking Secondary Driven Clutch Buttons
1. Park the vehicle safely. (See Parking Safely in the SAFETY section.)
2. Raise and secure cargo box.

3. Check for missing or worn clutch buttons (A).
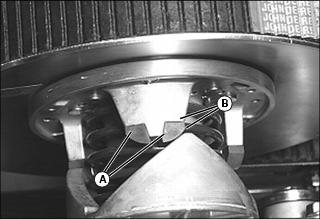
• There should not be any excessive wear on clutch buttons (A); replace before there is metal-to-metal (B) contact.