Operating
Filling Sprayer Tank
NOTE: There is no drain plug provided for draining sprayer tank. When filling tank, consider the area to be sprayer and amount of solution required to complete the task.
1. Clean area around tank filler cap to prevent tank contamination.
2. Remove tank filler cap and fill tank.
Draining and Cleaning Sprayer Tank
|
• Proper disposal of excess spray is very important. Dilute it with water and apply it to area previously treated. • Never dump excess into a storm drain or near a lake or stream. |
1. Remove tank drain cap, and empty sprayer tank:
• Empty remaining solution into an appropriated container for proper disposal.
2. Spray all inside surfaces of tank with low pressure garden hose to remove any remaining solution. Rinse several times to make sure sprayer tank is clean and free of chemicals.
3. Replace drain cap and run fresh, clean water through pump, sprayer wand and all hoses thoroughly.
4. Once the tank is empty, wipe out inside of sprayer tank with a clean cloth or paper towel.
Lifting Portable Sprayer Safely
• Use caution when lifting the portable sprayer to help prevent possible injury.
• When filled with liquid, the 25 gallon portable sprayer weighs 103 kg (227 lb). Empty tank before attempting to lift.
Transporting Portable Sprayer Safely
• Use caution when transporting the portable sprayer to help prevent possible injury.
• When filled with liquid, the 25 gallon portable sprayer weighs 103 kg (227 lb). This extra weight on the back of a vehicle, cart, wheelbarrow, etc. could change the stability of the machine which you chose for transportation.
Transporting Wheeled Sprayer Safely
• Push pump switch to off position.
• Fold boom extensions in their transport position.
Sprayer Weight:
• 15 Gallon Sprayer - Filled with liquid is 74 kg (164 lb)
• 25 Gallon Sprayer - Filled with liquid is 115 kg (253 lb)
• 45 Gallon Sprayer - Filled with liquid is 207 kg (456 lb)
Spraying Tips
• Check sprayer tip height. Adjust sprayer tip height, if needed, before operating.
• 15 and 25 Gallon Sprayer, 43 cm (17 in.)
• 45 Gallon Sprayer, 53 cm (21 in.)
• Do not let sprayer run in one spot.
• Do not over spray when you use weed killers.
• Liquid spray material is recommended. Sprayer does not agitate wettable powders.
• Timely applications of a smaller dosage are better than large applications.
• Turn sprayer off during turns to avoid double spraying.
• Fill sprayer where spills cannot harm grass.
• Follow manufacturer's recommendations for application of specific chemicals.
• Stop sprayer when tank is empty.
Checking Machine Ground Speed
1. Check ground speed in an open area.
2. Measure a test area that is 30.5 m (100 ft) in length.
3. Operate the machine at wide open throttle. Operate machine at a low speed and drive the machine the test distance. Record the time needed to travel that distance.
4. Make three passes, recording the time for each pass. The average time should be 23 to 27 seconds to achieve the recommended operating speed range:
• 15 Gallon Sprayer - the recommended operating speed is 4.8 km/h (3 mph). At this speed, the average time traveling the test distance should be 23 seconds.
• 25 and 45 Gallon Sprayer - the recommended operating speed is 4.0 km/h (2.5 mph). At this speed, the average time traveling the test distance should be 27 seconds.
5. Adjust accordingly to achieve recommended speed range.
General Spraying Information
15 Gallon Sprayer Application:
The 15 Gallon Sprayer operates at a fixed pressure of 689 kPa (100 psi). This yields 12 minutes of spraying time using the spray boom or 25 minutes of spraying time using the handgun. When operating the spray boom, plan on driving about 4.8 km/h (3 mph) or 80 m/min. (264 fpm). That provides 1472 m2 (15,840 sq ft) of spray coverage per tank. Plan on about 10 percent overlap, so put enough chemical in the tank for 1301 m2 (14,000 sq ft) of spray coverage.
25 Gallon Sprayer Application:
The 25 Gallon Sprayer operates at a fixed pressure of 689 kPa (100 psi). This yields 20 minutes of spraying time using the spray boom or 42 minutes of spraying time using the handgun. When operating the spray boom, plan on driving about 4.0 km/h (2.5 mph) or 67 m/min. (220 fpm). That provides 3065 m2 (33,000 sq ft) of spray coverage per tank. Plan on about 10 percent overlap, so put enough chemical in the tank for 2787 m2 (30,000 sq ft) of spray coverage.
45 Gallon Sprayer Application:
The 45 Gallon Sprayer operates at a fixed pressure of 689 kPa (100 psi). This yields 30 minutes of spraying time using the spray boom or 66 minutes of spraying time using the handgun. When operating the spray boom, plan on driving about 4.0 km/h (2.5 mph) or 67 m/min. (220 fpm). That provides 6,131 m2 (66,000 sq ft) of spray coverage per tank. Plan on about 10 percent overlap, so put enough chemical in the tank for 5,518 m2 (59,400 sq ft) of spray coverage.
Adjusting Drawbar Height (45 Gallon Sprayer)
NOTE: In order for the sprayer to completely empty the tank, the sprayer frame should be as level as possible. Adjust the sprayer drawbar to match the height of the machine hitch.
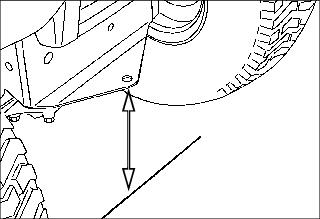
1. Measure distance from machine hitch to the ground.
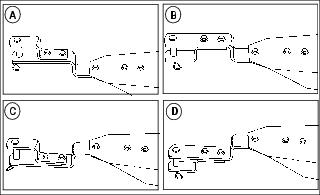
MX34794, MX34795, MX34779, MX34796
A - Configuration for 30 cm (12 in.) height.
B - Configuration for 27 cm (10.5 in.) height.
C - Configuration for 23 cm (9 in.) height.
D - Configuration for 18 cm (7 in.) height.
2. Assemble sprayer drawbar to match machine hitch height:
Adjusting Tip Height and Width
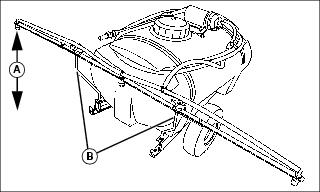
Picture Note: 25 Gallon Sprayer Shown
2. Measure from spray tip to ground. Distance to ground (A) should be approximately:
• 15 and 25 Gallon Sprayer - 43 cm (17 in.)
• 45 Gallon Sprayer - 53 cm (21 in.)
If necessary, adjust boom height by raising or lower the boom on the threaded boom supports (B).
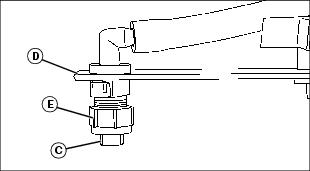
3. Check spray tips (C). Tips should be aligned with boom (D) as shown. If necessary, loosen spray tip cap nut (E). Align spray tip (C) and tighten cap nut.
4. Test spray pattern with water on driveway or sidewalk. Each spray tip pattern should spread out to the right and left sides, rather than to the front and back of the boom. There should be some spray overlap between each tip and the spray patterns should be consistent.
Starting and Stopping Sprayer
IMPORTANT: Avoid damage! Operate sprayer with transport vehicle running to avoid discharging the battery. |
NOTE: The sprayer pump to battery hookup is a direct electrical connection. Shutting off the transport vehicle does not prevent operation of the sprayer pump. To avoid accidental spraying, disconnect the pump connection before leaving the sprayer.
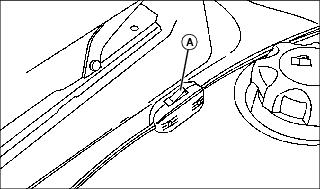
Push switch (A) to on or off position to start or stop sprayer.
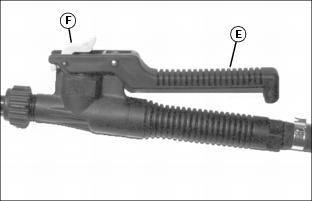
Selecting Spray Wand or Boom Nozzles
NOTE: Shut-off valve lever (A) has two positions:
• ON POSITION - Lever is parallel with hose. Pump flow is directed to the sprayer boom.
• OFF POSITION - Lever is perpendicular with hose. Pump flow is directed to the spray wand.
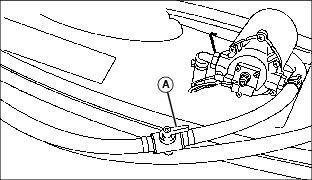
• To use spray wand: Turn lever (A) so that it is perpendicular with hose. You can now use the spray wand for spraying.
• To use sprayer boom: Turn lever (A) so that it is perpendicular with hose. Turn pump on and operate spray wand to remove all air from hose. After spray wand sprays liquid, turn pump off. Turn lever (A) so that it is parallel with hose. You can now use the boom nozzles for spraying.
Using Handgun
1. On wheeled sprayers only, turn valve to select handgun operation.
2. Turn the selector lever to the handgun position.
NOTE: Removal of spray tip (A) allows for quick cleaning/rinsing of sprayer tank.
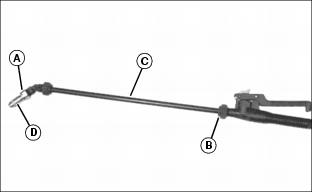
• Nozzle Angle – Loosen locknut (B). Turn the nozzle tube (C) to the desired position and tighten the locknut.
• Nozzle Spray Pattern – To change the spray pattern, tighten or loosen nozzle (D) as desired.