
Service
Service Intervals
Servicing Your Machine
IMPORTANT: Avoid damage! Operating in extreme conditions, such as heat or dust, may require more frequent service intervals. |
Please use the following timetables to perform routine maintenance on your machine.
Before Each Use
• Make sure carrier plate is securely pinned to receiver.
• Make sure all hardware is tight.
• Make sure winch cable and hook are in good condition.
• Check the remote control for proper operation.
• Make sure all rigging equipment is in good condition.
• Make sure vehicle battery is fully charged.
Every 3 Months
• Check battery cables are clean and tight at all connections.
Replacing the Winch Cable
1. Park vehicle safely. (See Parking Safely in the SAFETY section.)
2. Spool off entire length of winch cable. Turn vehicle key switch to stop position.
3. Disconnect the winch quick disconnect harness.

4. Manually rotate drum until cable opening appears at top side. Remove end of winch cable (A) from drum. Discard the winch cable and cable stop (B).
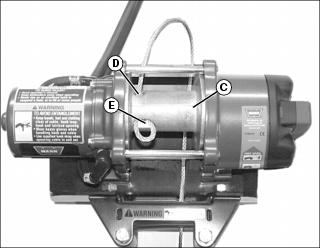
5. Route end of new winch cable through fairlead opening and between carrier plate and bottom side of drum (C). Insert end of cable into small opening (D) and through the drum.
6. Insert end of cable as far as possible into large opening (E) to form a loop.
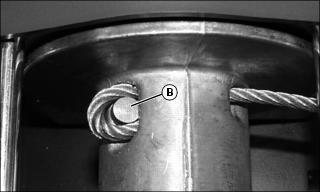
7. Install new cable stop (B) in loop and pull cable tight. Tap end of cable lightly with wood dowel to seat winch cable and cable stop in drum.
8. Maintain tension on cable and manually rotate drum toward rear of winch to obtain five complete wraps.
9. Stretch winch cable properly before operating.
Stretching the Winch Cable
IMPORTANT: Avoid damage! New winch cable will bind and become damaged if not properly stretched before use. Stretch the winch cable under a minimum 227 kg (500 lb) load. |
1. Center vehicle approximately 15 m (50 ft) from a minimum 227 kg (500 lb) load. Do not exceed winch load capacity.
2. Park vehicle safely. (See Parking Safely in the SAFETY section.)
3. Connect the winch quick disconnect harness to the winch harness.
4. Spool out entire length of winch cable, leaving five wraps on the drum. Move vehicle closer to load if necessary.
6. Prepare the rigging for a single line pull.
8. Place transaxle shift lever in neutral position.
9. Place differential lock lever in unlocked position.
10. Make sure park brake is locked.
11. Leave engine run to avoid draining battery.
12. Spool in the load to stretch the winch cable and create a tight wrap on the drum. Stop winching when hook is 1.2 m (4 ft) from roller fairlead.
13. Spool out enough slack to disconnect hook.
14. Install hook strap to hook and spool in all winch cable.
15. Turn key switch to stop position.
16. Disconnect the winch quick disconnect harness from the winch harness.
17. Install dust cover onto harness connector to keep it clean.