
Installing
Installing Winch
1. Park vehicle safely. (See Parking Safely in the SAFETY section.)
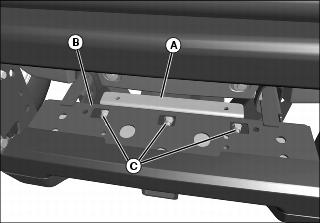
2. Install L-bracket (A) onto bumper bracket (B) with three M8x20 hex flanged bolts (C) and M8 locknuts.

3. Install winch assembly (D) onto bumper bracket with two M8x25 carriage bolts (E) and M8 locknuts in rear of bracket (F). Do not tighten hardware at this time.
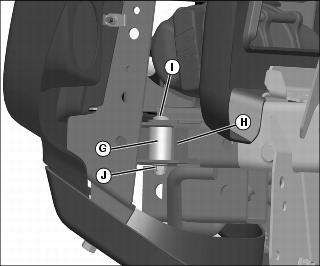
4. To secure front side of winch assembly, install one spacer (G) on each side of front bumper channel (H).
5. Secure both front sides with M8x60 carriage bolts (I) and M8 locknuts (J).
6. Tighten two rear M8 locknuts onto M8x25 carriage bolts.
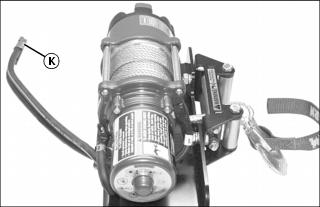
7. Connect the winch quick disconnect harness (K) to the front or rear mount harness as applicable.
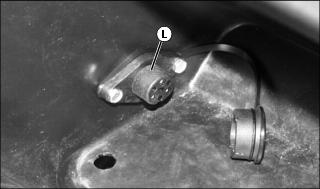
8. Connect the remote control to socket (L) in glove box.
Inspect and Test System
1. Check wiring to all components is correct and secure.
2. Make sure there are no exposed wires or terminals.
3. Make sure solenoid is mounted securely.
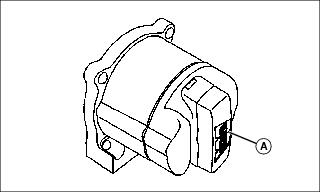
4. Rotate clutch knob (A) counter-clockwise completely to engage clutch. (See label on clutch cover.)
5. Connect the winch quick disconnect harness to the front or rear mount wiring harness as applicable.
6. Turn vehicle key switch to run position.
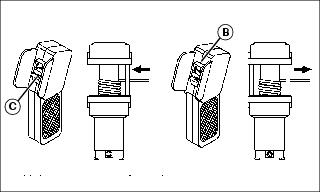
7. Push top (B) of toggle switch on the remote control. Make sure winch cable spools off drum.
8. Push bottom (C) of toggle switch on the remote control. Make sure winch cable spools in.
9. Turn key switch to stop position.
10. Disconnect the winch quick disconnect harness from the front or rear mount harness as applicable.
11. Install dust cover onto front or rear mount harness connector to keep it clean.
12. Install seat base panel and seats.
13. Install transaxle shift lever knob and differential lock lever knob.
14. Remove hook strap from hook. Store hook strap in a secure location.
Stretch Winch Cable (New Cable Only)
IMPORTANT: Avoid damage! New winch cable will bind and become damaged if not properly stretched before use. Stretch the winch cable under a minimum 227 kg (500 lb) load. |
1. Center vehicle approximately 15 m (50 ft) from a minimum 227 kg (500 lb) load. Do not exceed winch load capacity.
2. Park vehicle safely. (See Parking Safely in the SAFETY section.)
3. Connect the winch quick disconnect harness to the front or rear mount harness as applicable.
4. Spool out entire length of winch cable, leaving five wraps on the drum. Move vehicle closer to load if necessary.
6. Prepare the rigging for a single line pull.
8. Place transaxle shift lever in neutral position.
9. Place differential lock lever in unlocked position.
10. Make sure park brake is locked.
11. Leave engine run to avoid draining battery.
12. Spool in the load to stretch the winch cable and create a tight wrap on the drum. Stop winching when hook is 1.2 m (4 ft) from roller fairlead.
13. Spool out enough slack to disconnect hook.
14. Install hook strap to hook and spool in all winch cable.
15. Turn key switch to stop position.
16. Disconnect the winch quick disconnect harness from the front or rear mount harness as applicable.
17. Install dust cover onto front or rear mount harness connector to keep it clean.