
Installing
Installing Deck Boot
Installing Deck Boot and Bracket - 48, 54, 62 in. Mower Decks
1. Shut engine off and lock parking brake. Wait for all moving parts to stop.
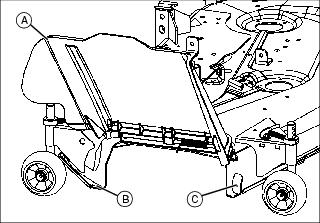
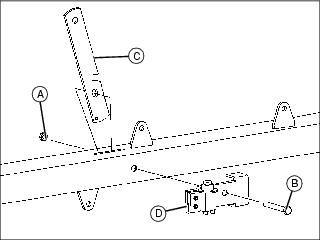
2. Lift discharge chute cover (A) (It is not necessary to remove the chute from the deck). Position deck boot assembly on deck with boot outlet facing rear of deck.
3. Install a 5/16x3/4 in. carriage bolt through boot bracket and deck at location (B). Loosely install a 5/16 in. locknut on bolt.
4. Install a 1/4x1 in. bolt, 1/4 in. flat washer and 5/16 in. flat washer through boot bracket and deck at location (C). Install a 1/4 in. flat washer and 1/4 in. locknut on bolt.
5. Tighten both bolts securely and lower discharge chute cover.
Installing Deck Boot and Bracket - 60 in. Mower Deck
1. Shut engine off and lock parking brake. Wait for all moving parts to stop.
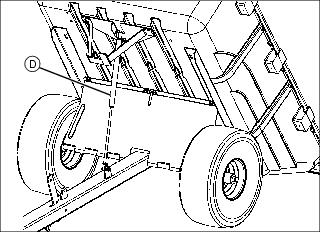
2. Lift discharge chute cover (It is not necessary to remove the chute from the deck). Position deck boot assembly on deck with boot outlet facing rear of deck.
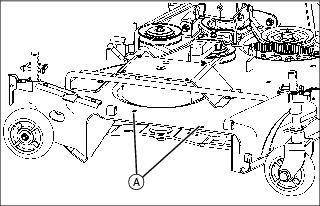
Picture Note: Discharge chute cover removed for better view.
3. Install two 5/16x3/4 in. carriage bolts through the boot bracket and deck at location (A) and secure with two 5/16 in. locknuts.
4. Lower discharge chute cover.
Installing MC542 with Cart on Machine
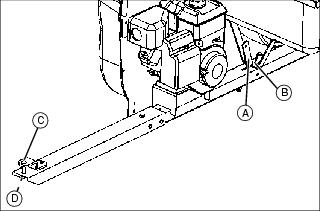
1. Ensure that cart bed release handle (A) is firmly engaged on the lock bracket (B).
2. Park machine safely. (See Parking Safely in the Safety section.)
3. Position the cart towbar on the machine, install the clevis pin (C) and secure with the spring locking pin (D).
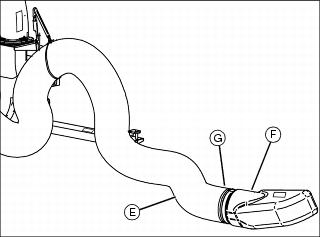
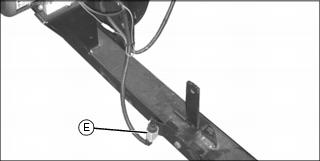
4. Position the blower hose (E) on the deck boot (F) and secure with a 8 in. hose clamp (G).
Seasonal Installation of MC542 on Cart
MC542 components can be removed from the 17P cart to allow seasonal use of the cart in its basic configuration. (See Seasonal Removal of MC542 from Cart in REMOVING section.)
Restore the cart to its Material Collection System configuration by installing all MC542 components removed using the following procedures:
Installing Gas Spring
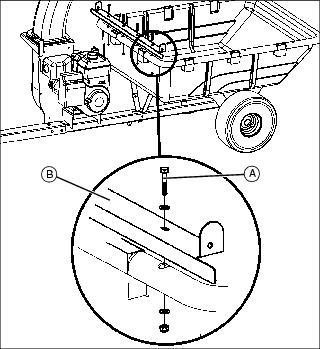
1. Position the cart on a level surface and allow the towbar to rest on the ground. Place a 50x100 mm (2x4 in.) block under each cart tire.
2. Move the bed release handle to allow the bed to tilt.
3. Remove the 3/8 in. locknut (A) and 3/8x3-1/2 in. bolt (B) securing the bed release handle (C) to the towbar.
4. Position switch bracket with switch (D) on towbar. Install the 3/8x3-1/2 bolt (B) through the switch bracket, towbar, bed release handle (C) and opposite side of towbar and secure with a 3/8 in. locknut (A).
5. Support the bed in the raised position and install the gas spring (D) on both ball studs.
6. Lower the bed and ensure that the bed release handle engages the lock bracket securely.
Installing Canopy and Frame
1. Position the canopy assembly on the cart.
2. Install four 1/4x1-1/2 in. bolts (A), eight 1/4 in. flat washers and four 1/4 in. locknuts in the front bracket (B) securing the canopy assembly to the bed.
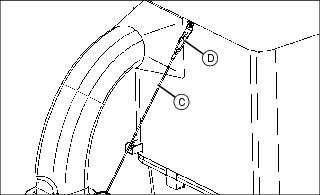
3. Install the cable (C) to the quik link (D).
Installing Engine/Blower/Chute Assembly

1. Place the engine, blower and chute assembly (A) on the towbar and position the chute in the canopy opening. Secure with the engine blower and chute assembly to the towbar with four 5/16x1-1/2 in. bolts (B), four 5/16 in. flat washers and four 5/16 in.locknuts (C).
2. Install the wiring harness connector on towbar switch (E).
3. Install the blower hose to the blower housing and secure with a 8 in. hose clamp.
4. Install the deck boot on the mower deck, attach the blower hose to the boot and secure with a 8 in.hose clamp.