
Operating
Adjusting Lift Height
The snowblower scraper blade should be approximately 10.2 cm (4 in.) off the ground when fully raised and locked, with the machine on a level surface.
1. Park machine safely. (See Parking Safely in the SAFETY section.)
3. Measure from ground to bottom of scraper blade at both sides.
4. Lower snowblower to ground.

5. Adjust lift height (each side):
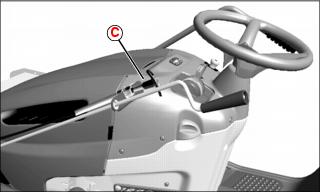
• To raise lift height, loosen nut (A) and tighten nut (B) at either side of the adjustable lift link (C).
• To lower lift height, loosen nut (B) and tighten nut (A) at either side of the adjustable lift link (C).
• For more range of adjustment, the adjustable lift link (C) on the adjustable lift rod (D) can be reversed
• Remove the locking cotter pin (E) and M10x30 OD washer (F) securing the lift link to the lift arm. Disengage the lift arm and pivot the lift link to allow the pivot block to be removed from the front bracket. Remove M10 locknut (B), reverse the lift link and assemble components.
7. Measure from ground to bottom of scraper blade at both sides.
8. Repeat above steps, if necessary.
Turning Discharge Chute

• Turn handle (A) counter-clockwise to rotate chute to the right.
• Turn handle (A) clockwise to rotate chute to the left.
Adjusting Spout
NOTE: Pivot tension of spout (A) is not adjustable. A return spring in the chute / spout assembly assists the spout cable (B) to adjust spout angle.

1. Pull handle (C) to pivot spout down.
2. Push handle (C) to pivot spout up.
Adjusting Skid Shoes
NOTE: Before using snow removal attachment on gravel or uneven surfaces, lower skid shoes fully. Both skid shoes must be in the same position.
1. Park machine safely. (See Parking Safely in the Safety section.)

2. Loosen bolts (A) on each skid shoe.
3. To clear snow from a flat surface, lower skid shoes so that scraper blade is 2–3 mm (1/16–1/8 in.) above surface.
4. To clear snow from a rough or a gravel surface, raise skid shoes so that scraper blade has maximum clearance.
Raising and Lowering Snowblower

• To raise snowblower: Push down on lift rod handle (A).
• To lock snowblower in raised / transport position: Push down on lift handle (A) until spring loaded lift lock pin (B) engages hole in snowblower housing.
• To lower snowblower: Push down on lift rod handle (A) slightly, squeeze trigger (C) to disengage locking pin, then slowly release pressure on lift rod handle.
Operating Snowblower
NOTE: Operate snowblower at full throttle for best performance.
4. Move throttle lever to full throttle position.
NOTE: It is necessary to engage the RIO (Reverse Implement Option) while beginning tractor movement in reverse to allow the attachment to continue running.
5. Push down on forward or reverse foot control pedal to begin movement.
Stopping Snowblower
1. Slow the machine forward speed.
2. Move the throttle to slow speed.
3. Run snowblower for several minutes after blowing snow to prevent freeze-up of the auger and impeller.
4. Disengage PTO and allow auger to stop.
5. Clean snow from snowblower before storing the machine.
Inspect, Unplug, or Park Attachment Safely
2. Lower attachment to the ground.
7. Wait for engine and all moving parts to stop before leaving operator’s seat.
Transporting
1. Drive machine and attachment onto heavy-duty trailer equipped with lights and signage required by law.
2. Lower attachment to trailer deck.
5. Fasten machine and attachment to deck with straps, chains, or cables.


